Scan fast multiple subnets to CSV files

I need multipe subnets scanned and need an outpu to a CSV file.

For this i will use a program called Softperfect Network Scanner. You candownload it from their website or download it here: [wpdm_file id=80]

First i’ll create an config file which has the settings i need:

I only need the ip, hostname and response time. So i will hide the MAC address from the View menu (Visible Columns). Also i do not need to scan a mac address and shared folders which are enabled by default. I will open the Program Options under the Options memu (or CTRL+K) and deselect the resolve MAC addresses under the Additional tab. Under the Shares tab i deslect the Scan for shared resources.

Now my config is like I want it, I need to save it to a xml file. I save the running config file to xml. Choose File, Current Config, Save to file and place it with the netscan.exe in a folder.

In the online manual you can read all other parameters to scan, but i use the simple command:

netscan /range:172.16.0.1-172.16.0.255 /auto:result.csv

This command will scan all devices within the 172.16.0.0/24 range and save it to a file called result.csv
Optimizing NTLM authentication flow in multi-domain environments

source

8037_image_thumb_524E26B7


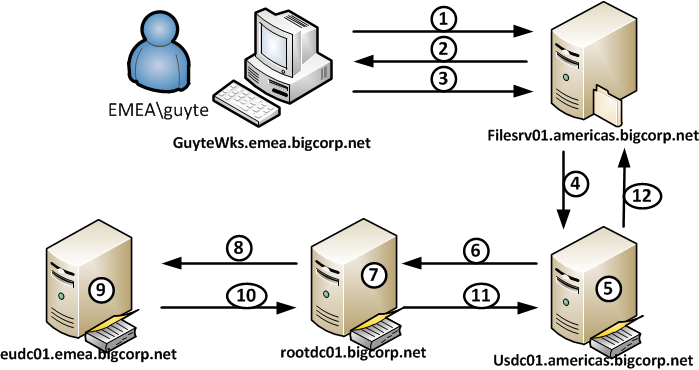
  1. Client (GUYTEWKS) sends username (EMEA\guyte) to FILESRV01.americas.bigcorp.net
  2. FILESRV01 generates NTLM challenge and sends it back to the client
  3. The client sends NTLM response, containing the encrypted user password hash, to FILESRV01
  4. FILESRV01 passes the authentication request to a DC in the domain it is member of to which it has a secure channel active (USDC01.americas.bigcorp.net in our case)
  5. The USDC01 DC sees that the authentication request is not for its own domain and consults the trust information. AMERICAS domain does not have a direct trust with EMEA domain, but the forest root domain does, hence the DC in AMERICAS domain decides to rout the request to a DC in ROOT domain
  6. USDC01 passes the authentication request to a DC in ROOT domain to which it has an active secure channel (ROOTDC01.bigcorp.net)
  7. ROOTDC01 receives the request, but can not authenticate it locally. Fortunately ROOT domain has a trust with EMEA domain and ROOTDC01 routs the request to a DC in EMEA domain
  8. ROOTDC01 passes the authentication request to a DC in EMEA domain to which it has an active secure channel (EUDC01.emea.bigcorp.net)
  9. EUDC01 sees that it can authenticate the request locally and verifies the credentials.
  10. We are going all the way back (the way we came from) to FILESRV01 to tell it whether the authentication attempt was successful

Read the webpage in PDF:[wpdm_file id=79 title=”true” ]

Uninstall software on remote computers using WMIC

  • In a window, type Runas /user:YourUsername@UPNsuffix cmd.exe (or Runas /user:domain\username cmd.exe) where YourUsername is your domain admin username or any username with admin privileges on the remote computer and UPNsuffix is your UPN suffix. Let’s suppose I use [email protected]
  • In the command prompt window type the password for user [email protected] and press Enter
  • Type WMIC
  • Now, list all Nokia software on a specific computer using the command /node:COMPUTERNAME product where vendor=”Nokia” get name, version
  • Once we know the software name, we can uninstall specific product using the following command /node:COMPUTERNAME product where name=”Nokia PC Suite” call uninstall. You will see a message like Execute (\\COMPUTERNAME\ROOT\CIMV2:Win32_Product.IdentifyingNumber=”{225DB4AA-3CFF-47E8-B3C8-6DAD713E986E}”,Name=”Nokia PC Suite”,Version=”7.1.51.0″)->Uninstall() (Y/N/?)? Type Y and wait for the result.


http://community.spiceworks.com/how_to/show/179-using-a-command-line-to-uninstall-software-on-remote-pcs

Windows Server 2012 GUI

http://blogs.technet.com/b/askds/archive/2012/09/20/windows-server-2012-shell-game.aspx


Adding Server Graphical Shell and Graphical Management Tools and Infrastructure

Install-WindowsFeature server-gui-mgmt-infra,server-gui-shell -source:wim:d:\sources\install.wim:2


Use 2 for standard and 4 for a datacenter edition and make sure D is the drive with the DVD with Windows Server 2012.

Clipboard Copy and Paste does not work in vSphere Client 4.1 and later

To be able to copy and paste between the guest operating system and the remote console, you must enable the Copy and Paste options using the vSphere Client. Alternatively, you can use RDP (Remote Desktop Protocol) to connect to the Windows virtual machines.

To enable this option for a specific virtual machine:

Note: VMware Tools must be installed for Copy and Paste to work.

  1. Log into a vCenter Server system using the vSphere Client and power off the virtual machine.
  2. Select the virtual machine and click the Summary tab.
  3. Click Edit Settings.
  4. Navigate to Options > Advanced > General and click Configuration Parameters.
  5. Click Add Row.
  6. Type these values in the Name and Value columns:


                            Name                                                Value

  • isolation.tools.copy.disable    false
  • isolation.tools.paste.disable   false

Note: These options override any settings made in the VMware Tools control panel of the guest operating system.

  1. Click OK to close the Configuration Parameters dialog, and click OK again to close the Virtual Machine Properties dialog.
  2. Power on the virtual machine.

Note: If you vMotion a virtual machine to a host where the isolation.tools.*="FALSE" is already set, the copy and paste options are automatically activated for that virtual machine.

To enable this option for all the virtual machines in the ESX/ESXi host:

  1. Log in to the ESX/ESXi host as a root user,
  2. Take a backup of the /etc/vmware/config file.
  3. Open the /etc/vmware/config file using a text editor.
  4. Add these entries to the file:

    isolation.tools.copy.disable="FALSE"
    isolation.tools.paste.disable="FALSE"

  5. Save and close the file.

    The Copy and Paste options are only enabled when the virtual machines restart or resume the next time or shutdown and power-on the VM for changes to take effect

Note: These options do not persist after an upgrade. If you upgrade to a newer version after enabling these options, the changes are lost and you may have to re-enable them.


http://kb.vmware.com/selfservice/microsites/search.do?language=en_US&cmd=displayKC&externalId=1026437

VirtualBox – PXE does not work

During a WDS implementation the image stopt. After installing the VirtualBox 4.2.4 Oracle VM VirtualBox Extension Pack PXE ran fine and WDS could deploy images.

Download the extension pack from: https://www.virtualbox.org/wiki/Downloads

Make sure the machine which you are deploying has at least 512 MB of internal memory, otherwise the pxe boot will fail.

Windows 2012 – CLI

Activating Windows 2012 with powershell:

(or use sconfig)

slmgr.vbs –ipk <productkey>
slmgr.vbs –ato


Rename the sever:
  • Determine the current name of the server with the hostname or ipconfig command.
  • In Windows PowerShell, run Rename-Computer.
  • Restart the computer.


Installing GUI with powershell:

(or use sconfig)

Install-WindowsFeature Server-Gui-Shell, Server-Gui-Mgmt-Infra

An other option is to use dism

Dism /online /enable-feature /featurename:ServerCore-FullServer /featurename:Server-Gui-Shell /featurename:Server-Gui-Mgmt

If this fail, you need to mount the files.

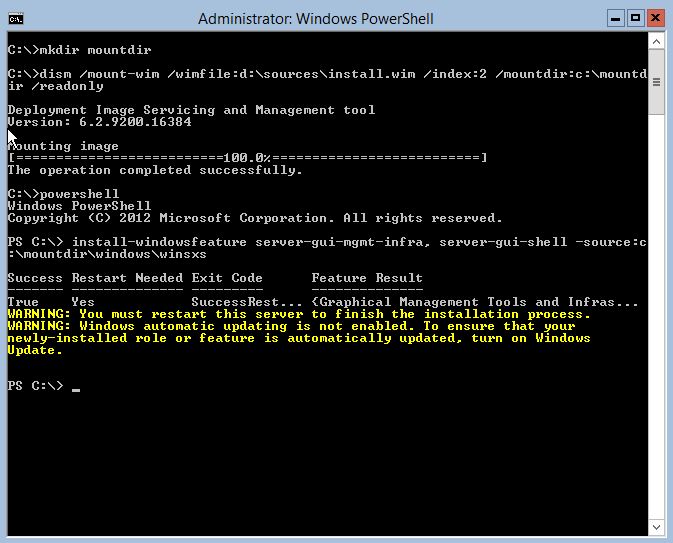
1. Create a folder to mount WIM (mkdir c:\mountdir)

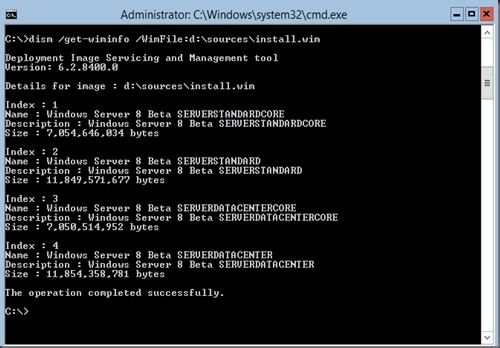
2. Check the index number needed for a server with GUI image (where d is the DVD drive)

dism /get-wiminfo /Wimfile: d:\sources\install.wim

We want to install the SERVERSTANDARD so the index number will be 2

3. Mount the WIM for Server Standard:

dism /mount-wim /wimfile: d:\sources\install.wim /Index:2 /mountdir:c:\mountdir /readonly

4. Start powershell and execute:

Install-WindowsFeature Server-Gui-Mgmt-Infra, Server-Gui-Shell –restart –source c:\mountdir\windows\winsxs

5. Restart the server


Remove the GUI with powershell:
Uninstall-WindowsFeature Server-Gui-Shell, Server-Gui-Mgmt-Infra


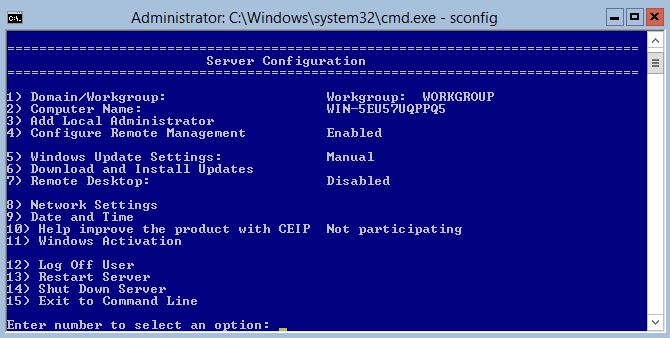
SCONFIG

Use SCONFIG to configure a lot of options (domain/Computername/updates/nic/…)


For other options to remove/install the GUI look at http://www.howtogeek.com/111967/how-to-turn-the-gui-off-and-on-in-windows-server-2012/

Configure a Server Core Server: http://technet.microsoft.com/en-us/library/jj592692.aspx#BKMK_1_5

Script – Get HP Serial Numbers

To get a list of HP Serial numers run the following Powershell script. Place the servernames/ipaddresses you want to check in the serverlist parameter.


#
# Get HP Serial Numbers from server text file
#
# Written by Bastiaan van Leeuwen
#
# Change $serverlist parameter to the right text file

$serverlist = "d:\script\servers.txt"
$username = Get-Credential domain\user

foreach($server in get-content $serverlist)
{
gwmi win32_systemenclosure -computer "$server" -credential $username –ErrorAction SilentlyContinue | 
select __SERVER,serialnumber
}