Symantec: How to work with Data Sources (ODBC) or ODBC connection in 64bit Windows OS

Problem

The Symantec Endpoint Protection Manager (SEPM) is installed on a 64 bit Windows Operating System. The Data Source Name (DSN) entry is not listed on the System DSN tab when Data Sources (ODBC) is accessed using control panel or through Administrative tools.

Symptoms
The Symantec Endpoint Protection Manager (SEPM) is installed on a 64 bit Windows Operating System.

  • The installation of the Symantec Endpoint Protection Manager (SEPM) produces no errors during installation, but the DSN name is still not listed.
  • The “SymantecEndpointDSN” is not listed in the System DSN tab in the ODBC connection.

Cause

The ODBC information for 64 bit systems will not appear in the Data Sources (ODBC) applet, because the Symantec Endpoint Protection Manager (SEPM) creates a 32-bit DSN.

Solution

Go to %systemroot%\Windows\SysWoW64 folder (Example – Click Start -> Run -> C:\Windows\Syswow64 and click on OK)

  1. Locate Odbcad32.exe & double click on the file
  2. Click on System DSN Tab
  3. You will find the “SymantecEndpointDSN” listed in the window.
  4. Now click on the CONFIGURE button and proceed with the configuration of the DSN for the Symantec Endpoint Protection Manager

source: http://www.symantec.com/docs/TECH103990

Sample PowerShell Scripts with OMSA

(http://en.community.dell.com/techcenter/systems-management/w/wiki/sample-powershell-scripts-with-omsa.aspx)

sample Function to launch DRAC, based on computer name

Below are sample PowerShell scripts for querying data from OMSA – download the attached .txt file for all the examples.

get-wmiobject -namespace root\cimv2\dell -computer Server1 -list | sort-object name Displays all classes int he root\cimv2\dell namespace on Server1
$a = get-wmiobject dell_chassis -namespace root\cimv2\dell -computer Server1
$a | select-object AmpStatus, EsmLogStatus, FanRedStatus, FanStatus, MemStatus, Model, ProcStatus, PsRedStatus, PsStatus, SecurityBreach, SerialNumber, Status, SystemClass, TempStatus, VoltStatus, VrmStatus
Displayoverall hardware status based on info from Dell_Chassis
$a = get-wmiobject Dell_baseboard -namespace root\cimv2\dell -computer Server1
$a.PartNumber, $a.BaseBoardTypeDescString
Display the part number of the motherboard
$a = get-wmiobject cim_PhysicalMemory -namespace root\cimv2\dell -computer Server1
$a | select-object capacity, datawidth, formfactor, memorytype, name, speedasstring, status, tag, totalwidth | format-table
Displays Physical Memory information (speed, type, etc)
$a = get-wmiobject cim_temperaturesensor -namespace root\cimv2\dell -computer Server1
$a | select-object baseunits, CurrentReading, LowerThresholdCritical, LowerThresholdNonCritical, name, status, unitmodifier, upperthresholdcritical,upperthresholdnoncritical
Show Current Temperature sensor information (CurrentReading in Celsius)
get-wmiobject cim_tachometer -namespace root\cimv2\dell -computer Server1 | select-object Name, CurrentReading Displays Current Fan Speed
get-wmiobject cim_fru -namespace root\cimv2\dell -computer Server1 | select-object DeviceID, FRUManufacturerName, FRUPartNumberName, FRUSerialNumberName Displays “Field Replaceable Units” (FRU) information for specific components
get-wmiobject cim_powersupply -namespace root\cimv2\dell -computer Server1 | select-object name, DeviceID, Status, TotalOutputPower Displays the total output power of the supply – in milliwatts
get-wmiobject cim_processor -namespace root\cimv2\dell -computer Server1 | select-object CoreCount, CoreEnabledCount, CPUStatus, CurrentClockSpeed, DeviceID, MaxClockSpeed, Name | ft -autosize Displays processor information
get-wmiobject dell_networkport -namespace root\cimv2\dell -computer Server1 | select-object OSAdapterDescription, IsTOEEnable Displays if TCP Offload Engine (TOE) is enabled
$a = get-wmiobject DELL_PowerConsumptionData -namespace root\cimv2\dell -computer Server1
$a | select-object Name, CumulativePowerReading, maxPowerConsumption, minPowerConsumption, parStartTime, parTime, peakAmpReading, peakHeadRoom, peakWattReading, powerCap, powerCapCapabilities, pwrStartTime, pwrTime, Status
Displays valuable power consumption information – shows “CumulativePowerReading based from pwrStartTime, as well as min/max power consumption, and peak amps, watts, etc.
get-wmiobject CIM_BIOSElement -namespace root\cimv2\dell -computer Server1 | select-object InstallDate, Name, Version Displays BIOS Version, and installation date
get-wmiobject CIM_BIOSElement -namespace root\cimv2\dell -computer Server1 | % {$_.ConvertToDateTime($_.InstallDate), $_.Name, $_.Version} Convert BIOS Install Date time to a friendly date/time
get-wmiobject DELL_Firmware -namespace root\cimv2\dell -computer Server1 | select-object Name, Version Displays DRAC Version information
get-wmiobject Dell_SoftwareFeature -namespace root\cimv2\dell -computer Server1 | select-object Description, OmsaURL, Version Displays the OMSAURL used to connect to DRAC
function LaunchDrac($strComputerName)
{
$a = get-wmiobject Dell_SoftwareFeature -namespace root\cimv2\dell -computer $strComputerName | select-object Description, OmsaURL, Version
$ie = new-object -comobject InternetExplorer.Application
$ie.visible = $true
$ie.navigate(($a.omsaurl.split(‘,’))[0])
}
sample Function to launch DRAC, based on computer name

Clipboard Copy and Paste does not work in vSphere Client 4.1 and later

Starting with vSphere 4.1, the Copy and Paste options are, by default, disabled for security reasons.


To enable this option for a specific virtual machine:

  1. Log into a vCenter Server system using the vSphere Client and power off the virtual machine.
  2. Select the virtual machine and click the Summary tab.
  3. Click Edit Settings.
  4. Navigate to Options > Advanced > General and click Configuration Parameters.
  5. Click Add Row.
  6. Type these values in the Name and Value columns:Name                                                Value
    • isolation.tools.copy.disable    false
    • isolation.tools.paste.disable   false

    Note: These options override any settings made in the VMware Tools control panel of the guest operating system.

  7. Click OK to close the Configuration Parameters dialog, and click OK again to close the Virtual Machine Properties dialog.
  8. Power on the virtual machine.

Note: If you vMotion a virtual machine to a host where the isolation.tools.*="FALSE" is already set, the copy and paste options are automatically activated for that virtual machine.

To enable this option for all the virtual machines in the ESX/ESXi host:

  1. Log in to the ESX/ESXi host as a root user and open the /etc/vmware/config file using a text editor.
  2. Add these entries to the file:isolation.tools.copy.disable="FALSE"
    isolation.tools.paste.disable="FALSE"
  3. Save and close the file.The Copy and Paste options are only enabled when the virtual machines restart or resume the next time or shutdown and power-on the VM for changes to take effect

Note: These options do not persist after an upgrade. If you upgrade to a newer version after enabling these options, the changes are lost and you may have to re-enable them.


http://kb.vmware.com/selfservice/microsites/search.do?language=en_US&cmd=displayKC&externalId=1026437

SQL Server 2008 R2 – Unattended Silent Install

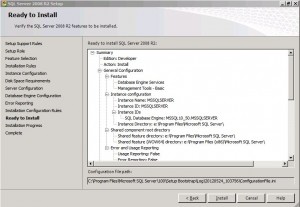
To create an Unattended Silent Install, you first need a configuration file with all the right settings in it. To create the file, run a installation of SQL and select all required settings. Continue the installation until you reach the “Ready To Install” step. In this step you will see the location of the configuration file (see the image below).


In this case it is: C:\program files\microsoft sql server\100\setup bootstrap\log\20120524_103756\configurationfile.ini

You can cancel the setup proces now.


Edit the configuration file as follows:


  • Set QUIET to “True”. This specifies that Setup will run in a quiet mode without any user interface (i.e. unattended installation)QUIET=”True”
  • Add IACCEPTSQLSERVERLICENSETERMS and set its value to “True”. This is to required to acknowledge acceptance of the license terms when the /Q (i.e. QUIET) parameter is specified for unattended installations.ACCEPTSQLSERVERLICENSETERMS=”True”
  • Remove the UIMODE parameter as it can’t be used with the QUITE parameter.
  • IF used SQL as the Securitymode, use SAPWD to set a password for the SA account
    SAPWD=”a complex password”
  • Set TCPENABLED to yes if you want external connections to you SQL instance
    TCPENABLED=”1″


Now you have your configuration file ready run SQL with the following command:

“<path to SQL setup folder>\setup.exe” /ConfigurationFile=”<path to config file>”

View BSOD (blue screen) crash information stored in dump files

Description

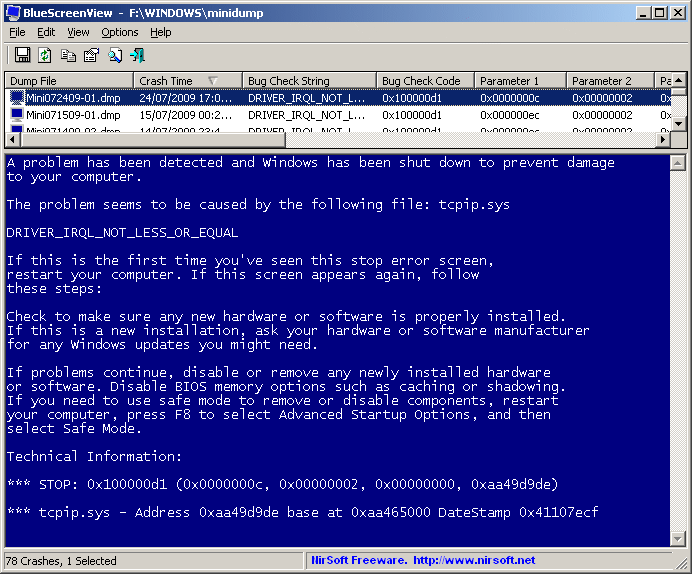
BlueScreenView scans all your minidump files created during ‘blue screen of death’ crashes, and displays the information about all crashes in one table. For each crash, BlueScreenView displays the minidump filename, the date/time of the crash, the basic crash information displayed in the blue screen (Bug Check Code and 4 parameters), and the details of the driver or module that possibly caused the crash (filename, product name, file description, and file version).
For each crash displayed in the upper pane, you can view the details of the device drivers loaded during the crash in the lower pane. BlueScreenView also mark the drivers that their addresses found in the crash stack, so you can easily locate the suspected drivers that possibly caused the crash.

http://www.nirsoft.net/utils/blue_screen_view.html

[wpdm_file id=76]

Terminal server logon gives “access denied”

When a user logs on to a terminal server the error “access denied” pops up.

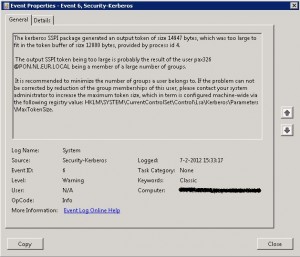
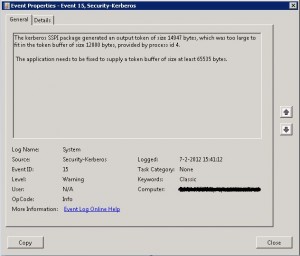
In the eventlog the following errors (event id 6 and 15)


To fix this problem add the MaxTokenSize key to the register with a value of 65535:

HKEY_LOCAL_MACHINE\SYSTEM\CurrentControlSet\Control\Lsa\Kerberos\Parameters

Entry: MaxTokenSize
Data type: REG_DWORD
Value: 65535


To change this for multiple Terminal Servers you can add it with a gpo: http://support.microsoft.com/kb/938118

How to Set or Change a Dell PowerEdge Service Tag

Source: http://lonesysadmin.net/2011/03/08/how-to-set-a-dell-poweredge-service-tag/


Got a Dell PowerEdge that you replaced the motherboard on, and now it doesn’t have a service tag? Reset it with the asset.com tool, which I’ve conveniently packaged as both a floppy disk image and an ISO for those of us in need. They both use the Windows 7 boot disk DOS and asset_A209.com from ftp.dell.com (renamed to asset.com).

[wpdm_file id=50]

[wpdm_file id=51]

Once you boot from these you can set the service tag with:

asset /s <service tag>

You can also set the asset tag with:

asset <asset tag>

Or clear the asset tag with:

asset /d