A nice oneline script to show the total VM’s on your datastore:
Get-Datastore | Select Name, @{N="NumVM";E={@($_ | Get-VM).Count}} | Sort Name
Example output:
| Name | NumVM |
| VMFS_0 | 5 |
| VMFS_1 | 2 |
A nice oneline script to show the total VM’s on your datastore:
Get-Datastore | Select Name, @{N="NumVM";E={@($_ | Get-VM).Count}} | Sort Name
Example output:
| Name | NumVM |
| VMFS_0 | 5 |
| VMFS_1 | 2 |
A oneline script to show the VM disk (or partiton) for each of your VM’s:
ForEach ($VM in (Get-VM |Get-View)){($VM.Guest.Disk |Select @{N=“Name“;E={$VM.Name}},DiskPath, @{N=“Capacity(MB)“;E={[math]::Round($_.Capacity/ 1MB)}}, @{N=“Free Space(MB)“;E={[math]::Round($_.FreeSpace / 1MB)}}, @{N=“Free Space %“;E={[math]::Round(((100 * ($_.FreeSpace))/ ($_.Capacity)),0)}}) | Format-Table}
Or look at the “advanced” script of virtu-al (http://www.virtu-al.net/2010/01/27/powercli-virtual-machine-disk-usage/)
After installing an application, it could not access the local MsSQL 2005 Express Database. There was a message: Error : 40 – could not open a connection to SQL server.
After investigating that the tcp/ip protocol was enabled (http://support.microsoft.com/default.aspx?scid=kb;EN-US;914277) it appeared that the port 1433 needed to set up.
You can check the port by doing the following:
We had a new Dell PowerEdge R710 with an additonal Intel Gigabit ET Quad Port Server Adapter network card.
After installing ESX i saw that the intel NIC wasn’t recognized, so i had to install it myself.
What where the steps i performed to install the drivers (after ESX was installed)?
1. Downloaded drivers from the following page: http://downloads.vmware.com/d/details/esx_esxi40_intel_82575_82576_dt/ZHcqYmR0QGpidGR3
2. Extracted the iso to disk
3. Copied the files with WinSCP over to the Dell server
4. Logged in the ESX server as root
5. Placed the ESX server in maintenance mode
6. Run “esxupdate -bundle=INT-intel-ladd-ddk-igb-1.3.19.12.1-offline_bundle-185976.zip update”
7. Issued a “shutdown -r now” command
After the server was rebooted, the nic was recognized and i did a exit maintenance mode.
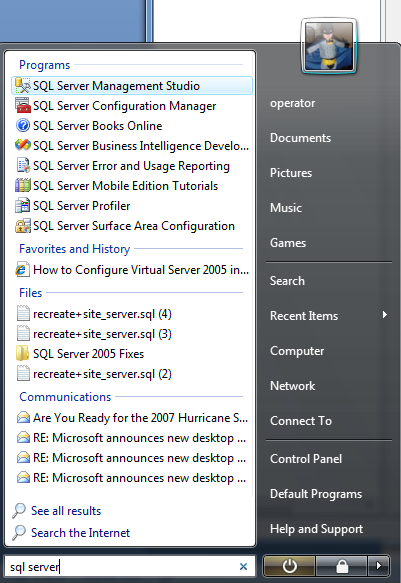
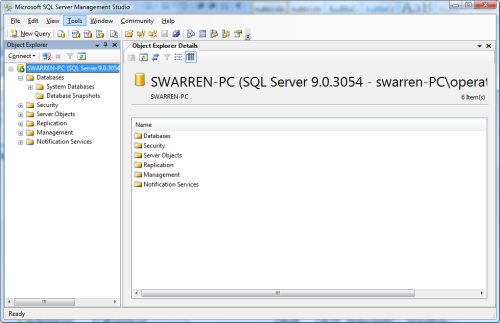
We will begin by opening SQL Server Management Studio from the Start Menu by choosing Start and typing SQL Server in the Instant Search field (Figure A) The SQL Server Management Studio appears (Figure B) and it will be the main area you use to restore your backups.
Note: I am going to assume that you already know how to backup a SQL Server database and that you have placed the backups on a file server or copied the backups to the new server. We will continue the tutorial from this point.
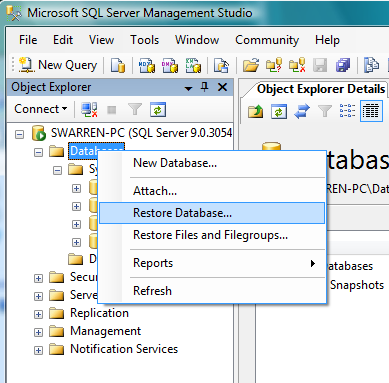
Now that you have the Management Studio opened, right-click on Databases and choose Restore Database (Figure C).
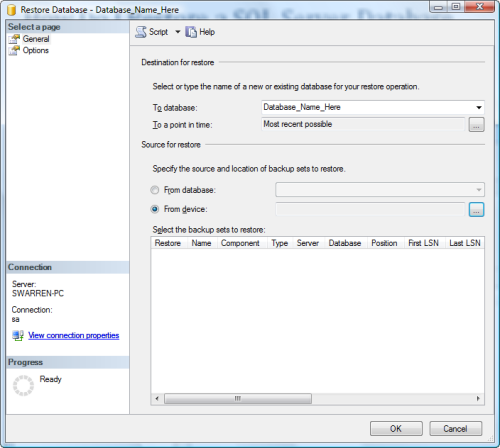
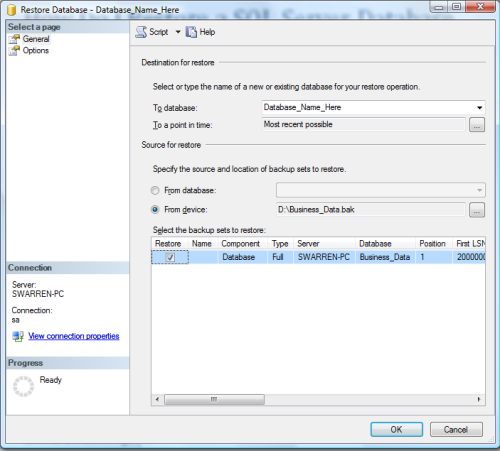
The Restore Database window appears and we will begin by typing the name of the Database we want to restore in the To Database field (Figure D) and choosing the From Device radio button to choose where your backup file is, shown in Figure E.
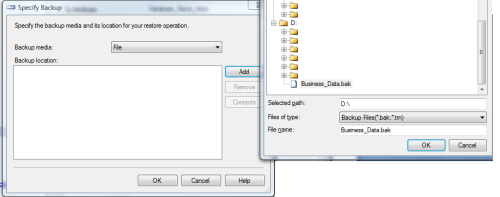
Your file now appears in the Select backups to restore text box. Place a check in the checkbox to continue as shown in Figure F.
You are now at the critical point of the restore where you choose Options from Select a Page. This is where you specify a new path for your database files. It is the same as the move option that will be discussed later in this tutorial. Simply type a new path to the database and log file (Figure G). For example, the current structure is the following:
C:\Program Files\Microsoft SQL Server\MSSQL.1\MSSQL\DATA\Database_Name_Here.mdfC:\Program Files\Microsoft SQL Server\MSSQL.1\MSSQL\DATA\Database_Name_Here_1.ldf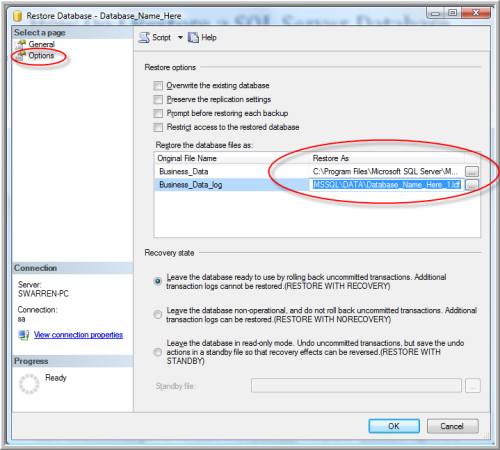
We want to move these database files to a new path. Simply type the new path (Figure H). For purposes of this tutorial, we will move it to the following:
D:\ SQL\DATA\Database_Name_Here.mdfD:\SQL\Logs\Database_Name_Here_1.ldf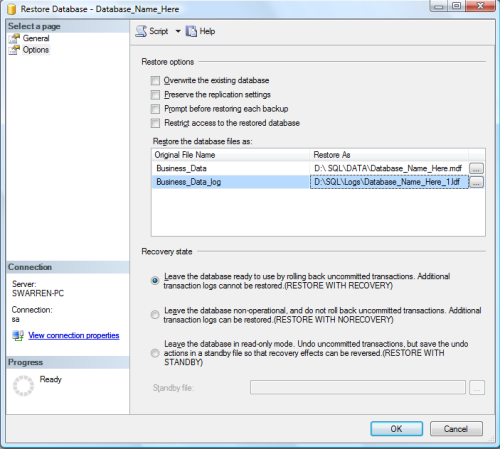
You are now ready to click OK and let the database be restored (Figure I).
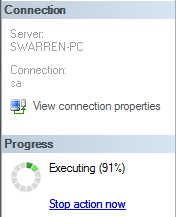
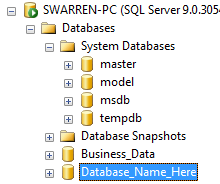
You have now successfully restored and moved the database files as shown in Figure J and Figure K.

Locate the key [HKEY_CLASSES_ROOT\CLSID\{20D04FE0-3AEA-1069-A2D8-08002B30309D}
Rename the value named “LocalizedString” to “LocalizedString.old”. Create a new REG_EXPAND_SZ value named “LocalizedString”, and set the value to “%USERNAME% or %COMPUTERNAME%”.
Exit the registry editor, click on your desktop and press F5 (for refresh). The “My Computer” icon should now be rename to “Username on Computername”.
On Windows 2008 you do not have enough permissions to change the key. Take ownership of the key and you can change it.
Create a folder with the following name (replace foldername with your own):
foldername.{ED7BA470-8E54-465E-825C-99712043E01C}
And you will get a “All Task Folder”, where you can manage your machine from.
The Parted Magic OS employs core programs of GParted and Parted to handle partitioning tasks with ease, while featuring other useful programs (e.g. Partimage, TestDisk, Truecrypt, Clonezilla, G4L, SuperGrubDisk, ddrescue, etc…)
Use the following CLI to get the state of your ESX hosts, the cpu and memory usage:
t-Datacenter | Sort | Get-VMHost | Sort | Get-View |`
Select Name, OverallStatus, `
@{N="CPU Usage (GHz)";E={[math]::round(
$_.Summary.QuickStats.OverallCpuUsage/1024,2)}}, `
@{N="Memory Usage (GB)";E={[math]::round(
$_.Summary.QuickStats.OverallMemoryUsage/1024,2)}}
Add line 7 to it to get all status except green:
Get-Datacenter | Sort | Get-VMHost | Sort | Get-View | `
Select Name, OverallStatus, `
@{N="CPU Usage (GHz)";E={[math]::round(
$_.Summary.QuickStats.OverallCpuUsage/1024,2)}}, `
@{N="Memory Usage (GB)";E={[math]::round(
$_.Summary.QuickStats.OverallMemoryUsage/1024,2)}} | `
Where { $_.OverallStatus -ne "green" }
source: http://laez.nl/quick-and-simple-vmware-esx-host-statistics/
At the customers site we are calculating Microsoft Licenses to buy for a new environment. A few links with a lot of information about microsoft licensing and vmware:
Windows Server Virtualization Calculators
Edition comparison by Technical Specification
Overview of Licensing for Virtualization
Licensing Microsoft Windows Server 2008 to Run with Virtualization Technologies