Retrieves the serial number from a Dell computer, then connects to the Internet and displays the warranty information.
[wpdm_file id=”14″]
Retrieves the serial number from a Dell computer, then connects to the Internet and displays the warranty information.
[wpdm_file id=”14″]
For a customer we needed to upgrade ESX servers from 32 GB to 46 GB. This type of servers (Dell PowerEdge 2850) had a problem reading 8GB memory modules. To support 8 GB memory modules a minimum BIOS level is 2.3.1 and BMC level 2.10 is required.
Therefore we needed to upgrade the firmware of the BIOS and BMC.
I downloaded the newest Dell images from the Dell site (actually the complete DVD image of all updates) and attached the DVD in the DVD player. After that i mounted the DVD with a ssh session:
mount /dev/cdrom /mnt/cdrom
I browsed to the repository directory of the DVD (offcourse you can copy the files through the netwerk with tools like winscp. Make sure you have the proper rights to execute the files “chmod +x filename.BIN”) and updated the BMC first (no reboot required) with the command:
./BMC_FRMW_LX_R202152.BIN
This will enter the install dialog wich you need to follow. After the BMC update was finished i continued with the BIOS update:
./PE2950_BIOS_LX_2.6.1.BIN
After this the Server needs to reboot on which point (during reboot) i shut down the server and placed the 8 GB memory modules in slot 1, 2, 5 and 6 for optimal performance (this are the first 4 slots).
Source: http://www.mobielbreedband.nl/detail/gebruik-je-mobiele-telefoon-als-internet-modem/
Het is ontzettend handig voor onderweg, of als je internetverbinding eruit ligt. Telecom aanbieders worden er niet blij van en sommige verbieden het in hun algemene voorwaarden: het gebruiken van de internetverbinding van je mobiele telefoon met een laptop of computer. Zonder gebruik van een applicatie, door een paar makkelijke instellingen in je computer. Bluetooth op laptop / pc en op mobiele telefoon zijn een vereiste.
Om te beginnen is het gewenst om een onbeperkt data abonnement te hebben voor je mobiele telefoon. Als je dit niet hebt loop je het risico dat je eind van de maand een dikke rekening van je provider krijgt. En daar zit natuurlijk niemand op te wachten. Dus kijk hiermee uit! Deze handleiding schrijf ik voor het gemak voor een laptop met Nederlandse Windows XP Professional. Details kunnen dus verschillen met andere hard- en software.
De eerste stap is een verbinding opzetten van je mobiele telefoon met je laptop via bluetooth. Schakel op beide apparaten bluetooth in en zoek op je laptop naar je telefoon in de bluetooth console onder configuratiescherm. Stel in met oog op veiligheid een sleutel in en accepteer op je telefoon de binnenkomende verbinding. Mijn laptop verteld me dat er een nieuw standaard modem via bluetooth is gevonden.
Om verwarring te voorkomen met andere mogelijke verbindingen heb ik mijn wireless, netwerk verbinding met kabel en mijn hardware modem uitgeschakeld. In de netwerkverbindingen van je laptop start je de wizard ‘nieuwe verbinding maken’. Kies de volgende serie opties: ‘verbinding met het internet maken’ –> ‘ik wil handmatig een verbinding instellen’ –> ‘verbinding maken via een inbelmodem’.
Geef de verbinding een naam, hier maakt het niet zoveel uit wat je invult. Bij telefoonnummer vul je de gegevens die bij jouw provider horen.
*99***1# is voor KPN, Debitel, Orange, Tele 2 en Telfort gemigreerd van O2.
*99# is voor Vodafone, T-Mobile, Telfort en Proximus.
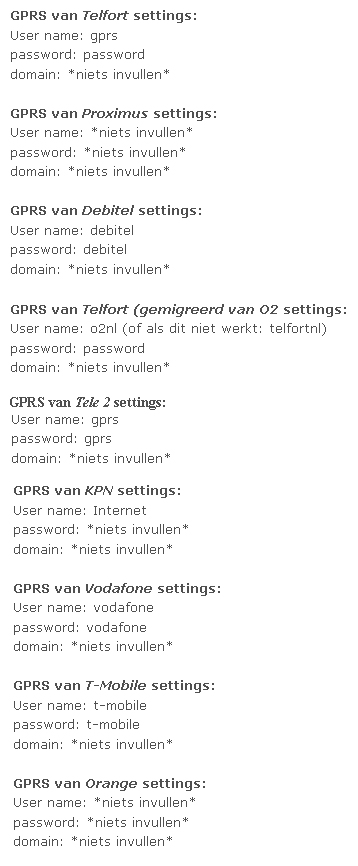
Zoek bij jouw provider de juiste gebruikersnaam en wachtwoord. Deze zijn te vinden in de afbeelding hieronder. De overige 2 opties onder deze gegevens heb ik uitgezet om te voorkomen dat ik zinloos of per ongeluk het GPRS netwerk belast. Dit in verband met de ‘fair use policy’ en datalimiet van mijn provider, en mijn bankrekening dus. Nu is je verbinding klaar voor gebruik. Waarschijnlijk moet je bij het maken van de verbinding nog wel toegang verlenen op je mobiele telefoon.

A script to find orphaned vmdk’s on your ESX infrastructure.
Source here: http://communities.vmware.com/docs/DOC-6960
[wpdm_file id=”13″]
If you want to run it to ESX 3.5 make sure you include the snapshot files extension for it (000001.vmdk and so on).
In the following example 00001 and 00002 are added:
#
# Purpose : List all orphaned vmdk on all datastores in all VC's
# Version: 1.0
# Author  : HJA van Bokhoven

#Main

$arrayVC = "YourVirtualCenter"
$OutputFile = "c:\OrphanedVMDK.txt"

Foreach ($strVC in $arrayVC)
{
	Connect-VIServer $strVC
	$arrUsedDisks = Get-VM | Get-HardDisk | %{$_.filename}
	$arrDS = Get-Datastore
	Foreach ($strDatastore in $arrDS)
	{
	   $strDatastoreName = $strDatastore.name
	   Write-Host $strDatastoreName
	   $ds = Get-Datastore -Name $strDatastoreName | %{Get-View $_.Id}
	   $fileQueryFlags = New-Object VMware.Vim.FileQueryFlags
	   $fileQueryFlags.FileSize = $true
	   $fileQueryFlags.FileType = $true
	   $fileQueryFlags.Modification = $true
	   $searchSpec = New-Object VMware.Vim.HostDatastoreBrowserSearchSpec
	   $searchSpec.details = $fileQueryFlags
	   $searchSpec.sortFoldersFirst = $true
	   $dsBrowser = Get-View $ds.browser
	   $rootPath = "["+$ds.summary.Name+"]"
	   $searchResult = $dsBrowser.SearchDatastoreSubFolders($rootPath, $searchSpec)
	   $myCol = @()
	   foreach ($folder in $searchResult)
	   {
	      foreach ($fileResult in $folder.File)
	      {
             $file = "" | select Name, FullPath
		     $file.Name = $fileResult.Path
		     $strFilename = $file.Name
		     IF ($strFilename)
		     {
		     IF ($strFilename.Contains(".vmdk"))
		     {
		     IF (!$strFilename.Contains("-flat.vmdk"))
		     {
		     IF (!$strFilename.Contains("delta.vmdk"))
		     {
		     IF (!$strFilename.Contains("000001.vmdk"))
		     {
		     IF (!$strFilename.Contains("000002.vmdk"))
		     {
		        $strCheckfile = "*"+$file.Name+"*"
			 IF ($arrUsedDisks -Like $strCheckfile){}
	         ELSE
			 {
			 $strOutput = $strDatastoreName + " Orphaned VMDK Found: " + $strFilename
			 $strOutput | Out-File $Outputfile -width 150 -Append
			 }
		     }
		     }
		     }
		     }
		     }
		     }
	      }
	   }
   }
}
Use the following VBS script to find the local Asset Tag from Dell:
Set objWMIservice = GetObject("winmgmts:\\.\root\cimv2")
set colitems = objWMIservice.ExecQuery("Select * from Win32_BIOS",,48)
For each objitem in colitems
Wscript.echo "Dell Service Tag: " & objitem.serialnumber
Next
Or download the script here:[wpdm_file id=12]
With the following script you can move the default IIS 7 installation path from c:\inetpub to every disk you want.
@echo off
IF "%1" == "" goto err
setlocal
set MOVETO=%1:\

REM simple error handling if drive does not exist or argument is wrong
IF NOT EXIST %MOVETO% goto err

REM Backup IIS config before we start changing config to point to the new path
%windir%\system32\inetsrv\appcmd add backup beforeRootMove

REM Stop all IIS services
iisreset /stop

REM Copy all content
REM /O - copy ACLs
REM /E - copy sub directories including empty ones
REM /I - assume destination is a directory
REM /Q - quiet

REM echo on, because user will be prompted if content already exists.
echo on
xcopy %systemdrive%\inetpub %MOVETO%inetpub /O /E /I /Q
@echo off
REM Move AppPool isolation directory
reg add HKLM\System\CurrentControlSet\Services\WAS\Parameters /v ConfigIsolationPath /t REG_SZ /d %MOVETO%inetpub\temp\appPools /f

REM Move logfile directories
%windir%\system32\inetsrv\appcmd set config -section:system.applicationHost/sites -siteDefaults.traceFailedRequestsLogging.directory:"%MOVETO%inetpub\logs\FailedReqLogFiles"
%windir%\system32\inetsrv\appcmd set config -section:system.applicationHost/sites -siteDefaults.logfile.directory:"%MOVETO%inetpub\logs\logfiles"
%windir%\system32\inetsrv\appcmd set config -section:system.applicationHost/log -centralBinaryLogFile.directory:"%MOVETO%inetpub\logs\logfiles"
%windir%\system32\inetsrv\appcmd set config -section:system.applicationHost/log -centralW3CLogFile.directory:"%MOVETO%inetpub\logs\logfiles"

REM Move config history location, temporary files, the path for the Default Web Site and the custom error locations
%windir%\system32\inetsrv\appcmd set config -section:system.applicationhost/configHistory -path:%MOVETO%inetpub\history
%windir%\system32\inetsrv\appcmd set config -section:system.webServer/asp -cache.disktemplateCacheDirectory:"%MOVETO%inetpub\temp\ASP Compiled Templates"
%windir%\system32\inetsrv\appcmd set config -section:system.webServer/httpCompression -directory:"%MOVETO%inetpub\temp\IIS Temporary Compressed Files"
%windir%\system32\inetsrv\appcmd set vdir "Default Web Site/" -physicalPath:%MOVETO%inetpub\wwwroot
%windir%\system32\inetsrv\appcmd set config -section:httpErrors /[statusCode='401'].prefixLanguageFilePath:%MOVETO%inetpub\custerr
%windir%\system32\inetsrv\appcmd set config -section:httpErrors /[statusCode='403'].prefixLanguageFilePath:%MOVETO%inetpub\custerr
%windir%\system32\inetsrv\appcmd set config -section:httpErrors /[statusCode='404'].prefixLanguageFilePath:%MOVETO%inetpub\custerr
%windir%\system32\inetsrv\appcmd set config -section:httpErrors /[statusCode='405'].prefixLanguageFilePath:%MOVETO%inetpub\custerr
%windir%\system32\inetsrv\appcmd set config -section:httpErrors /[statusCode='406'].prefixLanguageFilePath:%MOVETO%inetpub\custerr
%windir%\system32\inetsrv\appcmd set config -section:httpErrors /[statusCode='412'].prefixLanguageFilePath:%MOVETO%inetpub\custerr
%windir%\system32\inetsrv\appcmd set config -section:httpErrors /[statusCode='500'].prefixLanguageFilePath:%MOVETO%inetpub\custerr
%windir%\system32\inetsrv\appcmd set config -section:httpErrors /[statusCode='501'].prefixLanguageFilePath:%MOVETO%inetpub\custerr
%windir%\system32\inetsrv\appcmd set config -section:httpErrors /[statusCode='502'].prefixLanguageFilePath:%MOVETO%inetpub\custerr

REM Make sure Service Pack and Hotfix Installers know where the IIS root directories are
reg add HKLM\Software\Microsoft\inetstp /v PathWWWRoot /t REG_SZ /d %MOVETO%inetpub\wwwroot /f
reg add HKLM\Software\Microsoft\inetstp /v PathFTPRoot /t REG_SZ /d %MOVETO%inetpub\ftproot /f
REM Do the same for x64 directories
if not "%ProgramFiles(x86)%" == "" reg add HKLM\Software\Wow6432Node\Microsoft\inetstp /v PathWWWRoot /t REG_EXPAND_SZ /d %MOVETO%inetpub\wwwroot /f
if not "%ProgramFiles(x86)%" == "" reg add HKLM\Software\Wow6432Node\Microsoft\inetstp /v PathFTPRoot /t REG_EXPAND_SZ /d %MOVETO%inetpub\ftproot /f

REM Restart all IIS services
iisreset /start
echo.
echo.
echo ===============================================================================
echo Moved IIS7 root directory from %systemdrive%\ to %MOVETO%.
echo.
echo Please verify if the move worked. If so you can delete the %systemdrive%\inetpub directory.
echo If something went wrong you can restore the old settings via
echo     "APPCMD restore backup beforeRootMove"
echo and
echo     "REG delete HKLM\System\CurrentControlSet\Services\WAS\Parameters\ConfigIsolationPath"
echo You also have to reset the PathWWWRoot and PathFTPRoot registry values
echo in HKEY_LOCAL_MACHINE\Software\Microsoft\InetStp.
echo ===============================================================================
echo.
echo.
endlocal
goto success

REM error message if no argument or drive does not exist
:err
echo.
echo New root drive letter required.
echo Here an example how to move the IIS root to the F:\ drive:
echo.
echo MOVEIISROOT.BAT F
echo.
echo.

:success
Or download the file
[wpdm_file id=11]
On a local machine you can check the excluded directories off Symantec Anti Virus in the following registry key:
[HKEY_LOCAL_MACHINE\SOFTWARE\Intel\LANDesk\VirusProtect6\CurrentVersion\Storages\Filesystem\RealTimeScan\FileExceptions]
For Windows 2008 (64Bit) and Symantec Endpoint Protection (SEP) 11, look at the following location:
HKEY_LOCAL_MACHINE\SOFTWARE\Wow6432Node\Symantec\Symantec Endpoint Protection\AV\Exclusions\ScanningEngines\Directory\Admin
Start the service manager
Click configure IE ESC under the Server Summary section
Disable the feauture for administrators and/or users
Document ID: 2007071909500548
What should I think about in advance before I begin migrating my Symantec AntiVirus environment to Symantec Endpoint Protection?
Consider several factors before you begin your migration:
Before you begin migration, you must read the migration chapters in the Installation Guide for Symantec Endpoint Protection and Symantec Network Access Control.
What are the general steps to migrating Symantec AntiVirus to Symantec Endpoint Protection?
You must complete the following steps to migrate Symantec AntiVirus to Symantec Endpoint Protection in the order listed:
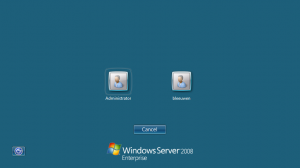
After installing windows server 2008, you can choose the user with whom you want to logon (see the picture below).

Offcourse this is not desirable for many company’s and you should turn this off. Take the following steps to do this on a stand alone server:
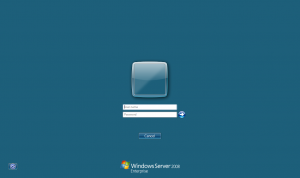
When logging off and pressing CTL+ALT+DEL you need to type in your username and password like the screen below:
