TCP Keep-Alive Messages

When a windows client is connected to a server, disconnects are experienced.

This is because the client does not communicate (default 2 hours) whith the server and then other devices (like a firewall with a 1 hour inactive disconnect setting) disconnects the session.

You can change the keep alive settings as follows:

  1. Open the register
  2. Go to HKEY_LOCAL_MACHINE\SYSTEM\CurrentControlSet\Services\Tcpip\Parameters
  3. Add/Change the Keepalive time

    KeepAliveTime

    Value Type: REG_DWORD – Time in milliseconds
    Valid Range: 1 – 0xFFFFFFFF
    Default: 7,200,000 (two hours)
    Description: The parameter controls how frequently TCP tries to verify that an idle connection is still intact by sending a keepalive packet. If the remote computer is still reachable and functioning, the remote computer acknowledges the keepalive transmission. By default, keepalive packets are not sent. A program can turn on this feature on a connection.

Microsoft knowledgebase 314053

Systems Manageability of VMware ESXi on Dell PowerEdge Servers

 After people have learned about ESXi, and understand all the benefits (less patching, easy deployment and manageability, etc), one of the first concerns that they raise is around hardware management. Many IT shops use management tools from OEMs such as Dell OpenManage Server Administrator (OMSA) to do things like hardware health monitoring, asset inventory, and viewing alert and command logs. Traditionally, this functionality has been provided for ESX by an agent running in the Service Console. Without the Service Console, they ask, how could this be done for ESXi?

Ever since ESXi was released almost one and half years ago (as version ESXi 3.5), VMware and Dell have been working closely together to provide hardware management capabilities via an agentless model, using industry standard interfaces for management such as WS-MAN. With the release of ESXi 4, the management capabilities of Dell servers running ESXi is almost at parity with ESX 4. In particular, the following features are available to OMSA from an ESXi hostView server and storage asset data

  • View server and storage health information
  • View alert and command logs
  • Configure hardware (storage, BIOS, etc.)

All this is available via the familiar web-based interfaced used for servers running ESX.  Here is a screenshot of the Power Tracking Statistics Page:


Power stats

In addition, we have enhanced VMware vCenter (formerly VirtualCenter) Server to provide fairly extensive hardware-level monitoring as well. With vSphere 4, this capability is fully integrated with the rest of vCenter, e.g. you can set alarms on hardware faults. (Note that monitoring functionality is available even for the stand-alone, free version of ESXi 4; simply look in the vSphere Client).  Here is a screenshot of a Dell System being monitor in vCenter:

 Hwmon

To learn more about the management capabilities of ESXi 4 running on Dell PowerEdge servers, see this new joint white paper from VMware and Dell. There is also an online article in the June 2009 edition of Dell Power Solutions that talks about this.
Configuring Symantec AntiVirus for deployment as part of a drive image

Symantec Document ID: 2005092215503348

Question/Issue:
You need to create a drive image with Symantec AntiVirus already installed.

Solution:
Every installation of Symantec AntiVirus creates a globally unique identifier (GUID) for that installation when the Rtvscan service first starts. If you use a computer with Symantec AntiVirus to create a drive image, and if that image is used to create clones of that computer on the same network, then each computer will have the same GUID. This causes problems in Symantec System Center, such as the following:

  • Clients do not appear.
  • Clients randomly appear and disappear.

You can prevent this problem by creating a drive image that does not have a Symantec AntiVirus GUID.

To create an image without a Symantec AntiVirus GUID

  1. Install the operating system, and install all patches as you would normally.
    Do not install Symantec AntiVirus yet.
  2. Install any other software besides Symantec AntiVirus that will be on the image.
  3. Install Symantec AntiVirus last, after any other installations.
  4. Before you save the image, start the Registry Editor.
  5. Go to the following key:

    HKEY_LOCAL_MACHINE\SOFTWARE\Intel\LANDesk\VirusProtect6\CurrentVersion

  6. In the right pane, right-click GUID, and then click Delete.
  7. Exit the Registry Editor.
    The hard drive now contains the final image. Do not restart the computer.
  8. Create the image with your preferred disk imaging software.

When the computer starts again, Rtvscan checks for the GUID value, and when it determines that it does not exist, it generates a new one.

If you have computers that were already deployed with identical GUID values, you can delete the GUID value on each computer, as described above. This can be done with a batch file, a login script, or a group policy object.

Wrong preferred DNS server (BIND) with VPN client

When you are connected with VPN to your work network, some dns names are resolving to the wrong number. This is because you are using the wrong preferred dns.

When typing nslookup, you see that the used DNS server is the dns server from your networkcard and not the VPN dns server.

Look with ipconfig /all” for the name of your vpn network interface, then go to the following key in the register:

HKLM\SYSTEM\CURRENTCONTROLSET\SERVICES\TCPIP\LINKAGE\BIND

Make sure the name of your network interface is on top of the bind sequence. This should set your preferred DNS to your VPN DNS server.

Change all ESX root passwords

Another great script from Arnim van Lieshout.

With this script you can change all ESX root passwords at once:

#
# This script changes the root password on all ESX hosts in the esxservers.txt textfile
# 

# Add VI-toolkit #
Add-PSsnapin VMware.VimAutomation.Core
Initialize-VIToolkitEnvironment.ps1# Get old root credential
$oldrootPassword = Read-Host “Enter old root password” -AsSecureString
$oldrootCredential = new-object -typename System.Management.Automation.PSCredential -argumentlist “root”,$oldrootPassword

# Get new root credential
$newrootPassword = Read-Host “Enter new root password” -AsSecureString
$newrootCredential = new-object -typename System.Management.Automation.PSCredential -argumentlist “root”,$newrootPassword
$newrootPassword2 = Read-Host “Retype new root password” -AsSecureString
$newrootCredential2 = new-object -typename System.Management.Automation.PSCredential -argumentlist “root”,$newrootPassword2

# Compare passwords
If ($newrootCredential.GetNetworkCredential().Password -ceq $newrootCredential2.GetNetworkCredential().Password) {

 # Create new root account object
 $rootaccount = New-Object VMware.Vim.HostPosixAccountSpec
 $rootaccount.id = “root”
 $rootaccount.password = $newrootCredential.GetNetworkCredential().Password
 $rootaccount.shellAccess = “/bin/bash”

 # Get list of Host servers from textfile to change root password on
 Get-Content esxservers.txt | %{
  Connect-VIServer $_ -User root -Password $oldrootCredential.GetNetworkCredential().Password -ErrorAction SilentlyContinue -ErrorVariable ConnectError | Out-Null
  If ($ConnectError -ne $Null) {
   Write-Host “ERROR: Failed to connect to ESX server:” $_
  }
  Else {
   $si = Get-View ServiceInstance
   $acctMgr = Get-View -Id $si.content.accountManager
   $acctMgr.UpdateUser($rootaccount)
   Write-Host “Root password successfully changed on” $_
      Disconnect-VIServer -Confirm:$False | Out-Null
  }
 }
}
Else {
Write-Host “ERROR: New root passwords do not match. Exiting…”
}

Example esxservers.txt:

esx001.yourdomain.local
esx002.yourdomain.local
esx003.yourdomain.local
esx004.yourdomain.local

Download: [wpdm_file id=9]

List all vm’s and total assigned diskspace

Looking for new scripts i’ve stumbled opon the following script to list all vm’s to an excel sheet and display the total assigned diskspace:

# Define Variables 
$outputFile = 'C:\VMDiskCapacity.csv' 
$VCServer = "vcenter.mydomain.com" 
$username = "vcenter_admin" 
$pass = "password" 

################## 
# Add VI-toolkit # 
################## 
Add-PSsnapin VMware.VimAutomation.Core 
Initialize-VIToolkitEnvironment.ps1 

# Connect server 
$VC = Connect-VIServer -Server "$VCServer" -User "$username" -Password "$pass" 

$myCol = @()    # Prepare output collection 
$VMs = Get-VM | sort Name    # Get all VMs (sorted) 
$counter = 0    # Initialize counter for progress bar 
ForEach ($VM in $VMs)    # Loop through VMs 
   { 
   $counter++    # Increase counter for progress bar 
   Write-Progress -Activity "Gathering disk information" -Status "Processing VM $VM" -PercentComplete (100*($counter/$VMs.count))    # Display progress bar 
    
   $myObj = "" | 
   select VM, TotalDiskSizeGB # Create output object 
   $myObj.VM = $VM.Name    # Virtual Machine Name 
    
   $TotalDiskSizeKB = 0 
   ForEach ($DISK in $VM.HardDisks)    # Loop through VM's harddisks 
      { 
      $TotalDiskSizeKB += $DISK.CapacityKB    
      } 
    
   $myObj.TotalDiskSizeGB = [math]::Round(($TotalDiskSizeKB * 1KB / 1GB),0) #Disk Size in GB 
   $myCol += $myObj    # Add output to collection 
   } 
$myCol | Export-Csv $outputFile -NoTypeInformation  # Export output to csv 

VMotion error CPUID mismatch on same hardware

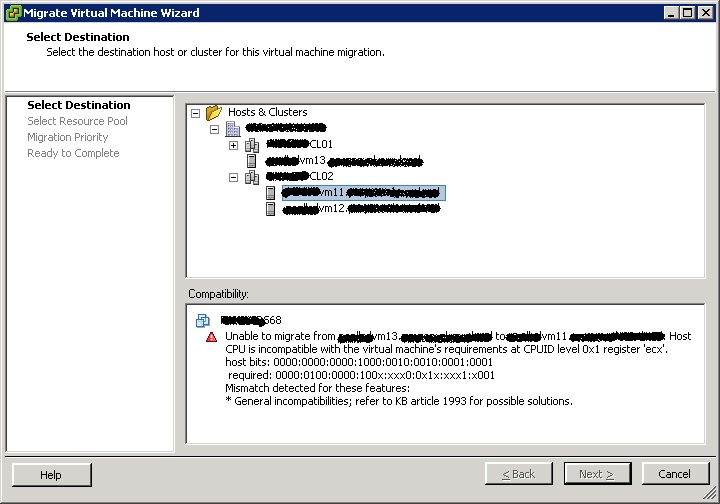
We recently acquired a new Dell PowerEdge for our VMware Cluster. Although the hardware was the same, we did get a vmotion error like this one:

vmotion error

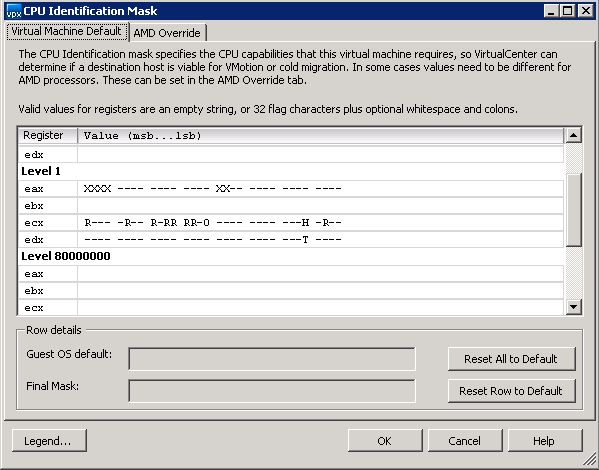
After investigating the problem, it looked like the virtual center server added maskid’s on it own to the virtual machines. After deleting this masks vmotion could occur without any problem. You can see themas settings in the following picture:

CPUID

To remove the mask id, do the following:

  • Shut down the virtual machine
  • Edit the settings of the virtual machine
  • Go to the options tab
  • Click the CPUID Maks setting
  • Click the Advanced Button
  • Press Reset all to default
  • Power on the virtual machine

After doing this, you should have no settings in this advanced page.

This happened on ESX 3.5 u2, an alternative for this solution is to upgrade to ESX 3.5 u4 and use EVC.