DelinvFile – Delete Invalid Files and Folders

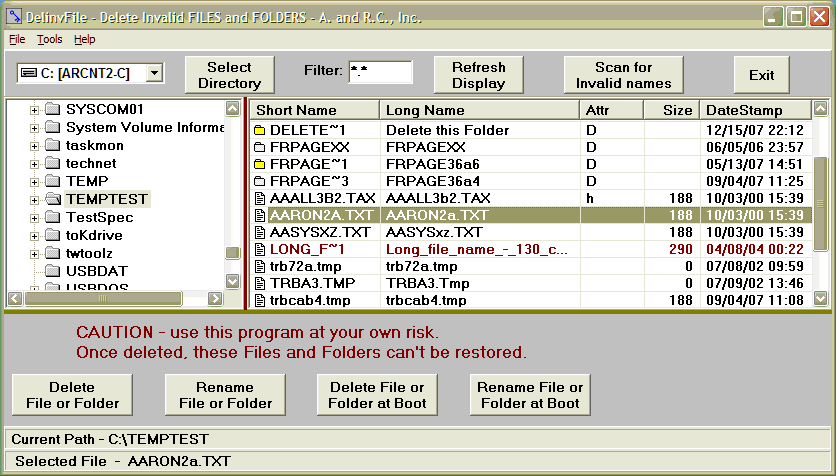
Windows allows the creation of file names and folder names that can not be deleted or renamed via Windows Explorer.  This includes names with invalid characters and names that are too long. The current limit is 260 characters.  In other words, windows can create names that are too long for the standard Windows Explorer to delete. When copying or deleting file the message: “Path too long” appears.


“DelinvFile.exe” is a Windows program that provides a convenient User Interface for selecting the file that you need to delete and provides for a choice of two delete methods. You use the standard controls for Drives, Folders, and Files to navigate to the Folder and Select the file to be deleted.


A trial version is available. See http://www.purgeie.com/delinv/

divfscrn

The Windows Server Update Services console crashes when browsing for updates

The Windows Server Update Services (WSUS) console crashes when browsing for updates and displays the following error message:

error

An unexpected error occurred. 
click reset server node to try to connect to the server again


This can occur if the application cache is corrupted.

To resolve this issue, delete the WSUS application cache from the location below:

C:\Documents and Settings\<user profile>\application data\microsoft\mmc

where user profile is the currently logged in user profile.


source: http://support.microsoft.com/kb/2761925

Default x.509 Certificates Have Longer Key Length

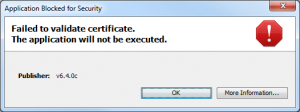
Openening a java application fails with the following error (Failed to validate certificate):


Untitled


Starting from 7u40, the use of x.509 certificates with RSA keys less than 1024 bits in length is restricted. This restriction is applied via the Java Security property, jdk.certpath.disabledAlgorithms. The default value of jdk.certpath.disabledAlgorithms is now as follows:

jdk.certpath.disabledAlgorithms=MD2, RSA keySize < 1024

In order to avoid the compatibility issue, users who use X.509 certificates with RSA keys less than 1024 bits, are recommended to update their certificates with stronger keys. As a workaround, at their own risk, users can adjust the key size to permit smaller key sizes through the security property jdk.certpath.disabledAlgorithms.


Open the java.security file which is located in your client machine’s Java/JRE installed directory (e.g. C:\Program Files (x86)\Java\jre7\lib\security)

Look for this line:

jdk.certpath.disabledAlgorithms=MD2, RSA keySize < 1024

Change 1024 to 256 and save.

Now you can open the java application.


It looks like every java updates reset this parameter to 1024 so you need to change it to 256 each time you have upgraded java.

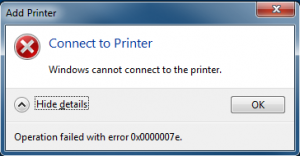
Windows 7: Windows cannot connect to the printer 0x0000007e

The problem occures because HP uses a 32 bit path to a file in the printer queue. The x64 client cannot resolve this location and the printer installation fails.

printer


Log on to the print server. Make sure that the 64bit driver is installed on the server. Delete the BIDI key in the register:

[HKEY_LOCAL_MACHINE\SOFTWARE\Microsoft\Windows NT\CurrentVersion\Print\Printers\PRINTERNAME\CopyFiles\BIDI

The printer can be installed now without errors.


references:

http://social.technet.microsoft.com/Forums/windowsserver/en-US/6c68f4d3-fa4c-4986-9567-bbe89551652f/windows-7-windows-cannot-connect-to-the-printer-0x0000007e

http://cloudsurvivalguide.com/error-0x0000007e-adding-printer-hp-universal-print-driver/

Report DHCP Scope Settings using Powershell

Source: http://www.rivnet.ro/2013/06/report-dhcp-scope-settings-using-powershell.html


A script to export information from all authorized DHCP servers in the Active directory. It will export the following information to a csv file:

DHCPServer name, Scope Name, Subnet defined, Start and End Ranges, Lease Times, Description, DNS Server, Gateway


import-module DHCPServer
#Get all Authorized DCs from AD configuration
$DHCPs = Get-DhcpServerInDC
$filename = "d:\backup\dhcp\DHCPScopes_DNS_$(get-date -Uformat "%Y%m%d-%H%M%S").csv"

$Report = @()
$k = $null
write-host -foregroundcolor Green "`n`n`n`n`n`n`n`n`n"
foreach ($dhcp in $DHCPs) {
    $k++
    Write-Progress -activity "Getting DHCP scopes:" -status "Percent Done: " `
    -PercentComplete (($k / $DHCPs.Count)  * 100) -CurrentOperation "Now processing $($dhcp.DNSName)"
    $scopes = $null
    $scopes = (Get-DhcpServerv4Scope -ComputerName $dhcp.DNSName -ErrorAction:SilentlyContinue)
    If ($scopes -ne $null) {
        #getting global DNS settings, in case scopes are configured to inherit these settings
        $GlobalDNSList = $null
        $GlobalDNSList = (Get-DhcpServerv4OptionValue -OptionId 6 -ComputerName $dhcp.DNSName -ErrorAction:SilentlyContinue).Value
        $scopes | % {
            $row = "" | select Hostname,ScopeID,SubnetMask,Name,State,StartRange,EndRange,LeaseDuration,Description,DNS1,DNS2,DNS3,GDNS1,GDNS2,GDNS3,Router
            $row.Hostname = $dhcp.DNSName
            $row.ScopeID = $_.ScopeID
            $row.SubnetMask = $_.SubnetMask
            $row.Name = $_.Name
            $row.State = $_.State
            $row.StartRange = $_.StartRange
            $row.EndRange = $_.EndRange
            $row.LeaseDuration = $_.LeaseDuration
            $row.Description = $_.Description
            $ScopeDNSList = $null
            $ScopeDNSList = (Get-DhcpServerv4OptionValue -OptionId 6 -ScopeID $_.ScopeId -ComputerName $dhcp.DNSName -ErrorAction:SilentlyContinue).Value
            #write-host "Q: Use global scopes?: A: $(($ScopeDNSList -eq $null) -and ($GlobalDNSList -ne $null))"
            If (($ScopeDNSList -eq $null) -and ($GlobalDNSList -ne $null)) {
                $row.GDNS1 = $GlobalDNSList[0]
                $row.GDNS2 = $GlobalDNSList[1]
                $row.GDNS3 = $GlobalDNSList[2]
                $row.DNS1 = $GlobalDNSList[0]
                $row.DNS2 = $GlobalDNSList[1]
                $row.DNS3 = $GlobalDNSList[2]
                }
            Else {
                $row.DNS1 = $ScopeDNSList[0]
                $row.DNS2 = $ScopeDNSList[1]
                $row.DNS3 = $ScopeDNSList[2]
                }
            $router = (Get-DhcpServerv4OptionValue -ComputerName $dhcp.DNSName -OptionId 3 -ScopeID $_.ScopeId).Value
            $row.Router = $router[0]
            $Report += $row            }
        }
    Else {
        write-host -foregroundcolor Yellow """$($dhcp.DNSName)"" is either running Windows 2003, or is somehow not responding to querries. Adding to report as blank"
        $row = "" | select Hostname,ScopeID,SubnetMask,Name,State,StartRange,EndRange,LeaseDuration,Description,DNS1,DNS2,DNS3,GDNS1,GDNS2,GDNS3,Router
        $row.Hostname = $dhcp.DNSName
        $Report += $row
        }
    write-host -foregroundcolor Green "Done Processing ""$($dhcp.DNSName)"""
    }

$Report  | Export-csv -NoTypeInformation -UseCulture $filename


Excel AddIn to reset the last worksheet cell

source: http://xsformatcleaner.codeplex.com/

Microsoft Excel saves only the part of each worksheet that is in use, meaning the section that contains data or formatting. Sometimes the last cell of a worksheet may be beyond the range of your actual used data. This issue may cause you to have a larger file size than neccesary, you may print extra pages, you may receive “Out of Memory” error messages, or you may experience other unusual behavior. Clearing the excess rows and columns to reset the last cell can help to resolve these issues.

Note You can locate the last cell of the active worksheet by pressing CTRL+SHIFT+END.

This is a sample of the code located in Microsoft KB 244435
How to reset the last cell in Excel
http://support.microsoft.com/kb/244435


[wpdm_file id=85]

Installing Dell OpenManage Server Administrator on VMWare ESXi 5.5

Installing Dell OpenManage Server Administrator on VMWare ESXi 5.5

Installing Dell OMSA on a ESXi server allows you to see more detailed information regarding the Dell hardware. It also allows you to perform operations such as specifying hot spares and rebuilding RAID arrays. After you install OMSA on the ESXi server you can install the OMSA web-based GUI on another Windows PC or Server in order to access OMSA.

The steps below will get OMSA up and running on VMWare ESXi 5.5. Be sure to download the version of the OMSA Offline Installation Bundle that corresponds to your version of ESXi.


Download the OMSA Offline Bundle from the Dell Website.

Enable SSH on the ESXi Server

  • Open and log-in to VMWare vShpere Client.
  • Select the server node in the tree view on the left.
  • Click the Configuration tab along the top.
  • Click the Properties link to the right of Services.
vSphere Client Security Profile Page
  • Select SSH in the list and click Options.
  • Select “Start and stop with host”
  • Under Service Commands click Start.
  • Click OK.
vSphere SSH Options
vSphere SSH Options

Transfer the OMSA Offline Bundle to the Server

Since SSH is enabled the easiest way to transfer the file “OM-SrvAdmin-Dell-Web-7.3.0-588_A00.VIB-ESX55i.zip” to the server is with a SFTP client. I typically use WinSCP on Windows, Transmit on a Mac, or the command line SCP client on Linux systems. I’ll show you how to use WinSCP below:

  • Open WinSCP.
  • Click New to create a new connection.
  • Enter the host name of the ESXi server, user name and password. (User name is root by default).
WinSCP Login Screen
WinSCP Login Screen
  • Click Login.
  • If this is your first time connecting to this host you’ll see a warning screen about the server’s host key. You can click Yes to continue.
  • Once connected you’ll see an explorer type view with your local files on the left and the server’s file system on the right.
  • You want to navigate to the /tmp/ folder.
ESXi /tmp/ Directory
  • Double click tmp to enter the directory.
  • In the left pane browse to where you downloaded “OM-SrvAdmin-Dell-Web-7.3.0-588_A00.VIB-ESX55i.zip”
  • Once located, drag the file to the right pane. When the Copy dialog comes up click Copy.
OMSA In tmp Directory

Install the Offline Bundle

Its now time to install the bundle. To do this  you’ll need a SSH client. I use Putty on Windows and the command line SSH client on Mac and Linux. I’ll show you how to use Putty below.

  • Open Putty.
  • Enter the ESXi server host name and click Open.
Putty Configuration
Putty Configuration
  • Again if this is your first time connecting to this host you’ll see a Putty Security Alert dialog box. Click Yes to continue.
  • Enter the user name (root).
  • Enter the password.
  • At the command line type “esxcli software vib install -d /tmp/OM-SrvAdmin-Dell-Web-7.3.0-588_A00.VIB-ESX55i.zip
  • Make sure to match the file name of the file you actually downloaded since version numbers will change frequently. You can use tab-auto-complete to type in the first few letters such as OM- and then press tab to complete the file name.
  • Press enter.
  • Reboot the server to complete the installation. If you don’t have any running hosts you’ll be able to restart without being in maintenance mode. If you do have running hosts you’ll need to shut them down and then put the ESXi server into maintenance mode.

Installing OpenManage Server Administrator Managed Node

  • Download the installer for Dell OpenManage Server Administrator Managed Node (Windows),v7.3 to a Windows PC.
  • Run and install the application.
  • The installer will complain about it not being installed on Dell software but you can proceed with the server installation only.
  • Dell OMSA is web-based, relying on a Java back-end so when you double click the icon on your desktop it will open your default browser.
  • Enter the ESXi host, user name and password. Check the box to Ingore certificate warnings.
OMSA Login
OMSA Login
  • This should allow you to use OpenManage similarly to how you would on a bare-metal install of Windows Server on a Dell system.

How to install Dell Openmanage Server Administratior on ESXi using VMware Update Manager

http://oxfordsbsguy.com/2013/08/09/how-to-install-dell-openmanage-server-administrator-on-esxi-5-1-using-vmware-update-manager/

1.  Download the OpenManage Server Administrator vSphere Installation Bundle (VIB) for ESXi 5.1, v7.3 from Dell’s website. It can be found on the Product Support page in the System Management section. Or you can download it from here.

OpenManage Server Administrator vSphere Installation Bundle (VIB) for ESXi 5.1, the current version is v7.32. Login in to vCenter, click Home, Update Manager and then select the Patch Repository tab.

VMware Update Manager - Patch Repository3. Click Import Patches.

VMware Update Manager - Import Patches4. Browse to the downloaded zip file and click Next. If you get a Security Warning dialogue box pop up, click Ignore.

Security Warning6. Click Finish to confirm the import.

VMware Update Manager - Import Patches7. If you browse the Patch Repository you will now see the OpenManage 7.3 for ESXi 510 patch.

VMware Patch Repository showing Dell OpenManage 7.3 for ESXi 510 patch

8. Click the Baseline and Groups tab. Then click on the left-hand Create option to create a new baseline.

VMware create Baseline

9. Give the baseline a name, Dell Host Extension, and select the Host Extension radio button, and click Next.

VMware New Baseline Name and Description10. Browse to the OpenManage 7.3 for ESXi510 extension, select it and click the Down Arrow to add it, click Next.

VMware New Baseline - Select Extensions

11. Review the selection and click Finish.

VMware New Baseline Complete

12. Click on Home, Hosts and Clusters, select the host you want to Install OpenManage Server Administrator on and select the Update Manager tab, then click Attach.

VMware Update Manager tab13. Select the Dell Host Extension baseline, then click Attach.

VMware - Attach Baseline or Group14. Select Patches and Extensions check box and click Scan.

VMware Confirm Scan15. To Apply the Extension, put the host into Maintenance Mode. Click the Stage button and then click the Remediate button.

To Access Server Administrator on ESXi 5.1 do the following or, just copy and paste the following address into a browser, changing the ESXiservername:

https://ESXiservername:1311/OMSALogin?manageDWS=false

1. From a Windows Server with Dell OpenManage Server Administrator installed, Open the local Server Administrator instance.

2. Click Logout in the top right hand corner of the web interface.

3. Click Log in.

Dell Server Administrator - Log in4. At the bottom of the login dialogue box, click Manage Remote Node.

Dell OpenManage Login

4. Enter the Esxi hostname or IP address, username and password, and check the box to Ignore certificate warnings. Click Submit.

Dell OpenManage - Managed System LoginYou will now be presented with the Dell OpenManage Server Administrator interface for your ESXi server.

Dell OpenManage Server Administrator ESXi interface

Easily audit and install patches on your servers in the network by providing a graphical interf

Project Description
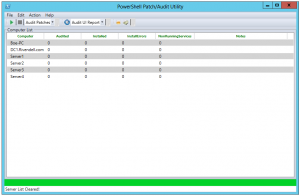
PoshPAIG allows you to easily audit and install patches on your servers in the network by providing a graphical interface

The utility works in any environment, but the optimal environment is a where you have a local WSUS server and your systems have Windows Update settings configured to “Download updates and do not install” either through Group Policy or local policy.

Due to licensing issues, please download PSExec.exe from the link below and place in the root of the UI folder, otherwise the Install portion will fail
http://technet.microsoft.com/en-us/sysinternals/bb897553

Version 2.1.5 has been released!
Please see release notes in the downloads section for new features/bug fixes.
http://poshpaig.codeplex.com/releases/view/100929

Capture

Hey, Scripting Guy articles:
http://blogs.technet.com/b/heyscriptingguy/archive/2011/08/13/use-powershell-to-audit-and-install-windows-patches.aspx
http://blogs.technet.com/b/heyscriptingguy/archive/2011/08/14/lessons-learned-while-writing-the-powershell-poshpaig-module.aspx

A list of new features available are:

  • Updated ListView UI
  • PSJobs replaced with Background runspaces for better performance
  • New reports for installed updates
  • Keyboard Shortcuts
    • F1: Display Help
    • F5: Run the selected command. Ex. Audit Patches,Install Patches
    • F8: Run a select report to generate
    • Ctrl+E: Exits the PoshPAIG applicaton
    • Ctrl+A: Select all systems in the Computer List
    • Ctrl+O: Opens up the Options menu
    • Ctrl+S: Opens window up to add more systems to Computer List
    • Ctrl+D: Removes a selected System or Systems
  • Services Reporting for non-running services set to Automatic
  • New UI changes
  • Better interaction with Windows Update Service
  • New reporting options available
  • Options menu to adjust some settings
  • MultiThreading of operations (Supports running 20 jobs at one time) without UI freeze
  • Add multiple computers with Add Server button using comma to separate each server
  • Select multiple computers in server list and perform operations on only those servers
  • Able to reboot systems with a monitored reboot
  • Ping sweep of all systems in server list
  • View windowsupdate.log on an individual server
  • View installed updates on servers
  • Remotely run wuauclt /detectnow on servers
  • Generate host list of servers
  • Sort columns
  • Notes column to track running operations
  • Error report

The PowerShell Patch Audit/Installation GUI started out as a project for work to build an interface to perform the patching of our systems to those who were not familiar enough with PowerShell to run a set of scripts I build to perform the same auditing and installation of patches. This product is currently in Alpha as there are some bugs that need to be squashed as well as other features I need to add to the tool as well as updating some some current features.

A blog post about this is available at http://learn-powershell.net/2011/06/03/powershell-patch-auditinstall-gui-poshpaig-released/

What this tool gives you is a way to first audit your systems which you can supply one of many ways. You can supply a list of systems, pull a list from Active Directory or manually add the systems yourself into the utility.

One of the best features about this tool is that it uses background jobs to perform all of the actions while the front end GUI is not affected. This means that you can freely move the GUI around as it does not get locked up like a normal WPF gui would in PowerShell if you attempted to run a job of some kind. You will also notice that the data in the GUI updates automatically as each job finishes for a server. For instance, if you are Auditing for patches, you will start seeing the number of patches waiting to be installed start updating next to each respective server. Same for Installing patches, the total number of installed patches, along with patches that gave an error when installing will be displayed in the GUI’s data window. Also, a progress bar is at the bottom of the GUI and status bar to show you how far along the process is.

After an Audit or Installation is performed, there are options to generate a Grid-View report for viewing or a CSV report can easily be generated to the default location of the GUI in no time!

Next version
The next version will have the following items that I am working on:

  • Better displaying of services report to allow restart
  • UI updates for grid view
  • Updated code and reporting
  • Various feature/bug requests


Project page: http://poshpaig.codeplex.com/

Download software: [wpdm_file id=84]

Event ID 8 is logged in the Application log

The following error occurs in the application log:

Event Type: Error
Event Source: crypt32
Event Category: None
Event ID: 8
Date: date
Time: time
User: user name
Computer: computer name
Description:
Failed auto update retrieval of third-party root list sequence number from: <http://www.download.windowsupdate.com/msdownload/update/v3/static/trustedr/en/authrootseq.txt> with error: This operation returned because the timeout period expired.
For more information, see Help and Support Center at http://support.microsoft.com.


This behavior can occur if the Update Root Certificates component is turned on and the computer cannot connect to the Windows Update server on the Internet. The Update Root Certificates component automatically updates trusted root-certificate authorities from the Microsoft Update server at regular intervals.

To resolve this behavior, you must connect to the Internet or turn off the Update Root Certificates component. To turn off the Update Root Certificates component, follow these steps:
In Control Panel, double-click Add/Remove Programs.
Click Add/Remove Windows Components.
Click to clear the Update Root Certificates check box, and then continue with the Windows Components Wizard.

Or, by using a GPO turn off the option.
Computer Configuration – Administrative Templates – System – Internet Communication Settings
“Turn off Automatic Root Certificates Update”


http://support.microsoft.com/kb/317541