Category Archives: VMware
Errors when gathering disk information during a physical to virtual conversion
KB Article: 1010341
Symptoms
When gathering disk information during a physical to virtual conversion, you may see the following errors:
- Fatal error occurred. The most common reason for this is loss of network connection.
- The wizard will now be closed.
- Please check your network connection and try again.
- Exception getting Disks and Volumes
- sourceStorageInfo is missing
Purpose
This article provides troubleshooting steps for converting a physical Windows source computer to a virtual machine. It assists you in eliminating common causes for this issue by verifying that networking is still in place between the Converter server and the the Windows source, and that the Windows source is not using any virtual disks.
Resolution
Please validate that each troubleshooting step below is true for your environment. Each step will provide instructions or a link to a document, in order to eliminate possible causes and take corrective action as necessary. The steps are ordered in the most appropriate sequence to isolate the issue and identify the proper resolution. Please do not skip a step.
Note: If you perform corrective action in any of the following steps, attempt the conversion again.
- Verify that networking is still in place between the Converter server and the source computer. For more information, see Required VMware vCenter Converter ports (1010056).
- Confirm that there are no virtual disks appearing as disk devices in the Disk Management utility.
- Click Start > Run.
- Type diskmgmt.msc and press Enter.
- Review the list of drive letters and devices in the bottom window. If there is a drive that is not associated with a physical device then remove it.
Note: You must determine what software process has mounted this virtual drive and consult with its product documentation.
Note: If your problem still exists after trying the steps in this article, please:
- Gather the VMware Support Script Data. For more information, see Collecting diagnostic information for VMware products (1008524).
- File a support request with VMware Support and note this KB Article ID in the problem description. For more information, see How to Submit a Support Request.
Microsoft Cluster Service (MSCS) support on ESX
http://kb.vmware.com/selfservice/documentLink.do?externalID=1004617
| ESX Server 3 Release | MSCS Supported? | Documentation |
| 3.0 | Yes | Setup for Microsoft Cluster Service (PDF) |
| 3.0.1 | Yes | Setup for Microsoft Cluster Service (PDF) |
| 3.0.2 | Yes | Setup for Microsoft Cluster Service (PDF) |
| 3.0.2 Update 1 | Yes | VMware Infrastructure 3 Release Notes
see also Setup for Microsoft Cluster Service (PDF) |
| 3.5 | No | VMware Infrastructure 3 Release Notes |
| 3.5 Update 1, 2, 3, 4 | Yes | VMware Infrastructure 3 Release Notes
see also Setup for Microsoft Cluster Service (PDF) |
| vSphere 4.0 | Yes | What’s New in VMware vSphere 4.0
see also Setup for Failover Clustering and Microsoft Cluster Service(PDF) |
VM / P2V Engineering Worksheet
The following Excel sheet was created to help management easily see what servers can be consolidated into group of ESX hosts. This is a engineering worksheet that architects can use to present to management showing the possible consolidation of servers using ESX/P2V.
[wpdm_file id=10]
Restore Snapshot to vmdk file – Part 1
With no tools available, i needed to restore a snapshot image to a vmware virtual disk. Normally a bartpe with snapshot integrated and network working is used for this, but this time i did not had access to my bartpe iso file to restore the snapshot image.
What did i do to restore the snapshot image to a vmdk (the vmdk was not partitioned yet)?
Dowloaded vdk and mounted the disk in a command line with:
- VDK open 0 Virtualdisk.vmdk /RW
After answering a few errors with i (ignore), the disk was mounted - Started snapshot and went to the selection process of the restore option
- When i reached the option to select the disk, selected the mounted disk
- Right click and choose “Create primary Partition” on the mounted disk
- Restore the disk image to the mounted disk
- Close vdk “vdk close 0”
- Start the virtual machine
Used the following site as a reference: http://www.drivesnapshot.de/en/tips.htm
Extend boot volume on Windows Server 2000/2003
Before you begin, make sure that you do not have an active snapshot on the VM, extending a virtual disk with a snapshot will cause corrpution
Extend the boot volume of Windows Server 2003 Virtual Machine
To start, I have a Windows Server 2003 Virtual Machine that has a 5.3G disk allocated to it, I need to expand this disk to 10G.

Step 1: Power off the virtual machine that holds the boot volume that you want to extend.
Step 2: Make a backup copy of your virutal disk, this is optional but if you mess up don’t call me unless you’re willing to pay.
Step 3: From the service console, increase the size of the .dsk or .vmdk virtual disk file. This can also be accomplished through the Virtual Infrastructure Client if you are using VirtualCenter 2.x+.
[root@esx-test local]# ls -lah test.vmdk

-rw------- 1 root root 5.4G Jul 18 13:57 test.vmdk
Extend the virtual disk with vmkfstools. The input to the -X switch is the size that you want the disk file to be not the size you want to extend the disk file by.
[root@esx-test local]# vmkfstools -X 10G test.vmdk
View the new size of test.vmdk
[root@esx-test local]# ls -lah test.vmdk

-rw-------    1 root     root          10G Jul 18 13:57 test.vmdk
Step 4: For this step you will need an additional Virtual Machine running Windows Server 2003. Power off the second Virtual Machine, and add the disk from the first Virtual Machine to it through the mui. Power up the second Virtual Machine and verify that the imported disk has unallocated space on it.

From the run menu type “diskpart.exe” to enter the command line utility to resize disk partitions in Windows Server 2003.

The command list volume will show you all the available volumes. Select your volume as shown below. select volume 1 corresponds to the “D” volume that I want to exntend. Finally extend the volume with the extend command.

If all goes well, the partition will be immediately exnteded under the Disk Management snap in.

Step 5: Shut down the second Virtual Machine and remove the disk from the second Virtual Machine. Power on the first Virtual Machine and check out your new space.

Systems Manageability of VMware ESXi on Dell PowerEdge Servers
After people have learned about ESXi, and understand all the benefits (less patching, easy deployment and manageability, etc), one of the first concerns that they raise is around hardware management. Many IT shops use management tools from OEMs such as Dell OpenManage Server Administrator (OMSA) to do things like hardware health monitoring, asset inventory, and viewing alert and command logs. Traditionally, this functionality has been provided for ESX by an agent running in the Service Console. Without the Service Console, they ask, how could this be done for ESXi?
Ever since ESXi was released almost one and half years ago (as version ESXi 3.5), VMware and Dell have been working closely together to provide hardware management capabilities via an agentless model, using industry standard interfaces for management such as WS-MAN. With the release of ESXi 4, the management capabilities of Dell servers running ESXi is almost at parity with ESX 4. In particular, the following features are available to OMSA from an ESXi hostView server and storage asset data
- View server and storage health information
- View alert and command logs
- Configure hardware (storage, BIOS, etc.)
All this is available via the familiar web-based interfaced used for servers running ESX. Here is a screenshot of the Power Tracking Statistics Page:
In addition, we have enhanced VMware vCenter (formerly VirtualCenter) Server to provide fairly extensive hardware-level monitoring as well. With vSphere 4, this capability is fully integrated with the rest of vCenter, e.g. you can set alarms on hardware faults. (Note that monitoring functionality is available even for the stand-alone, free version of ESXi 4; simply look in the vSphere Client). Here is a screenshot of a Dell System being monitor in vCenter:
To learn more about the management capabilities of ESXi 4 running on Dell PowerEdge servers, see this new joint white paper from VMware and Dell. There is also an online article in the June 2009 edition of Dell Power Solutions that talks about this.
Change all ESX root passwords
Another great script from Arnim van Lieshout.
With this script you can change all ESX root passwords at once:
#
# This script changes the root password on all ESX hosts in the esxservers.txt textfile
#

# Add VI-toolkit #
Add-PSsnapin VMware.VimAutomation.Core
Initialize-VIToolkitEnvironment.ps1# Get old root credential
$oldrootPassword = Read-Host “Enter old root password” -AsSecureString
$oldrootCredential = new-object -typename System.Management.Automation.PSCredential -argumentlist “root”,$oldrootPassword

# Get new root credential
$newrootPassword = Read-Host “Enter new root password” -AsSecureString
$newrootCredential = new-object -typename System.Management.Automation.PSCredential -argumentlist “root”,$newrootPassword
$newrootPassword2 = Read-Host “Retype new root password” -AsSecureString
$newrootCredential2 = new-object -typename System.Management.Automation.PSCredential -argumentlist “root”,$newrootPassword2

# Compare passwords
If ($newrootCredential.GetNetworkCredential().Password -ceq $newrootCredential2.GetNetworkCredential().Password) {

 # Create new root account object
 $rootaccount = New-Object VMware.Vim.HostPosixAccountSpec
 $rootaccount.id = “root”
 $rootaccount.password = $newrootCredential.GetNetworkCredential().Password
 $rootaccount.shellAccess = “/bin/bash”

 # Get list of Host servers from textfile to change root password on
 Get-Content esxservers.txt | %{
  Connect-VIServer $_ -User root -Password $oldrootCredential.GetNetworkCredential().Password -ErrorAction SilentlyContinue -ErrorVariable ConnectError | Out-Null
  If ($ConnectError -ne $Null) {
   Write-Host “ERROR: Failed to connect to ESX server:” $_
  }
  Else {
   $si = Get-View ServiceInstance
   $acctMgr = Get-View -Id $si.content.accountManager
   $acctMgr.UpdateUser($rootaccount)
   Write-Host “Root password successfully changed on” $_
      Disconnect-VIServer -Confirm:$False | Out-Null
  }
 }
}
Else {
Write-Host “ERROR: New root passwords do not match. Exiting…”
}
Example esxservers.txt:
esx001.yourdomain.local
esx002.yourdomain.local
esx003.yourdomain.local
esx004.yourdomain.local
Download: [wpdm_file id=9]
List all vm’s and total assigned diskspace
Looking for new scripts i’ve stumbled opon the following script to list all vm’s to an excel sheet and display the total assigned diskspace:
# Define Variables
$outputFile = 'C:\VMDiskCapacity.csv'
$VCServer = "vcenter.mydomain.com"
$username = "vcenter_admin"
$pass = "password"

##################
# Add VI-toolkit #
##################
Add-PSsnapin VMware.VimAutomation.Core
Initialize-VIToolkitEnvironment.ps1

# Connect server
$VC = Connect-VIServer -Server "$VCServer" -User "$username" -Password "$pass"

$myCol = @()    # Prepare output collection
$VMs = Get-VM | sort Name    # Get all VMs (sorted)
$counter = 0    # Initialize counter for progress bar
ForEach ($VM in $VMs)    # Loop through VMs
   {
   $counter++    # Increase counter for progress bar
   Write-Progress -Activity "Gathering disk information" -Status "Processing VM $VM" -PercentComplete (100*($counter/$VMs.count))    # Display progress bar

   $myObj = "" |
   select VM, TotalDiskSizeGB # Create output object
   $myObj.VM = $VM.Name    # Virtual Machine Name

   $TotalDiskSizeKB = 0
   ForEach ($DISK in $VM.HardDisks)    # Loop through VM's harddisks
      {
      $TotalDiskSizeKB += $DISK.CapacityKB
      }

   $myObj.TotalDiskSizeGB = [math]::Round(($TotalDiskSizeKB * 1KB / 1GB),0) #Disk Size in GB
   $myCol += $myObj    # Add output to collection
   }
$myCol | Export-Csv $outputFile -NoTypeInformation  # Export output to csv
VMotion error CPUID mismatch on same hardware
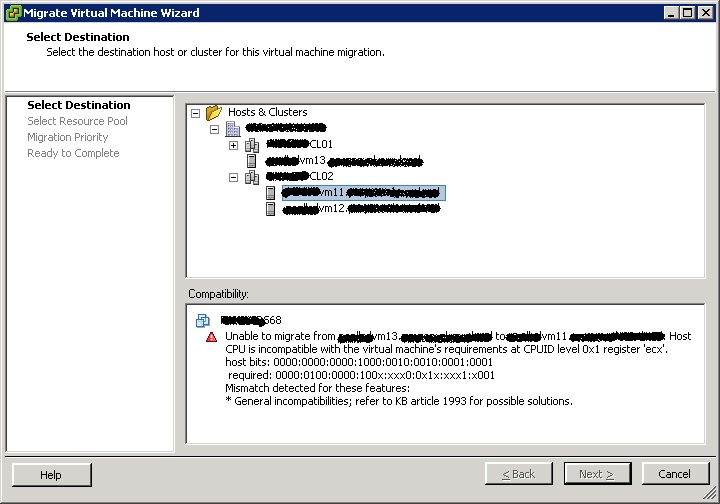
We recently acquired a new Dell PowerEdge for our VMware Cluster. Although the hardware was the same, we did get a vmotion error like this one:

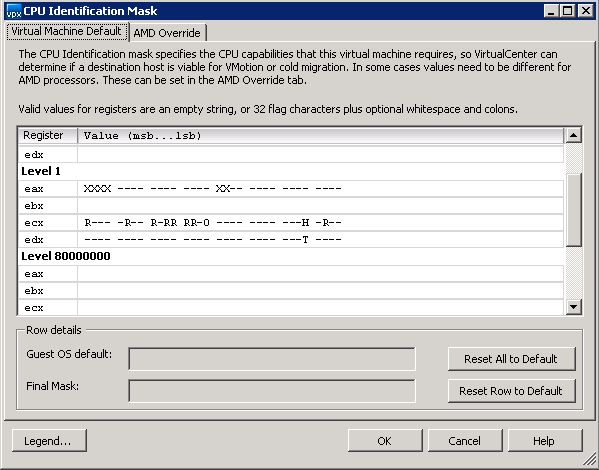
After investigating the problem, it looked like the virtual center server added maskid’s on it own to the virtual machines. After deleting this masks vmotion could occur without any problem. You can see themas settings in the following picture:

To remove the mask id, do the following:
- Shut down the virtual machine
- Edit the settings of the virtual machine
- Go to the options tab
- Click the CPUID Maks setting
- Click the Advanced Button
- Press Reset all to default
- Power on the virtual machine
After doing this, you should have no settings in this advanced page.
This happened on ESX 3.5 u2, an alternative for this solution is to upgrade to ESX 3.5 u4 and use EVC.