Configuring DNS for a KMS host

If you have multiple KMS servers in your domain, or want to add an other KMS server from outside the domain, just ad an SRV entry in your DNS.

Name Setting
Name _vlmcs._tcp
Type SRV
Priority 0
Weight 0
Port 1688
Hostname FQDN of KMS Host

With the priority you can add a preferred server. If you choose a higher number for the kms record, this record comes after the record with “0”.


Source: http://technet.microsoft.com/en-us/library/ff793405.aspx

Sample PowerShell Scripts with OMSA

(http://en.community.dell.com/techcenter/systems-management/w/wiki/sample-powershell-scripts-with-omsa.aspx)

sample Function to launch DRAC, based on computer name

Below are sample PowerShell scripts for querying data from OMSA – download the attached .txt file for all the examples.

get-wmiobject -namespace root\cimv2\dell -computer Server1 -list | sort-object name Displays all classes int he root\cimv2\dell namespace on Server1
$a = get-wmiobject dell_chassis -namespace root\cimv2\dell -computer Server1
$a | select-object AmpStatus, EsmLogStatus, FanRedStatus, FanStatus, MemStatus, Model, ProcStatus, PsRedStatus, PsStatus, SecurityBreach, SerialNumber, Status, SystemClass, TempStatus, VoltStatus, VrmStatus
Displayoverall hardware status based on info from Dell_Chassis
$a = get-wmiobject Dell_baseboard -namespace root\cimv2\dell -computer Server1
$a.PartNumber, $a.BaseBoardTypeDescString
Display the part number of the motherboard
$a = get-wmiobject cim_PhysicalMemory -namespace root\cimv2\dell -computer Server1
$a | select-object capacity, datawidth, formfactor, memorytype, name, speedasstring, status, tag, totalwidth | format-table
Displays Physical Memory information (speed, type, etc)
$a = get-wmiobject cim_temperaturesensor -namespace root\cimv2\dell -computer Server1
$a | select-object baseunits, CurrentReading, LowerThresholdCritical, LowerThresholdNonCritical, name, status, unitmodifier, upperthresholdcritical,upperthresholdnoncritical
Show Current Temperature sensor information (CurrentReading in Celsius)
get-wmiobject cim_tachometer -namespace root\cimv2\dell -computer Server1 | select-object Name, CurrentReading Displays Current Fan Speed
get-wmiobject cim_fru -namespace root\cimv2\dell -computer Server1 | select-object DeviceID, FRUManufacturerName, FRUPartNumberName, FRUSerialNumberName Displays “Field Replaceable Units” (FRU) information for specific components
get-wmiobject cim_powersupply -namespace root\cimv2\dell -computer Server1 | select-object name, DeviceID, Status, TotalOutputPower Displays the total output power of the supply – in milliwatts
get-wmiobject cim_processor -namespace root\cimv2\dell -computer Server1 | select-object CoreCount, CoreEnabledCount, CPUStatus, CurrentClockSpeed, DeviceID, MaxClockSpeed, Name | ft -autosize Displays processor information
get-wmiobject dell_networkport -namespace root\cimv2\dell -computer Server1 | select-object OSAdapterDescription, IsTOEEnable Displays if TCP Offload Engine (TOE) is enabled
$a = get-wmiobject DELL_PowerConsumptionData -namespace root\cimv2\dell -computer Server1
$a | select-object Name, CumulativePowerReading, maxPowerConsumption, minPowerConsumption, parStartTime, parTime, peakAmpReading, peakHeadRoom, peakWattReading, powerCap, powerCapCapabilities, pwrStartTime, pwrTime, Status
Displays valuable power consumption information – shows “CumulativePowerReading based from pwrStartTime, as well as min/max power consumption, and peak amps, watts, etc.
get-wmiobject CIM_BIOSElement -namespace root\cimv2\dell -computer Server1 | select-object InstallDate, Name, Version Displays BIOS Version, and installation date
get-wmiobject CIM_BIOSElement -namespace root\cimv2\dell -computer Server1 | % {$_.ConvertToDateTime($_.InstallDate), $_.Name, $_.Version} Convert BIOS Install Date time to a friendly date/time
get-wmiobject DELL_Firmware -namespace root\cimv2\dell -computer Server1 | select-object Name, Version Displays DRAC Version information
get-wmiobject Dell_SoftwareFeature -namespace root\cimv2\dell -computer Server1 | select-object Description, OmsaURL, Version Displays the OMSAURL used to connect to DRAC
function LaunchDrac($strComputerName)
{
$a = get-wmiobject Dell_SoftwareFeature -namespace root\cimv2\dell -computer $strComputerName | select-object Description, OmsaURL, Version
$ie = new-object -comobject InternetExplorer.Application
$ie.visible = $true
$ie.navigate(($a.omsaurl.split(‘,’))[0])
}
sample Function to launch DRAC, based on computer name

SQL Server 2008 R2 – Unattended Silent Install

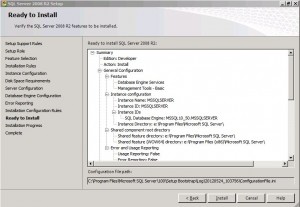
To create an Unattended Silent Install, you first need a configuration file with all the right settings in it. To create the file, run a installation of SQL and select all required settings. Continue the installation until you reach the “Ready To Install” step. In this step you will see the location of the configuration file (see the image below).


In this case it is: C:\program files\microsoft sql server\100\setup bootstrap\log\20120524_103756\configurationfile.ini

You can cancel the setup proces now.


Edit the configuration file as follows:


  • Set QUIET to “True”. This specifies that Setup will run in a quiet mode without any user interface (i.e. unattended installation)QUIET=”True”
  • Add IACCEPTSQLSERVERLICENSETERMS and set its value to “True”. This is to required to acknowledge acceptance of the license terms when the /Q (i.e. QUIET) parameter is specified for unattended installations.ACCEPTSQLSERVERLICENSETERMS=”True”
  • Remove the UIMODE parameter as it can’t be used with the QUITE parameter.
  • IF used SQL as the Securitymode, use SAPWD to set a password for the SA account
    SAPWD=”a complex password”
  • Set TCPENABLED to yes if you want external connections to you SQL instance
    TCPENABLED=”1″


Now you have your configuration file ready run SQL with the following command:

“<path to SQL setup folder>\setup.exe” /ConfigurationFile=”<path to config file>”

View BSOD (blue screen) crash information stored in dump files

Description

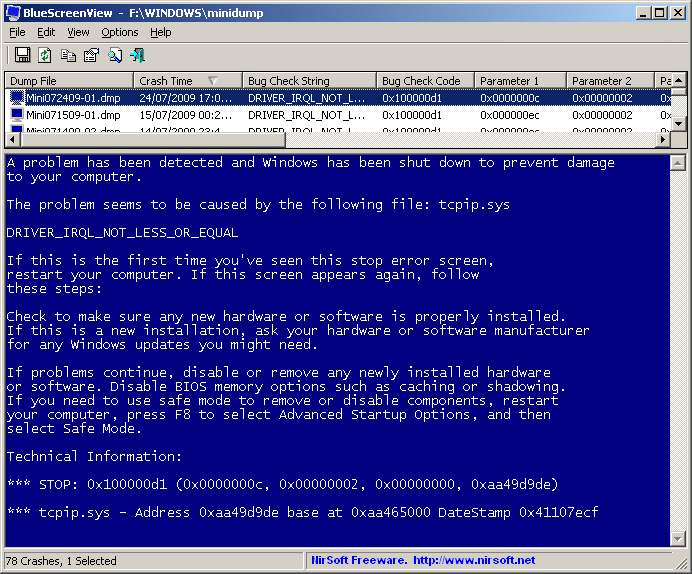
BlueScreenView scans all your minidump files created during ‘blue screen of death’ crashes, and displays the information about all crashes in one table. For each crash, BlueScreenView displays the minidump filename, the date/time of the crash, the basic crash information displayed in the blue screen (Bug Check Code and 4 parameters), and the details of the driver or module that possibly caused the crash (filename, product name, file description, and file version).
For each crash displayed in the upper pane, you can view the details of the device drivers loaded during the crash in the lower pane. BlueScreenView also mark the drivers that their addresses found in the crash stack, so you can easily locate the suspected drivers that possibly caused the crash.

http://www.nirsoft.net/utils/blue_screen_view.html

[wpdm_file id=76]

Terminal server logon gives “access denied”

When a user logs on to a terminal server the error “access denied” pops up.

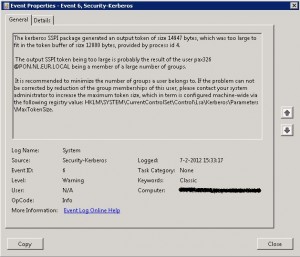
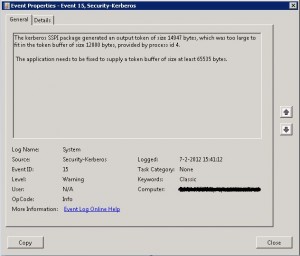
In the eventlog the following errors (event id 6 and 15)


To fix this problem add the MaxTokenSize key to the register with a value of 65535:

HKEY_LOCAL_MACHINE\SYSTEM\CurrentControlSet\Control\Lsa\Kerberos\Parameters

Entry: MaxTokenSize
Data type: REG_DWORD
Value: 65535


To change this for multiple Terminal Servers you can add it with a gpo: http://support.microsoft.com/kb/938118

Check FSMO Roles

Run the following vbs script to show you the location off the FSMO roles:


Set objRootDSE = GetObject("LDAP://rootDSE")

Set objSchema = GetObject _
    ("LDAP://" & objRootDSE.Get("schemaNamingContext"))
strSchemaMaster = objSchema.Get("fSMORoleOwner")
Set objNtds = GetObject("LDAP://" & strSchemaMaster)
Set objComputer = GetObject(objNtds.Parent)
WScript.Echo "Forest-wide Schema Master FSMO: " & objComputer.Name

Set objNtds = Nothing
Set objComputer = Nothing

Set objPartitions = GetObject("LDAP://CN=Partitions," & _
    objRootDSE.Get("configurationNamingContext"))
strDomainNamingMaster = objPartitions.Get("fSMORoleOwner")
Set objNtds = GetObject("LDAP://" & strDomainNamingMaster)
Set objComputer = GetObject(objNtds.Parent)
WScript.Echo "Forest-wide Domain Naming Master FSMO: " & objComputer.Name

Set objDomain = GetObject _
    ("LDAP://" & objRootDSE.Get("defaultNamingContext"))
strPdcEmulator = objDomain.Get("fSMORoleOwner")
Set objNtds = GetObject("LDAP://" & strPdcEmulator)
Set objComputer = GetObject(objNtds.Parent)
WScript.Echo "Domain's PDC Emulator FSMO: " & objComputer.Name

Set objRidManager = GetObject("LDAP://CN=RID Manager$,CN=System," & _
    objRootDSE.Get("defaultNamingContext"))
strRidMaster = objRidManager.Get("fSMORoleOwner")
Set objNtds = GetObject("LDAP://" & strRidMaster)
Set objComputer = GetObject(objNtds.Parent)
WScript.Echo "Domain's RID Master FSMO: " & objComputer.Name

Set objInfrastructure = GetObject("LDAP://CN=Infrastructure," & _
    objRootDSE.Get("defaultNamingContext"))
strInfrastructureMaster = objInfrastructure.Get("fSMORoleOwner")
Set objNtds = GetObject("LDAP://" & strInfrastructureMaster)
Set objComputer = GetObject(objNtds.Parent)
WScript.Echo "Domain's Infrastructure Master FSMO: " & objComputer.Name


download link: [wpdm_file id=49]

WMIC Delete shadowcopy

1) Open an elevated command prompt (“cmd” + ctl-shift-enter)

2) At the command prompt, type “wmic”, after some time “wmic:root\cli>” will appear

3) Type “shadowcopy”

4) it will display a list of existing shadow copies

4) Type “shadowcopy delete”

5) one by one, it will give a “Y/N” style prompt, confirming the deletion of each individual shadow copy.

6) Type “exit” to get back to normal command prompt

Changing the default SQL Server backup folder

When installing SQL, you can change the default SQL Server backup folder. When you want to change this afterwards you can’t do this through a gui.


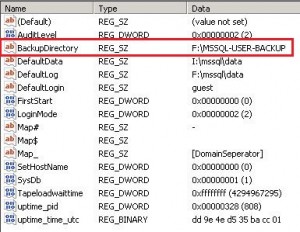
If you want to change the path open REGEDIT and navigat to the following key (or similar for your instance or SQL version:

HKEY_LOCAL_MACHINE\SOFTWARE\Microsoft\Microsoft SQL Server\MSSQL10.50.MSSQLSERVER\MSSQLServer

Change the BackupDirectory key to the desired path.

This default path will be used when backing up a database.

TSM add/remove schedule as a service

Install the windows Service:

dsmcutil install sched /name:"TSM Client Scheduler %NODENAME%" /node:%NODENAME% /password:%PASSWORD% /autostart:no /startnow:no /clientdir:"%DSM_DIR%" /optfile:"%OPTFILE%"


Remove the windows service:

 dsmcutil remove /name:"TSM Central Scheduler Service"

source: http://publib.boulder.ibm.com/infocenter/tivihelp/v1r1/index.jsp?topic=%2Fcom.ibm.itsmfdt.doc%2Fans60000559.htm