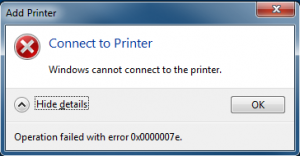
Windows 7: Windows cannot connect to the printer 0x0000007e

The problem occures because HP uses a 32 bit path to a file in the printer queue. The x64 client cannot resolve this location and the printer installation fails.

printer


Log on to the print server. Make sure that the 64bit driver is installed on the server. Delete the BIDI key in the register:

[HKEY_LOCAL_MACHINE\SOFTWARE\Microsoft\Windows NT\CurrentVersion\Print\Printers\PRINTERNAME\CopyFiles\BIDI

The printer can be installed now without errors.


references:

http://social.technet.microsoft.com/Forums/windowsserver/en-US/6c68f4d3-fa4c-4986-9567-bbe89551652f/windows-7-windows-cannot-connect-to-the-printer-0x0000007e

http://cloudsurvivalguide.com/error-0x0000007e-adding-printer-hp-universal-print-driver/

Report DHCP Scope Settings using Powershell

Source: http://www.rivnet.ro/2013/06/report-dhcp-scope-settings-using-powershell.html


A script to export information from all authorized DHCP servers in the Active directory. It will export the following information to a csv file:

DHCPServer name, Scope Name, Subnet defined, Start and End Ranges, Lease Times, Description, DNS Server, Gateway


import-module DHCPServer
#Get all Authorized DCs from AD configuration
$DHCPs = Get-DhcpServerInDC
$filename = "d:\backup\dhcp\DHCPScopes_DNS_$(get-date -Uformat "%Y%m%d-%H%M%S").csv"

$Report = @()
$k = $null
write-host -foregroundcolor Green "`n`n`n`n`n`n`n`n`n"
foreach ($dhcp in $DHCPs) {
    $k++
    Write-Progress -activity "Getting DHCP scopes:" -status "Percent Done: " `
    -PercentComplete (($k / $DHCPs.Count)  * 100) -CurrentOperation "Now processing $($dhcp.DNSName)"
    $scopes = $null
    $scopes = (Get-DhcpServerv4Scope -ComputerName $dhcp.DNSName -ErrorAction:SilentlyContinue)
    If ($scopes -ne $null) {
        #getting global DNS settings, in case scopes are configured to inherit these settings
        $GlobalDNSList = $null
        $GlobalDNSList = (Get-DhcpServerv4OptionValue -OptionId 6 -ComputerName $dhcp.DNSName -ErrorAction:SilentlyContinue).Value
        $scopes | % {
            $row = "" | select Hostname,ScopeID,SubnetMask,Name,State,StartRange,EndRange,LeaseDuration,Description,DNS1,DNS2,DNS3,GDNS1,GDNS2,GDNS3,Router
            $row.Hostname = $dhcp.DNSName
            $row.ScopeID = $_.ScopeID
            $row.SubnetMask = $_.SubnetMask
            $row.Name = $_.Name
            $row.State = $_.State
            $row.StartRange = $_.StartRange
            $row.EndRange = $_.EndRange
            $row.LeaseDuration = $_.LeaseDuration
            $row.Description = $_.Description
            $ScopeDNSList = $null
            $ScopeDNSList = (Get-DhcpServerv4OptionValue -OptionId 6 -ScopeID $_.ScopeId -ComputerName $dhcp.DNSName -ErrorAction:SilentlyContinue).Value
            #write-host "Q: Use global scopes?: A: $(($ScopeDNSList -eq $null) -and ($GlobalDNSList -ne $null))"
            If (($ScopeDNSList -eq $null) -and ($GlobalDNSList -ne $null)) {
                $row.GDNS1 = $GlobalDNSList[0]
                $row.GDNS2 = $GlobalDNSList[1]
                $row.GDNS3 = $GlobalDNSList[2]
                $row.DNS1 = $GlobalDNSList[0]
                $row.DNS2 = $GlobalDNSList[1]
                $row.DNS3 = $GlobalDNSList[2]
                }
            Else {
                $row.DNS1 = $ScopeDNSList[0]
                $row.DNS2 = $ScopeDNSList[1]
                $row.DNS3 = $ScopeDNSList[2]
                }
            $router = (Get-DhcpServerv4OptionValue -ComputerName $dhcp.DNSName -OptionId 3 -ScopeID $_.ScopeId).Value
            $row.Router = $router[0]
            $Report += $row            }
        }
    Else {
        write-host -foregroundcolor Yellow """$($dhcp.DNSName)"" is either running Windows 2003, or is somehow not responding to querries. Adding to report as blank"
        $row = "" | select Hostname,ScopeID,SubnetMask,Name,State,StartRange,EndRange,LeaseDuration,Description,DNS1,DNS2,DNS3,GDNS1,GDNS2,GDNS3,Router
        $row.Hostname = $dhcp.DNSName
        $Report += $row
        }
    write-host -foregroundcolor Green "Done Processing ""$($dhcp.DNSName)"""
    }

$Report  | Export-csv -NoTypeInformation -UseCulture $filename


Excel AddIn to reset the last worksheet cell

source: http://xsformatcleaner.codeplex.com/

Microsoft Excel saves only the part of each worksheet that is in use, meaning the section that contains data or formatting. Sometimes the last cell of a worksheet may be beyond the range of your actual used data. This issue may cause you to have a larger file size than neccesary, you may print extra pages, you may receive “Out of Memory” error messages, or you may experience other unusual behavior. Clearing the excess rows and columns to reset the last cell can help to resolve these issues.

Note You can locate the last cell of the active worksheet by pressing CTRL+SHIFT+END.

This is a sample of the code located in Microsoft KB 244435
How to reset the last cell in Excel
http://support.microsoft.com/kb/244435


[wpdm_file id=85]

Easily audit and install patches on your servers in the network by providing a graphical interf

Project Description
PoshPAIG allows you to easily audit and install patches on your servers in the network by providing a graphical interface

The utility works in any environment, but the optimal environment is a where you have a local WSUS server and your systems have Windows Update settings configured to “Download updates and do not install” either through Group Policy or local policy.

Due to licensing issues, please download PSExec.exe from the link below and place in the root of the UI folder, otherwise the Install portion will fail
http://technet.microsoft.com/en-us/sysinternals/bb897553

Version 2.1.5 has been released!
Please see release notes in the downloads section for new features/bug fixes.
http://poshpaig.codeplex.com/releases/view/100929
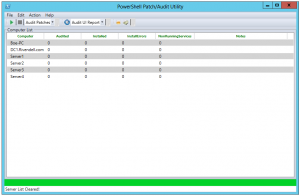
Capture

Hey, Scripting Guy articles:
http://blogs.technet.com/b/heyscriptingguy/archive/2011/08/13/use-powershell-to-audit-and-install-windows-patches.aspx
http://blogs.technet.com/b/heyscriptingguy/archive/2011/08/14/lessons-learned-while-writing-the-powershell-poshpaig-module.aspx

A list of new features available are:

  • Updated ListView UI
  • PSJobs replaced with Background runspaces for better performance
  • New reports for installed updates
  • Keyboard Shortcuts
    • F1: Display Help
    • F5: Run the selected command. Ex. Audit Patches,Install Patches
    • F8: Run a select report to generate
    • Ctrl+E: Exits the PoshPAIG applicaton
    • Ctrl+A: Select all systems in the Computer List
    • Ctrl+O: Opens up the Options menu
    • Ctrl+S: Opens window up to add more systems to Computer List
    • Ctrl+D: Removes a selected System or Systems
  • Services Reporting for non-running services set to Automatic
  • New UI changes
  • Better interaction with Windows Update Service
  • New reporting options available
  • Options menu to adjust some settings
  • MultiThreading of operations (Supports running 20 jobs at one time) without UI freeze
  • Add multiple computers with Add Server button using comma to separate each server
  • Select multiple computers in server list and perform operations on only those servers
  • Able to reboot systems with a monitored reboot
  • Ping sweep of all systems in server list
  • View windowsupdate.log on an individual server
  • View installed updates on servers
  • Remotely run wuauclt /detectnow on servers
  • Generate host list of servers
  • Sort columns
  • Notes column to track running operations
  • Error report

The PowerShell Patch Audit/Installation GUI started out as a project for work to build an interface to perform the patching of our systems to those who were not familiar enough with PowerShell to run a set of scripts I build to perform the same auditing and installation of patches. This product is currently in Alpha as there are some bugs that need to be squashed as well as other features I need to add to the tool as well as updating some some current features.

A blog post about this is available at http://learn-powershell.net/2011/06/03/powershell-patch-auditinstall-gui-poshpaig-released/

What this tool gives you is a way to first audit your systems which you can supply one of many ways. You can supply a list of systems, pull a list from Active Directory or manually add the systems yourself into the utility.

One of the best features about this tool is that it uses background jobs to perform all of the actions while the front end GUI is not affected. This means that you can freely move the GUI around as it does not get locked up like a normal WPF gui would in PowerShell if you attempted to run a job of some kind. You will also notice that the data in the GUI updates automatically as each job finishes for a server. For instance, if you are Auditing for patches, you will start seeing the number of patches waiting to be installed start updating next to each respective server. Same for Installing patches, the total number of installed patches, along with patches that gave an error when installing will be displayed in the GUI’s data window. Also, a progress bar is at the bottom of the GUI and status bar to show you how far along the process is.

After an Audit or Installation is performed, there are options to generate a Grid-View report for viewing or a CSV report can easily be generated to the default location of the GUI in no time!

Next version
The next version will have the following items that I am working on:

  • Better displaying of services report to allow restart
  • UI updates for grid view
  • Updated code and reporting
  • Various feature/bug requests


Project page: http://poshpaig.codeplex.com/

Download software: [wpdm_file id=84]
Event ID 8 is logged in the Application log

The following error occurs in the application log:

Event Type: Error
Event Source: crypt32
Event Category: None
Event ID: 8
Date: date
Time: time
User: user name
Computer: computer name
Description:
Failed auto update retrieval of third-party root list sequence number from: <http://www.download.windowsupdate.com/msdownload/update/v3/static/trustedr/en/authrootseq.txt> with error: This operation returned because the timeout period expired.
For more information, see Help and Support Center at http://support.microsoft.com.


This behavior can occur if the Update Root Certificates component is turned on and the computer cannot connect to the Windows Update server on the Internet. The Update Root Certificates component automatically updates trusted root-certificate authorities from the Microsoft Update server at regular intervals.

To resolve this behavior, you must connect to the Internet or turn off the Update Root Certificates component. To turn off the Update Root Certificates component, follow these steps:
In Control Panel, double-click Add/Remove Programs.
Click Add/Remove Windows Components.
Click to clear the Update Root Certificates check box, and then continue with the Windows Components Wizard.

Or, by using a GPO turn off the option.
Computer Configuration – Administrative Templates – System – Internet Communication Settings
“Turn off Automatic Root Certificates Update”


http://support.microsoft.com/kb/317541

Shrink disks in Windows

First delete all VSS snapshots (e.g. disk F):

vssadmin delete shadows /for=f: /all


Optimize the disk with powershell:

Optimize-Volume -driveletter F -defrag -verbose

Resize the disk with powershell (e.d. to 450 GB):

Resize-Partition -Driveletter F –Size 450GB

Shrink the disk with diskpart (e.d. 1784 MB):

shrink minimum 1784

To check the Maximum size and the Minimum size to where a disk can shrink, use the following command:

Get-PartitionSupportedSize -DiskNumber 1 -PartitionNumber 1 | select @{Name=”Minimum Size (GB)”; Expression={$_.SizeMin/1GB}}, @{Name=”Maximum Size (GB)”;Expression={$_.SizeMax/1GB}}

With Diskpart

shrink querymax

How to Configure IPv6 Using Group Policy

By default, Windows Server 2008 R2, Windows 7, Windows Server 2008 and Windows Vista enable and use IPv6 as the default protocol. These versions of Windows will normally use IPv6 for all network communication and will step down to IPv4 as necessary.
You may decide to disable Windows IPv6 for several reasons. Perhaps your IPv4 network doesn’t support it, and you want to disable unnecessary protocols. You may have also read that IPv6 breaks Outlook Anywhere on Exchange 2007 Client Access servers.

Most people think that you disable IPv6 by simply unchecking the Internet Protocol Version 6 (TCP/IPv6) checkbox, as shown above. This method disables IPv6 on the particular LAN interface and connection. For other network adapters or connections, users have to repeat the steps to disable IPv6. However, disabling IPv6 this way does not disable IPv6 on tunnel interfaces or the IPv6 loopback interface. It also must be done manually and cannot be instrumented or enforced using Group Policy.

In order to truly disable IPv6, you must disable it in the registry in the following key:
Normally, the DisabledComponents value does not exist. If the value does not exist or the value data is 0, IPv6 is enabled on all interfaces.

HKEY_LOCAL_MACHINE\SYSTEM\CurrentControlSet\Services\Tcpip6\Parameters\DisabledComponents

Microsoft wrote KB article 929852 to document how to disable certain Internet Protocol version 6 (IPv6) components in Windows Vista (and later) manually using the registry. At the end of the article, Microsoft helpfully wrote, “Note: Administrators must create an ADMX file in order to expose the settings in step 5 in a Group Policy setting.” Nice. So, I decided to do just that.

I wrote the attached ADMX and ADML files to enable the configuration of IPv6 using Group Policy. Copy each file to the computer you will use to configure the policy.
IPv6Configuration.zip [wpdm_file id=82]- This ZIP file contains both the ADMX and ADML files:

  • IPv6Configuration.admx – Copy this file to %SYSTEMROOT%\PolicyDefinitions
  • IPv6Configuration.adml – Copy this file to %SYSTEMROOT&\PolicyDefinitions\en-US (Replace en-US with your country’s language, as necessary)

Now log into the computer and use the Group Policy Management Console (GPMC) to configure the IPv6 settings. The new policy will be located under Computer Configuration > Policies > Administrative Templates > Network > IPv6 Configuration, as shown below:

Here, you can configure the following IPv6 settings:

  • Enable all IPv6 components (Windows default)
  • Disable all IPv6 components (the setting you probably want)
  • Disable 6to4
  • Disable ISATAP
  • Disable Teredo
  • Disable Teredo and 6to4
  • Disable all tunnel interfaces
  • Disable all LAN and PPP interfaces
  • Disable all LAN, PPP and tunnel interfaces
  • Prefer IPv4 over IPv6

Note that you must restart the computer for the configuration to go into effect.


source: http://www.expta.com/2009/02/how-to-configure-ipv6-using-group.html

How to disable IP version 6 or its specific components in Windows

To disable certain IPv6 components yourself, follow these steps:

  1. Click Start
    Collapse this imageExpand this image

    Start button

    , type regedit in the Start Search box, and then click regedit.exe in the Programs list.

  2. In the User Account Control dialog box, click Continue.
  3. In Registry Editor, locate and then click the following registry subkey:
    HKEY_LOCAL_MACHINE\SYSTEM\CurrentControlSet\Services\Tcpip6\Parameters \
  4. Double-click DisabledComponents to change the DisabledComponents entry.
    Collapse this imageExpand this image

    2683283

    Note If the DisabledComponents entry is unavailable, you must create it. To do this, follow these steps:

    1. In the Edit menu, point to New, and then click DWORD (32-bit) Value.
    2. Type DisabledComponents, and then press ENTER.
    3. Double-click DisabledComponents.
  5. Type any one of the following values in the Value data field to configure the IPv6 protocol to the desired state, and then click OK:
    1. Type 0 to enable all IPv6 components. (Windows default setting)
    2. Type 0xffffffff to disable all IPv6 components except the IPv6 loopback interface. This value also configures Windows to prefer using IPv4 over IPv6 by changing entries in the prefix policy table. For more information, see Source and Destination Address Selection
      (http://technet.microsoft.com/library/bb877985.aspx)

      .

    3. Type 0x20 to prefer IPv4 over IPv6 by changing entries in the prefix policy table.
    4. Type 0x10 to disable IPv6 on all nontunnel interfaces (both LAN and Point-to-Point Protocol [PPP] interfaces).
    5. Type 0x01 to disable IPv6 on all tunnel interfaces. These include Intra-Site Automatic Tunnel Addressing Protocol (ISATAP), 6to4, and Teredo.
    6. Type 0x11 to disable all IPv6 interfaces except for the IPv6 loopback interface.

source: http://support.microsoft.com/kb/929852/en-us


Dell: How to install Server Administrator on Windows 2012 Server Core Edition

Do the following to install Server Administrator on a Server Core. Once installed, you can launch OMSA using a supported remote browser.

1. Enable WOW component. Run the following command from the Server Core command prompt:

 dism /online /enable-feature /featurename:ServerCore-WOW64

2. Install x64 Server Administrator. Run the following command to install

Msiexec /i SysMgmtx64.msi

3. Disable WOW: Run the following command to disable WOW feature.

 dism /online /disable-feature /featurename:ServerCore-WOW64

4. Reboot the system.

Note: Disabling or enabling the WOW component would require system reboot.

5. Server Administrator is installed. You can launch the Server Administrator from a remote device as Server Core does not have the user interface