Create a bootable SERT USB key

The Symantec Endpoint Recovery Tool is an image that you can burn on a disc, which you can use to scan and remove malware from client computers. You use this tool for the computers that are too infected for Symantec  Endpoint Protection to clean effectively.

(http://www.symantec.com/connect/videos/symantec-endpoint-recovery-tool-sert)

You can download the tool from https://fileconnect.symantec.com/ and you need your license number like B1234567891.

Download the tool and get a USB key with at least 512 MB space

1.    Using WinRAR or similar, extract the SERT.iso file to the local file system (assume C:\SERT).
2.    Open a command prompt with admin rights.
3.    Insert the USB stick into the computer.
4.    Type the following command to start Diskpart:
diskpart <enter>
5.    Type the following command to list the available disks:
list disk <enter>

This command is important.  It will show you what number your USB drive is.  Failure to select the right disk at this point may result in loss of data from your hard disk.  Normally the drive is Disk 1, but you should confirm before proceeding.

6.    Type following commands to format the USB stick and prepare it for SERT:
select disk <number> <enter>
clean <enter>
create partition primary <enter>
select partition 1 <enter>
active <enter>
format fs=fat32 <enter>
assign <enter>
exit <enter>

7.    At the command prompt, type the following to copy the SERT files to the USB Stick:
xcopy C:\SERT\*.* <removable disk drive letter>\ /e /h /f <enter>

For updated definition files, download the JDB files and unzip them to the USB key. The JDB files can be found at http://www.symantec.com/business/security_response/definitions/download/detail.jsp?gid=savce

To see how the SERT tool can be updated with the downloaded JDB file, read the following article: http://www.bvanleeuwen.nl/faq/?p=748

How To Enable Telnet In Windows Server 2008

Telnet Client allows a computer to connect to a remote Telnet server and run applications on that server. Once logged on, a user is given a command prompt that can be used as if it had been opened locally on the Telnet server’s console. Commands that you type at the Telnet client command prompt are sent to the Telnet Server and executed there, as though you were locally logged on to a command prompt session at the server. Output from the commands that you run are sent back to the Telnet client where they are displayed for you to view. 

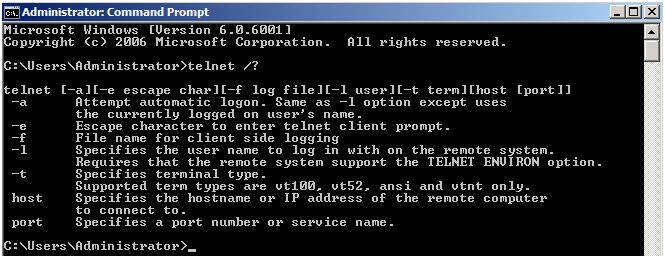
When you first try to run a telnet command, Windows will informs you that telnet is not recognized as a command  


 To enable Telnet on Windows Server 2008 follow these steps :

  1. Open Server Manager, click Start  > Server Manager
  2. From the left panel in Server Manager, click on Features
  3. Click on Add Features
  4. From the available list of features, scroll down and select Telnet Client, then click Next
  5. On the Confirmation page, click on Install
  6. Installation of the selected feature will be initialized and started
  7. Once installation is completed, click on Close
  8. Now open Command Prompt, and run the telnet command

As you can see, Telnet is now recognized by Windows Server 2008 and you can start using it to connect to your telnet servers.

Configuring SNMP Traps for ESX 3.5 and ESX 4.0

Details

To generate virtual machine and environmental traps from ESX 3.5 and ESX 4.0 hosts, you must configure and enable the embedded SNMP agent. You cannot use the Net-SNMP-based agent to generate these traps, although it can receive GET transactions and generate other types of traps.
 
This represents a change in behavior from ESX 3.0.x, in which the configuration file for the Net-SNMP-based agent controlled the generation of virtual machine traps. For more information, see Configuring SNMP on an ESX 3.0.x host (1008186).

Solution

Use the vicfg-snmp command from the Remote CLI or vSphere CLI to enable this SNMP agent and configure trap destinations. Each time you specify a target with the vicfg-snmp command, the settings you specify overwrite all previously specified settings. To specify multiple targets, specify them in a single command, separated by commas.

To enable and configure SNMP traps:
 
Note: For ESX 3.5, use the Remote CLI. For ESX 4.0, use the vSphere CLI. The commands for both are same.  vicfg-snmp.pl is located in the C:\Program Files\VMware\VMware vSphere CLI\bin directory after the VMware vSphere CLI installation, by default.
 
  1. Specify the communities and trap targets with the command:

    vicfg-snmp.pl –server <hostname> –username <username> –password <password> -t <target hostname>@<port>/<community>

    Note: Under ESX 4.0, you may need to use the -c <community> flag.

    For example, to send SNMP traps from the host host.example.com to port 162 on target.example.com using the public community, use the command:

    vicfg-snmp.pl –server host.example.com –username root –password password -t target.example.com@162/public
     

  2. To enable the SNMP service, run the command:

    vicfg-snmp.pl –server <hostname> –username <username> –password <password> –enable
     

  3. (Optional) Send a test trap to verify that the agent is configured correctly with the command:

    vicfg-snmp.pl –server <hostname> –username <username> –password <password> –test

The test trap generated is a warmStart trap.

source: http://kb.vmware.com/kb/1008065

Using Tech Support Mode in ESXi 4.1

Enable the Tech Support Mode in ESXi 4.1

http://kb.vmware.com/kb/1017910

Enabling and Accessing Tech Support Mode

To enable local or remote TSM from the Direct Console User Interface (DCUI):
  1. At the DCUI of the ESXi host, press F2 and provide credentials when prompted.
  2. Scroll to Troubleshooting Options, and press Enter.
  3. If you want to enable local TSM, select Local Tech Support and press Enter once. This allows users to login on the virtual console of the ESXi host.

    If you want to enable remote TSM, select Remote Tech Support (SSH) and press Enter once. This allows users to login via SSH on the virtual console of the ESXi host.

  4. Optionally, if you want to configure the timeout for TSM:
    1. Select Modify Tech Support timeout and press Enter.
    2. Enter the desired timeout value in minutes and press Enter.
  5. Press Esc three times to return to the main DCUI screen.
To enable local or remote TSM from the vSphere Client:
  1. Select the host and click the Configuration tab.
  2. Click Security profile > Properties.
  3. Click Local Tech Support or Remote Tech Support (SSH) and click Options.
  4. Choose the desired startup policy and click Start, then click OK.
  5. Verify that the daemon selected in step 3 shows as running in the Services Properties window.
To configure the TSM timeout value using the vSphere Client:
  1. Select the host and click the Configuration tab.
  2. Click Advanced Settings.
  3. Change the UserVars.TSMTimeOut field to the desired value in minutes.
  4. Click OK.
To access the local TSM:
  1. At the main DCUI screen, press ALT+F1 simultaneously. This opens a virtual console window to the host.
  2. Provide credentials when prompted.

    Note: When typing the password, characters are not displayed on the console.

To access the remote TSM:
  1. Open an SSH client.
  2. Specify the IP address or domain name of the ESX host.

    Notes:

    • Directions may vary depending on what SSH client you are using. For more information, consult vendor documentation and support.
    • By default, SSH works on TCP port 22.
  3. Provide credentials when prompted.

MsSQL: Database in restoring state

When a MsSQL database has a mirror and something goes wrong, the database can end up in a restoring state. To force a recover of the database use the following command:

  • restore database <database> with recovery

This will make the database go on line.

To delete the database, use the following command:

  • drop database <db>

This command will remove the database and database files.

MsSQL: Move tempdb

When you need to move a database in MsSQL -in this case the tempdb- you can use two scripts:

use tempdb
go
sp_helpfile
go


When running this script, it will show the location of the tempdb database

This script is usefull to determine the file location of the databases. After relocating the database, these files can be removed.

With the following script, you can move the tempdb database to another location:

use master
go
Alter database tempdb modify file (name = tempdev, filename = 'E:\MSSQL\DATA\tempdb.mdf')
go
Alter database tempdb modify file (name = templog, filename = 'F:\MSSQL\DATA\templog.ldf')
go

After this script is run, the SQL services need to be restarted and the old files can be removed.

VB Script: DiskSpace Monitoring

When i needed a script to check multiple servers for disk usage, i found this script: http://gallery.technet.microsoft.com/ScriptCenter/en-us/cc8176ab-348b-4152-b9a3-25b6ad950d3e

Download it here: [wpdm_file id=”17″], or see the code:

'******************************************************************************
'* Provides data from disks from a list of servers (servers.txt)              *
'* Created by Nag Pal and Modify by Martin Scaine                             *
'* The original script don't manage error,                                    *
'* so if you can't connect to a server it will repeat the data from last.     *
'* Also I include the date on the name of the report file and on it header.   *
'* It can be usefull if you need to check it every day                        *
'******************************************************************************

On Error Resume Next
Const ForAppending = 8
Const HARD_DISK = 3
Const ForReading = 1

'Var declaration
dtmDay = Day(Date)
dtmMonth = Month(Date)
dtmYear = Year(Date)
dtmDate = CDate(dtmYear & "-" & dtmMonth & "-" & dtmDay)

Set objFSO = CreateObject("Scripting.FileSystemObject")

'Open the server list
Set SrvList = objFSO.OpenTextFile("Servers.txt", ForReading)

'Create a result file
If dtmday < 10 and dtmMonth >9 then
Set ReportFile = objFSO.OpenTextFile ("Srv_Disk_Space_" & dtmYear & "-" & dtmMonth & "-0" & dtmDay & ".html", ForAppending, True)
End If
If dtmday > 9 and dtmMonth < 10 then
Set ReportFile = objFSO.OpenTextFile ("Srv_Disk_Space_" & dtmYear & "-0" & dtmMonth & "-" & dtmDay & ".html", ForAppending, True)
End If
If dtmday < 10 and dtmMonth < 10 then Set ReportFile = objFSO.OpenTextFile ("Srv_Disk_Space_" & dtmYear & "-0" & dtmMonth & "-0" & dtmDay & ".html", ForAppending, True) End If If dtmday > 9 and dtmMonth >9 then
Set ReportFile = objFSO.OpenTextFile ("Srv_Disk_Space_" & dtmYear & "-" & dtmMonth & "-" & dtmDay & ".html", ForAppending, True)
End If
i = 0

'Inicializar HTML
ReportFile.writeline("")
ReportFile.writeline("
-->")
ReportFile.writeline("")

ReportFile.writeline("

“) ReportFile.writeline(“”) ReportFile.writeline(” “) ReportFile.writeline(” “) ReportFile.writeline(”

“) ReportFile.writeline(“Server Space Disk Report ” & dtmdate & ““) ReportFile.writeline(“
")

'Server name declaration
Do Until SrvList.AtEndOfStream
	StrComputer = SrvList.Readline

	Set objWMIService = GetObject("winmgmts:\\" & strComputer & "\root\cimv2")
	Set colDisks = objWMIService.ExecQuery("Select * from Win32_LogicalDisk Where DriveType = " & HARD_DISK & "")

	If Err.Number <> 0 Then
		ReportFile.writeline("

“) ReportFile.writeline(“”) ReportFile.writeline(” “) ReportFile.writeline(” “) Err.Clear Else ReportFile.writeline(”

Error – ” & StrComputer & ” – Error

“) ReportFile.writeline(“”) ReportFile.writeline(” “) ReportFile.writeline(” “) ReportFile.writeline(“”) ReportFile.writeline(” “) ReportFile.writeline(” “) ReportFile.writeline(” “) ReportFile.writeline(” “) ReportFile.writeline(” “) ReportFile.writeline(” “) ‘Data recolection For Each objDisk in colDisks ‘Var init TotSpace=0 FrSpace=0 FrPercent=0 UsSpace=0 Drv=”Error” VolName=”Error” ‘Var charge TotSpace=Round(((objDisk.Size)/1073741824),2) FrSpace=Round(objDisk.FreeSpace/1073741824,2) FrPercent=Round((FrSpace / TotSpace)*100,0) UsSpace=Round((TotSpace – FrSpace),2) Drv=objDisk.DeviceID VolName=objDisk.DeviceID ‘Lnt=Len(VolName) ‘If Len(VolName) = 3 then If FrPercent > 20 Then ReportFile.WriteLine ” ” ElseIf FrPercent < 10 Then ReportFile.WriteLine ” ” Else ReportFile.WriteLine ” ” End If ‘Else ‘End If Next End If ReportFile.writeline(“”) ReportFile.writeline(” “) ReportFile.writeline(” “) ReportFile.writeline(”

” & StrComputer & “
Drive / Mount Total Capacity (in GB) Used Capacity (in GB) Free Space (in GB) Freespace %
” & Drv & “ ” & TotSpace & “ ” & UsSpace & “ ” & FrSpace & “ ” & FrPercent & “%” &”
")
Loop
ReportFile.WriteLine ""

How-to install the Schemus tool

Obtaining a license key for Mail Synchronization:

  1. Select Configuration > Email Services > Platform > Tools.
  2. In the Synchronization Interface Activation area, click the Request key button.
  3. Enter your name and check the email address to receive the key.
  4. Select the checkbox according to the synchronization type you wish to use.
  5. Click OK.


Downloading the Synchronization Tool for Mail Synchronization:

  1. Select Configuration > Email Services > Platform > Tools
  2. Download the Disclosure Agreement by clicking the attached statement link.
  3. Email the Disclosure Agreement to [email protected].
    You will be sent an email containing credentials and a URL to the site from which you can download the Synchronization Tool. Before downloading the Synchronization Tool, you must request a license key (see Obtaining a license key for Mail Synchronization).


Installing the Synchronization Tool

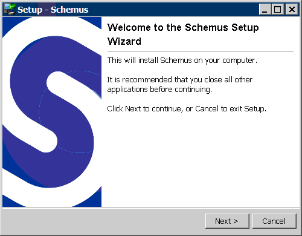
  1. Run the installer
  2. Click Next.
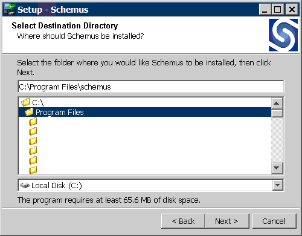
    In the license agreement window, read the agreement and if your company is in agreement with the conditions, click the I accept the agreement option button, and then click Next. The installation location window is displayed.
  3. Select the directory in which to install the Synchronization Tool, for example, C:\Program Files\schemus. Click Next.
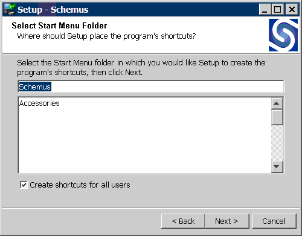
    Select where to launch Schemus from.
  4. Click Next. The installation starts.
    Once the copying of files has completed, the installer displays any release notes and change logs. The release notes contain any additional information that has been introduced since this guide was written. Additional features and bug fixes appear in this list as well as the history of changes.
  5. Click Next to move to the end of the installer
  6. Click Finish to quit the installer.

Bluetooth USB device not recognized

When adding a Bluetooth dongle i got the message : “Found New Hardware: ISSCEDRBTA”

But when Windows XP is trying to install it, it can not find any drivers for it. Here is a way to make it recognized and install the bluetooth drivers for it:

  1. Go to Device Manager and find the “unknown” USB Device. It has a question mark icon.
  2. Double-click to raise the properties window and go to Details tab.
  3. Select the Device Instance Id and identify the VID and PID (vendor and product IDs). For me was VID_1131 and PID_1004
  4. Open the file %windir%/inf/bth.inf for editing.
  5. Add a new device using your own VID and PID within the section Cambridge.NT.5.1 as shown in the file extract below:
    [Cambridge.NT]
    Generic Bluetooth Radio=                                         BthUsb, USB\Vid_0a12&Pid_0001
    CSR Nanosira=                                                        BthUsb, USB\Vid_0a12&Pid_0003
    CSR Nanosira WHQL Reference Radio=                     BthUsb, USB\Vid_0a12&Pid_0004
    CSR Nanosira-Multimedia=                                       BthUsb, USB\Vid_0a12&Pid_0005
    CSR Nanosira-Multimedia WHQL Reference Radio=    BthUsb, USB\Vid_0a12&Pid_0006
    Cambridge Generic Radio=                                      BthUsb, USB\Vid_1131&Pid_1004