Error while installing SQL Server 2005 – Native Client cannot be found

When installing from the original disc’s of Microsoft SQL, the following error occured:

“An installation package for the product Microsoft SQL Server Native
Client cannot be found. Try the installation again using a valid copy of
the installation package ‘sqlncli.msi’”

To resolve this, use the add/Remove programs to deinstall the existing SQL Server Native Client installation.

After deinstalling this package, run the setup again and the problem is fixed.

Windows Live Mesh behind Proxy

Run Netsh Commands for WINHTTP to set proxy?
http://technet.microsoft.com/en-us/library/cc731131(WS.10).aspx

  1. client Start. In the search box, type
    Command, and then right-click on Command
    Prompt
    -> Run as Administrator
  2. in the Command prompt,
  3. type netsh winhttp set proxy myproxy (where
    myproxy should be your proxy server)
    and
    Enter OR type netsh winhttp import proxy source=ie and Enter
    (if you can browser Internet using IE without issue)
  4. click Start. In the search box, type
    Services, and then click Services
  5. find “Windows Live ID Sign-in Assistant” service
    and make sure it is running
  6. if not, make sure its “Startup Type” is set to “Automatic”, and start the
    service manually by right-click -> “Start
  7. find “WinHTTP Web Proxy Auto-Discovery Service
  8. right click on it -> All Tasks -> Restart
  9. run Mesh

What is the USC?

The Dell™ Unified Server Configurator is a pre-installed configuration utility that enables systems and storage management tasks from an embedded environment throughout the server’s lifecycle.

Residing on an embedded flash memory card on the system board of supported servers, the Unified Server Configurator is similar to a BIOS utility in that it can be started during the POST (Power On Self Test) sequence and functions independently of the operating system (OS).

Using the Unified Server Configurator, you can quickly identify, download, and apply system updates without needing to search the Dell support site (support.dell.com). You can also deploy an OS with drivers (the USC stores Operating System drivers contained within a driver pack), configure a Redundant Array of Independent Disks (RAID), and run 32 -bit diagnostics to validate the system and attached hardware.

NOTE:
Certain platforms or servers may not support the full set of features provided by the Unified Server Configurator.

Starting the Unified Server Configurator

To start the Unified Server Configurator, press the <F10> key within 10 seconds of the Dell logo being displayed during the system boot process.

The first time you boot the system, the Unified Server Configurator starts with the User Settings wizard displayed so that you can configure your preferred language and network settings.


USC and Diagnostics

Dell has built into the Unified Server Configurator the ability to launch the system DMRK diagnostics.

CE TIP:
Learning about how the USC can be used to launch and utilize the DRMK diagnostics can be an advantage for you when addressing customer issues. Especially those that require diagnostics to be performed to identify the problem, as the diagnostics will always be on the system board, and there is no need to download them from support.dell.com, as long as the USC on the system is viable and functioning.

When launching the DRMK diagnostics please keep in mind the following:

  • The BIOS provides “thunking” mechanism to allow DRMK DOS to run the tools.
  • When the Diagnostics are complete a reboot of the system is required, sometime after initial launch a reboot will not be required.

The process below illustrates how to launch these diagnostics from the USC.

Platform Update Using FTP Repository
1. To perfom the following procedure you need the following.1.     A server booted into the Unified Server Configurator, F10 on P.O.S.T.
2. Select the Diagnostics option from the left menu of the Unified Server Configurator.
3. On the next screen of the USC Diagnostics Launching Wizard, you will see a single option for Run Diagnostics, select this option.
4. You will now see a screen saying the system is “Loading DRMK V8.00,” indicating the system is loading the diagnostic files.
5. The DMRK diagnostics is now loaded, from here the diagnostics is identical in form and function when compared to the media loaded diags.

Platform Update using FTP Repository

With the Unified Server Configurator Dell has provided the ability to update the USC platform, OS driver pack and system diagnostics using an FTP repository. By default the repository would be ftp.dell.com, but customers can create there own FTP repository and point to it for updates. The image below provides a high level overview of how the Platform Update works using an FTP repository.

The process below explains how to initiate a platform update using an FTP repository, like ftp.dell.com.

Platform Update Using FTP Repository
1. To perform the following procedure you need the following.

  1. A server booted into the Unified Server Configurator, F10 on P.O.S.T.
  2. One of the NICs on the server must be connected, and have properly configured access to the internet to gain access to ftp.dell.com.
2. Select the Platform Update option from the left menu of the Unified Server Configurator.
3. On the next screen of the Platform Update Wizard, you will see a single option for Launch Platform Update, select this option.
4. This next screen select an FTP server or USB Key containing the Platform Update Repository files. Select FTP Server, and configure the FTP server address, proxy server information proxy port, proxy type, proxy user name and proxy user password information. Once all the information is populated click the next button to continue.
5. The next screen in the platform updates wizard allows the user to select the available updates on the repository. Notice that this page shows the current version diagnostics, OS Drivers Pack and the USC platform version as well as the versions to be updated to during the update process.
6. Once the user sees this screen, the system is now performing the Platform Updates.
7. Once the system completes each task for the update, the system will now reboot. You will notice on P.O.S.T. that the system will state it is entering system services, this is the normal and expected behavior.

8. Once the system gets to the welcome screen of the USC after the first reboot, it will reboot again. However, upon the second reboot it will default to the normal boot process, as configured in the system BIOS.

!!It is very important that you update the USC itself!!

Download this as a document: [wpdm_file id=”23″]

You may see “Media is Write Protected” Error or VDS error 80070013 after bringing SAN disk online via Diskpart in Windows Server 2008

When a LUN is presented from a SAN to Windows Server 2008, the following error may pop up and Event ID: 10 may be logged in the Event log when trying to use the disk for the first time.

Error Message:

“The Media is Write Protected

System Event Log:

Log Name: System

Source: Virtual Disk Service

Date:

Event ID: 10

Task Category: None

Level: Error

Keywords: Classic

User: N/A

Description:

VDS fails to write boot code on a disk during clean operation. Error code:

80070013@02070008

In Windows Server 2008 there is a policy new to Windows related to SAN disks. This “SAN policy” determines whether a newly discovered disk is brought online or remains offline, and whether it is made read/write or remains read-only.

On Windows Server 2008 Enterprise and Windows Server 2008 Datacenter, the default SAN policy is VDS_SP_OFFLINE_SHARED. On all other Windows Server 2008 editions, the default SAN policy is VDS_SP_ONLINE.

SAN Policies:

VDS_SP_ONLINE: All newly discovered disks are brought online and made read-write.

VDS_SP_OFFLINE_SHARED: All newly discovered disks that do not reside on a shared bus are brought online and made read-write.

VDS_SP_OFFLINE: All newly discovered disks remain offline and read-only.

If the policy is such that newly discovered disks are set to offline and readonly, then the administrator can use DiskPart at the command line or Diskmanagement from Server Manager\storage to prepare the disks for use.

When using the diskmanagement snap in to Online a disk, the new disk will be set to online and read-write. When using DiskPart, only those flags you specify will be changed. Thus if you issue the command to bring a disk online, it will only be put into online state. You must issue a separate command to make the disk read/write. In this way, Diskpart allows you to have finer control than Disk Management.

Using diskpart to online a disk does not change the read only attribute. This needs to be done manually using the following steps:

1. Run DiskPart

2. List and select the disk that needs to be made available.

LIST DISK

SELECT DISK )

3. If the disk is offline, bring it online by running ONLINE DISK

4. View the attributes by running DETAIL DISK

The command DETAIL DISK may give an output similar to the following

DISKPART> detail disk

Disk ID: ########

Type :

Bus : #

Target : #

LUN ID : #

Read-only : Yes

Boot Disk : No

Pagefile Disk : No

Hibernation File Disk : No

Crashdump Disk : No

5. To clear the read only flag, run ATTRIBUTE DISK CLEAR READONLY

6. Exit DiskPart

You should now be able to write to the disk.

Link; http://support.microsoft.com/default.aspx?scid=kb;EN-US;971436

Windows 2008 Multipath I/O Overview

Adding and removing MPIO support
To install Multipath I/O on a computer running Windows Server 2008, complete the following steps.

To install Multipath I/O
1.Open Server Manager.

To open Server Manager, click Start, point to Administrative Tools, and then click Server Manager.

2.In the Features area, click Add Features.

3.On the Select Features page of the Add Features Wizard, select Multipath I/O, and then click Next.

4.On the Confirm Installation Selections page, click Install.

5.When installation has completed, click Close.

Source: http://technet.microsoft.com/en-us/library/cc725907.aspx
Documentation: [wpdm_file id=”18″]

How-to install the Schemus tool

Obtaining a license key for Mail Synchronization:

  1. Select Configuration > Email Services > Platform > Tools.
  2. In the Synchronization Interface Activation area, click the Request key button.
  3. Enter your name and check the email address to receive the key.
  4. Select the checkbox according to the synchronization type you wish to use.
  5. Click OK.


Downloading the Synchronization Tool for Mail Synchronization:

  1. Select Configuration > Email Services > Platform > Tools
  2. Download the Disclosure Agreement by clicking the attached statement link.
  3. Email the Disclosure Agreement to [email protected].
    You will be sent an email containing credentials and a URL to the site from which you can download the Synchronization Tool. Before downloading the Synchronization Tool, you must request a license key (see Obtaining a license key for Mail Synchronization).


Installing the Synchronization Tool

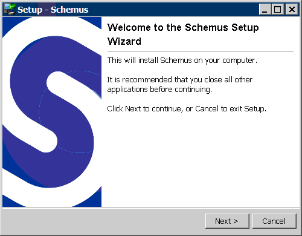
  1. Run the installer
  2. Click Next.
    In the license agreement window, read the agreement and if your company is in agreement with the conditions, click the I accept the agreement option button, and then click Next. The installation location window is displayed.
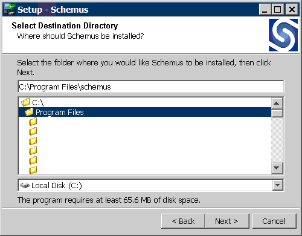
  3. Select the directory in which to install the Synchronization Tool, for example, C:\Program Files\schemus. Click Next.
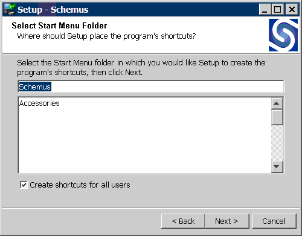
    Select where to launch Schemus from.
  4. Click Next. The installation starts.
    Once the copying of files has completed, the installer displays any release notes and change logs. The release notes contain any additional information that has been introduced since this guide was written. Additional features and bug fixes appear in this list as well as the history of changes.
  5. Click Next to move to the end of the installer
  6. Click Finish to quit the installer.

Bluetooth USB device not recognized

When adding a Bluetooth dongle i got the message : “Found New Hardware: ISSCEDRBTA”

But when Windows XP is trying to install it, it can not find any drivers for it. Here is a way to make it recognized and install the bluetooth drivers for it:

  1. Go to Device Manager and find the “unknown” USB Device. It has a question mark icon.
  2. Double-click to raise the properties window and go to Details tab.
  3. Select the Device Instance Id and identify the VID and PID (vendor and product IDs). For me was VID_1131 and PID_1004
  4. Open the file %windir%/inf/bth.inf for editing.
  5. Add a new device using your own VID and PID within the section Cambridge.NT.5.1 as shown in the file extract below:
    [Cambridge.NT]
    Generic Bluetooth Radio=                                         BthUsb, USB\Vid_0a12&Pid_0001
    CSR Nanosira=                                                        BthUsb, USB\Vid_0a12&Pid_0003
    CSR Nanosira WHQL Reference Radio=                     BthUsb, USB\Vid_0a12&Pid_0004
    CSR Nanosira-Multimedia=                                       BthUsb, USB\Vid_0a12&Pid_0005
    CSR Nanosira-Multimedia WHQL Reference Radio=    BthUsb, USB\Vid_0a12&Pid_0006
    Cambridge Generic Radio=                                      BthUsb, USB\Vid_1131&Pid_1004