Administer WID instance with SQL Server Management Studio

Windows Server Update Services (WSUS) can use a Windows Internal Database (WID). This database is manged through WSUS, but occasionally you want to administer this with SQL Server Management Studio.

Install SQL Server Management Studion (Express) on the server where WSUS has been installed. Then connect to the WID database by using the following server name:

2008R2:
\\.\pipe\MSSQL$MICROSOFT##SSEE\sql\query
2012R2: 
\\.\pipe\MICROSOFT##WID\tsql\query 

Now you can administer the instance.

If you prefer to administer the database from CLI, you can install the SQL Server Command Line Query Utility – SQLCMD.

To connec to to the database instance, run the sqlcmd utility by passing the instance name. If the database is set in single user mode you can change this by running the following commands:

Windows Server 2012R2:
Open Command Prompt with Administrator Rights
sqlcmd -S np:\\.\pipe\MICROSOFT##WID\tsql\query
alter database susdb
set multi_user
go 

or

Windows Server 2008R2:
sqlcmd -S np:\\.\pipe\MSSQL$MICROSOFT##SSEE\sql\query
alter database susdb
set multi_user
go 

Please Note. It is possible to administer WID instances this way, but it is not recommended. Changes to the WID instance can break the product or changes can be overwritten by updates of the products.

MsSQL – Backup all SQL Server Databases

source: https://www.mssqltips.com/sqlservertip/1070/simple-script-to-backup-all-sql-server-databases/

Change @Path for the location of the backups.

DECLARE @name VARCHAR(50) — database name 
DECLARE @path VARCHAR(256) — path for backup files 
DECLARE @fileName VARCHAR(256) — filename for backup 
DECLARE @fileDate VARCHAR(20) — used for file name
 
— specify database backup directory
SET @path = ‘C:\Backup\’ 
 
— specify filename format
SELECT @fileDate = CONVERT(VARCHAR(20),GETDATE(),112)
 
— specify filename format Including Time
— SELECT @fileDate = CONVERT(VARCHAR(20),GETDATE(),112) + ‘_’ + REPLACE(CONVERT(VARCHAR(20),GETDATE(),108),’:’,”)
 
DECLARE db_cursor CURSOR READ_ONLY FOR 
SELECT name
FROM master.sys.databases
WHERE name NOT IN (‘master’,’model’,’msdb’,’tempdb’)  — exclude these databases
AND state = 0 — database is online
AND is_in_standby = 0 — database is not read only for log shipping
 
OPEN db_cursor  
FETCH NEXT FROM db_cursor INTO @name  
 
WHILE @@FETCH_STATUS = 0  
BEGIN  
   SET @fileName = @path + @name + ‘_’ + @fileDate + ‘.BAK’ 
   BACKUP DATABASE @name TO DISK = @fileName 
 WITH STATS, COMPRESSION, COPY_ONLY
   FETCH NEXT FROM db_cursor INTO @name  
END  
 
 
CLOSE db_cursor  
DEALLOCATE db_cursor

MsSQL Backup a Database

Use the following query to backup a MsSQL database. Fill in the correct database name (@name) and backup location (@path).

This script uses the date for the filename, so if multiple backups are needed on the same day make sure to add some remarks to it (@filename).

Also a COPY_ONLY object is used, so this will not interfere with the normal backup job.


— Declare variables
DECLARE @fileName VARCHAR(256) — filename for backup  
DECLARE @path VARCHAR(256) — path for backup files  
DECLARE @name VARCHAR(50) — database name  
DECLARE @fileDate VARCHAR(20) — used for file name
— specify database name
SET @name = ‘databasename’
— specify database backup directory
SET @path = ‘backup location’
— specify filename format
SELECT @fileDate = CONVERT(VARCHAR(20),GETDATE(),112)
SET @fileName = @path + @fileDate + ‘-‘ + @name + ‘.BAK’
— start backup of the database
BACKUP DATABASE @name TO DISK = @fileName WITH STATS, COMPRESSION, COPY_ONLY

Last Logon Date AD Users

source: https://gallery.technet.microsoft.com/scriptcenter/Get-Last-Logon-for-Users-c8e3eab2

The “lastLogon” Active Directory attribute is a property that is not replicated throughout the Domain Controllers.  This attribute is stored on the domain controller that received the authentication request and updated its property accordingly.  Because of this behavior, you have have experienced issues where Domain Controllers in other sites have old or empty lastLogon information.  This makes it difficult to be sure an account is truly inactive without verifying on each Domain Controller.  This can be a problem for environments that have tens or hundreds of Domain Controllers across its enterprise.

I was faced with a problem of writing a script, and like many, developed a seemingly simple solution.  The problem was the runtime was very long for the amount of Domain Controllers / User accounts for the environment.  I sought out to find the solution to this exceedingly long runtime, and I finally did.

This PowerShell will query each of your Domain Controllers only once and produce the most recent logon date/time.

To protect the informaiton about my directory, lets say my environment is between 5 and 10 Domain Controllers, with between 15 – 25k user accounts.  My runtime is between 4-5 minutes for the entire directory!  Which is a far cry faster than the hours other methods produce.

By default, this script will return the entire directory ($Username=*) and save to a CSV ($FileName).  You may call the function with a -Username to return a single account, and this will output on screen instead of a file.

<########################################################################### 
    The purpose of this PowerShell script is to collect the last logon  
    for user accounts on each DC in the domain, evaluate, and return the 
    most recent logon value. 
 
        Author:   Jeremy Reeves 
        Modified: 02/14/2018 
        Notes:    Must have RSAT Tools if running on a workstation 
 
Note: Added enabled true/false to output
###########################################################################> 
 
 
Import-Module ActiveDirectory 
 
function Get-ADUsersLastLogon($Username="*") { 
 
    $FilePath_Prefix = "C:\temp\UserLastLogon-" 
 
    function Msg ($Txt="") { 
        Write-Host "$([DateTime]::Now)    $Txt" 
    } 
 
    #Cycle each DC and gather user account lastlogon attributes 
     
    $List = @() #Define Array 
    (Get-ADDomain).ReplicaDirectoryServers | Sort | % { 
 
        $DC = $_ 
        Msg "Reading $DC" 
        $List += Get-ADUser -Server $_ -Filter "samaccountname -like '$Username'" -Properties LastLogon | Select samaccountname,lastlogon,enabled,@{n='DC';e={$DC}} 
 
    } 
 
    Msg "Sorting for most recent lastlogon" 
     
    $LatestLogOn = @() #Define Array 
    $List | Group-Object -Property samaccountname | % { 
 
        $LatestLogOn += ($_.Group | Sort -prop lastlogon -Descending)[0] 
 
    } 
     
    $List.Clear() 
 
    if ($Username -eq "*") { #$Username variable was not set.    Running against all user accounts and exporting to a file. 
 
        $FileName = "$FilePath_Prefix$([DateTime]::Now.ToString("yyyyMMdd-HHmmss")).csv" 
         
        try { 
 
            $LatestLogOn | Select samaccountname, lastlogon, @{n='lastlogondatetime';e={[datetime]::FromFileTime($_.lastlogon)}}, Enabled, DC | Export-CSV -Path $FileName -NoTypeInformation -Force 
            Msg "Exported results. $FileName" 
 
        } catch { 
 
            Msg "Export Failed. $FileName" 
 
        } 
 
    } else { #$Username variable was set, and may refer to a single user account. 
 
        if ($LatestLogOn) { $LatestLogOn | Select samaccountname, @{n='lastlogon';e={[datetime]::FromFileTime($_.lastlogon)}}, Enabled, DC | FT } else { Msg "$Username not found." } 
 
    } 
 
    $LatestLogon.Clear() 
 
} 

Get Office 365 users with a specific license type via Powershell

It can sometimes be useful to get a list of Office 365 users with a specific license type via PowerShell. Instead of logging into the Office 365 portal and using a filtered view in the admin center, you can do it straight from the command line.

  • Connect to Office 365 via Powershell. If this cmdlet doesn’t work for you, follow this quick guide for instructions on installing the required PowerShell module.

Connect-MsolService

  • Run Get-MsolAccountSku to get a list of the current licenses in your Office 365 tenant. Make a note of the AccountSkuId value for the license you want to filter on.

Get-MsolAccountSku

Get-MsolAccountSku Information
  • Now you can edit this short script to get the users matching that license. In this case, we’re getting users with the EnterprisePremium license.

Get-MsolUser | Where-Object {($_.licenses).AccountSkuId -match "EnterprisePremium"}

Replace EnterprisePremium with the AccountSkuID you’re trying to filter by. Since we’re using the -match operator we don’t need to type the entire AccountSkuID, we can just type enough of it to ensure that we’re only retrieving that specific one.

The script can be tweaked for specific use

Get-MsolUser -MaxResults 100000 | Where-Object {($_.licenses).AccountSkuId -match "EnterprisePremium"} | ft UserPrincipalName, IsLicensed | Out-File c:\temp\E3.csv

Get-MsolUser With Specific Office 365 License

Export these users to a text document

You can export these users to a text document using the Out-File cmdlet.

Get-MsolUser | Where-Object {($_.licenses).AccountSkuId -match "EnterprisePremium"} | Out-file C:\temp\EnterprisePremiumUsers.csv

Source: https://gcits.com/knowledge-base/get-office-365-users-specific-license-type-via-powershell/

How to enable the Disk Cleanup tool on Windows Server 2008 R2

source: https://support.appliedi.net/kb/a110/how-to-enable-the-disk-cleanup-tool-on-windows-server-2008-r2.aspx

How to enable the Disk Cleanup tool:

1) Go to Programs & Features, and in the Features section, enable/install “Desktop Experience”.   The downside to this is that you will need to reboot your server after installing this and it installs other components you do not need on a server.

2) [RECOMMENDED] –  All you really need to do is copy some files that are already located on your server into specific system folders, as described at http://technet.microsoft.com/en-us/library/ff630161(WS.10).aspx

The location of the files you need to copy depend on your version of Windows:

Operating System Architecture File Location
Windows Server 2008 R2 64-bit C:\Windows\winsxs\amd64_microsoft-windows-cleanmgr_31bf3856ad364e35_6.1.7600.16385_none_c9392808773cd7da\cleanmgr.exe
Windows Server 2008 R2 64-bit C:\Windows\winsxs\amd64_microsoft-windows-cleanmgr.resources_31bf3856ad364e35_6.1.7600.16385_en-us_b9cb6194b257cc63\cleanmgr.exe.mui
Windows Server 2008 64-bit C:\Windows\winsxs\amd64_microsoft-windows-cleanmgr.resources_31bf3856ad364e35_6.0.6001.18000_en-us_b9f50b71510436f2\cleanmgr.exe.mui
Windows Server 2008 64-bit C:\Windows\winsxs\amd64_microsoft-windows-cleanmgr_31bf3856ad364e35_6.0.6001.18000_none_c962d1e515e94269\cleanmgr.exe.mui
Windows Server 2008 32-bit C:\Windows\winsxs\x86_microsoft-windows-cleanmgr.resources_31bf3856ad364e35_6.0.6001.18000_en-us_5dd66fed98a6c5bc\cleanmgr.exe.mui
Windows Server 2008 32-bit C:\Windows\winsxs\x86_microsoft-windows-cleanmgr_31bf3856ad364e35_6.0.6001.18000_none_6d4436615d8bd133\cleanmgr.exe

Windows Server 2012:

C:\Windows\WinSxS\amd64_microsoft-windows-cleanmgr_31bf3856ad364e35_6.2.9200.16384_none_c60dddc5e750072a\cleanmgr.exe
C:\Windows\WinSxS\amd64_microsoft-windows-cleanmgr.resources_31bf3856ad364e35_6.2.9200.16384_en-us_b6a01752226afbb3\cleanmgr.exe.mui

Windows Server 2012 R2:  must install Desktop Experience. Use Powershell command:
Install-WindowsFeature Desktop-Experience


Once you’ve located the files move them to the following locations (Server 2012 non-R2 and earlier):

  1. Copy Cleanmgr.exe to %systemroot%\System32.
  2. Copy Cleanmgr.exe.mui to %systemroot%\System32\en-US.

You can now launch the Disk cleanup tool by running Cleanmgr.exe from the command prompt.

If an old cleanup manager is used, windows update files will not be cleaned. For this you need Microsoft hotfix 2852386

Synching Microsoft NPS (RADIUS) servers

source: http://www.routereflector.com/2016/07/syncing-microsoft-nps-servers/

Use the following powershell script to sync microsoft NPS (radius) servers.

Export-NpsConfiguration -Path C:\TEMP\LocalNPSExportedConfig.xml

$CurrentServerNPS = $env:computername

$NPServers = Get-ADGroupMember "RAS and IAS Servers"
$NPServers | ForEach-Object {

	$NPServerName = $_.Name

	if ($NPServerName -ne $CurrentServerNPS) {
		$NPServerName
		copy-item Export-NpsConfiguration -Path  \\$NPServerName\C$\TEMP\LocalNPSExportedConfig.xml
		Invoke-Command -ComputerName $NPServerName -ScriptBlock {Export-NPSConfiguration -Path C:\TEMP\BackupNPSExportedConfig.xml
		Invoke-Command -ComputerName $NPServerName -ScriptBlock {Import-NPSConfiguration -Path C:\TEMP\LocalNPSExportedConfig.xml
	}
}


Failed To Open or Edit GPO

source: https://mohdzmaili.wordpress.com/2017/02/15/failed-to-open-or-edit-gpo/comment-page-1/#comment-30


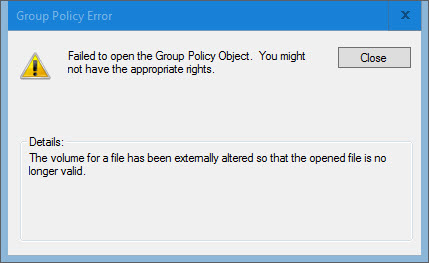
Group Policy Object cannot be opened or edited with the error: Failed to open Group Policy Object. You might not have the appropriate rights.

Details: The volume for a file has been externally altered so that the opened file is no longer valid.

gpo1

gpo2

Solution:

  • Get GPO GUID: from Group Policy Management Console (GPMC) –> choose GPO –> from right pane go to Details tab –> go to Unique ID field.
  • Open the path: C:\Windows\SYSVOL\sysvol\<Domain>\Policies\<GPO GUID>\User
  • Delete “registry.pol” file.

Note: if you have migrated SYSVOL replication type from FRS to DFSR, open the path:  C:\Windows\SYSVOL_DFSR\sysvol\<Domain>\Policies\<GPO GUID>\User

Resetting Administrator Password in Windows 2012

Instructions

To reset the password on your Windows 2012 server, simply complete the following steps:

  • Boot from the Micrsoft Windows Server 2012 DVD
  • From the Windows Setup menu, click “Next”.
  • Select “Repair your computer”
  • Under Choose and option, click on “Troubleshoot”.
  • Under Advanced options, click “Command Prompt”.
  • At the command prompt, run the following commands:
    d:
    cd windows\system32
    ren Utilman.exe Utilman.exe.old
    copy cmd.exe Utilman.exe
  • Close the command prompt and then click “Continue”.
  • The server should now boot and present the logon screen. Here click Windows Key + U.
  • At the prompt you can now change the password, by typing the following command:
    net user administrator Password123
    This will set the password for the Administrator user to be Password123 (case sensitive).

    If a new (adminstrator) user is needed, type the following commands:
    net user “OtherUser” Password123 /add
    net localgroup administrators “OtherUser” /add

Closing the command prompt, you should now be able to log back onto the server using the password you have provided in the last step.


Cleanup Steps

Once you have verified you can log on to the server you will have repeat the steps above and boot using the Windows Server 2008 DVD/ISO and run the command prompt again.

  • Restart your server and once again, boot from the Micrsoft Windows Server 2012 DVD
  • From the Windows Setup menu, click “Next”.
  • Select “Repair your computer”
  • Under Choose and option, click on “Troubleshoot”.
  • Under Advanced options, click “Command Prompt”.
  • At the command prompt, run the following commands:
    d:
    cd windows\system32
    ren utilman.exe utilman.exe.new
    copy utilman.exe.old utilman.exe
  • Close the command prompt and then click “Continue”.

You should be back up and running as if nothing ever happened.


source: http://www.kieranlane.com/2013/09/18/resetting-administrator-password-windows-2012/

Copy SQL server database role

source: http://stackoverflow.com/questions/6300740/how-to-script-sql-server-database-role


With the following script a script is generated which can be used to copy a SQL database role

declare @RoleName varchar(50) = 'RoleName'

declare @Script varchar(max) = 'CREATE ROLE ' + @RoleName + char(13)
select @script = @script + 'GRANT ' + prm.permission_name + ' ON ' + OBJECT_NAME(major_id) + ' TO ' + rol.name + char(13) COLLATE Latin1_General_CI_AS 
from sys.database_permissions prm
    join sys.database_principals rol on
        prm.grantee_principal_id = rol.principal_id
where rol.name = @RoleName

print @script