When SQL Analysis is installed, but there is no way to connect to it you probably installe only the basis management tools.
Rerun the installation and make sure the complete management tools are installed.
In the SQL Server 2008 setup you can now set the default backup location but in case you set it wrong or need to change it at later time the SSMS interface does not provide you with any options to do that. You can do the same thing as in 2005 …
Go to following key in Registry and put the new path in …
First we need to determine the instance Name; go to
[HKEY_LOCAL_MACHINE\Software\Microsoft\Microsoft SQL Server\Instance Names\SQL\]
Note down the value for the default instance usually MSSQL10.MSSQLSERVER (note they changed the naming convention of instance names from MSSQL.Instance# to MSSQL10.InstanceID which you enter in at install time).
Now go to …
[HKEY_LOCAL_MACHINE\Software\Microsoft\Microsoft SQL Server\MSSQL10.MSSQLSERVER\MSSQLServer\]
And change the value for BackupDirectory to the new value.
Now if you modify a Maintenance Plan it will grab the new value. You don’t need to restart server or services.
source: http://sqllearnings.blogspot.com/2009/03/default-backup-path-in-sql-2008.html
When installing from the original disc’s of Microsoft SQL, the following error occured:
“An installation package for the product Microsoft SQL Server Native
Client cannot be found. Try the installation again using a valid copy of
the installation package ‘sqlncli.msi’”
To resolve this, use the add/Remove programs to deinstall the existing SQL Server Native Client installation.
After deinstalling this package, run the setup again and the problem is fixed.
A good article about migrating to SQL 2008 R2
http://technet.microsoft.com/en-us/magazine/gg454217.aspx
When a MsSQL database has a mirror and something goes wrong, the database can end up in a restoring state. To force a recover of the database use the following command:
This will make the database go on line.
To delete the database, use the following command:
This command will remove the database and database files.
When you need to move a database in MsSQL -in this case the tempdb- you can use two scripts:
use tempdb
go
sp_helpfile
go
When running this script, it will show the location of the tempdb database
This script is usefull to determine the file location of the databases. After relocating the database, these files can be removed.
With the following script, you can move the tempdb database to another location:
use master
go
Alter database tempdb modify file (name = tempdev, filename = 'E:\MSSQL\DATA\tempdb.mdf')
go
Alter database tempdb modify file (name = templog, filename = 'F:\MSSQL\DATA\templog.ldf')
go
After this script is run, the SQL services need to be restarted and the old files can be removed.
Use a MsSQL query to backup a database to a network share:
EXEC master.dbo.sp_configure 'show advanced options', 1
RECONFIGURE
EXEC master.dbo.sp_configure 'xp_cmdshell', 1
RECONFIGURE

exec master.dbo.xp_cmdshell 'net use Z: \\sharename password /user:user'
BACKUP DATABASE Staging TO DISK='Z:\database.bak'
EXEC master.dbo.xp_cmdshell 'net use /delete Z:'

EXEC master.dbo.sp_configure 'xp_cmdshell', 0
RECONFIGURE
EXEC master.dbo.sp_configure 'show advanced options', 0
RECONFIGURE
After installing an application, it could not access the local MsSQL 2005 Express Database. There was a message: Error : 40 – could not open a connection to SQL server.
After investigating that the tcp/ip protocol was enabled (http://support.microsoft.com/default.aspx?scid=kb;EN-US;914277) it appeared that the port 1433 needed to set up.
You can check the port by doing the following:
We will begin by opening SQL Server Management Studio from the Start Menu by choosing Start and typing SQL Server in the Instant Search field (Figure A) The SQL Server Management Studio appears (Figure B) and it will be the main area you use to restore your backups.
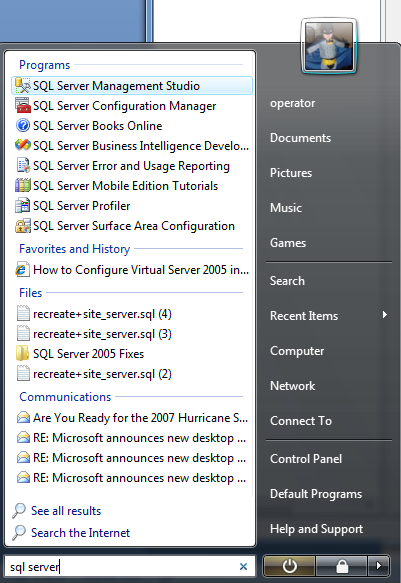
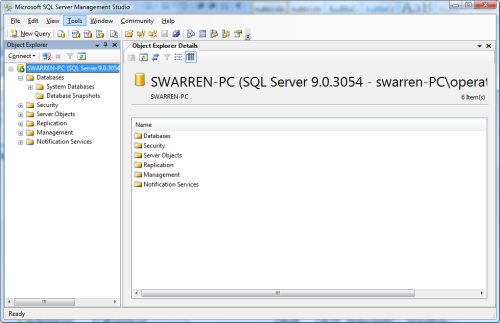
Note: I am going to assume that you already know how to backup a SQL Server database and that you have placed the backups on a file server or copied the backups to the new server. We will continue the tutorial from this point.
Now that you have the Management Studio opened, right-click on Databases and choose Restore Database (Figure C).
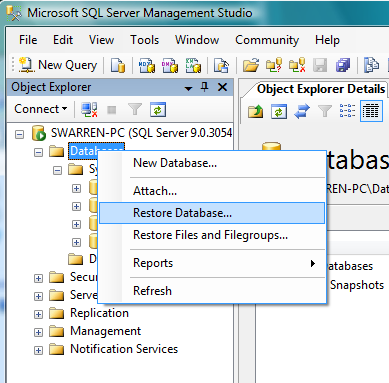
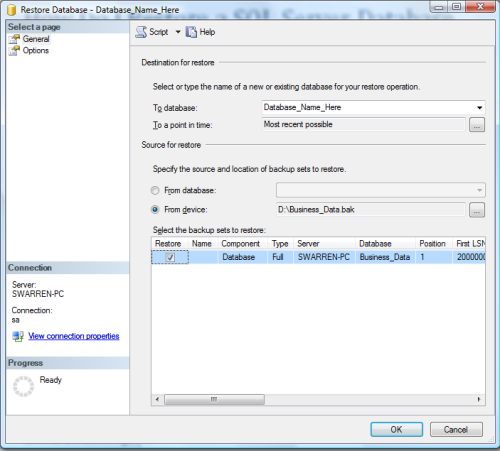
The Restore Database window appears and we will begin by typing the name of the Database we want to restore in the To Database field (Figure D) and choosing the From Device radio button to choose where your backup file is, shown in Figure E.
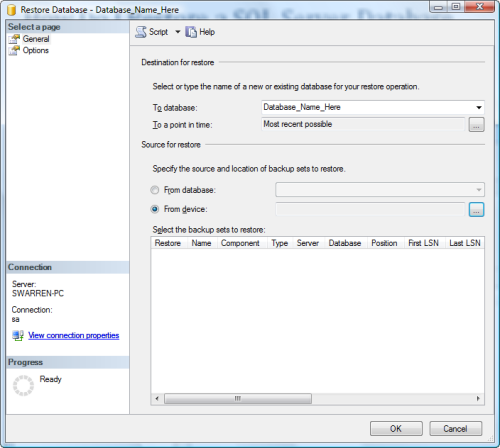
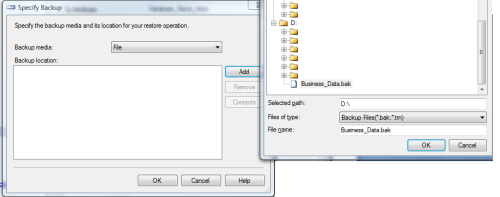
Your file now appears in the Select backups to restore text box. Place a check in the checkbox to continue as shown in Figure F.
You are now at the critical point of the restore where you choose Options from Select a Page. This is where you specify a new path for your database files. It is the same as the move option that will be discussed later in this tutorial. Simply type a new path to the database and log file (Figure G). For example, the current structure is the following:
C:\Program Files\Microsoft SQL Server\MSSQL.1\MSSQL\DATA\Database_Name_Here.mdfC:\Program Files\Microsoft SQL Server\MSSQL.1\MSSQL\DATA\Database_Name_Here_1.ldf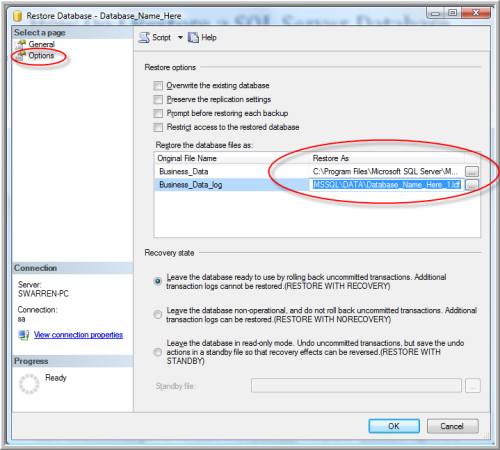
We want to move these database files to a new path. Simply type the new path (Figure H). For purposes of this tutorial, we will move it to the following:
D:\ SQL\DATA\Database_Name_Here.mdfD:\SQL\Logs\Database_Name_Here_1.ldf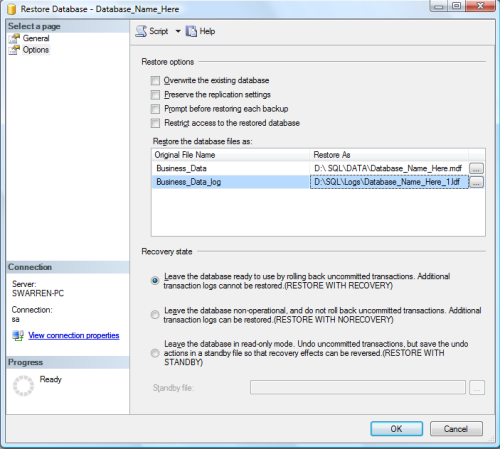
You are now ready to click OK and let the database be restored (Figure I).
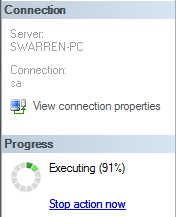
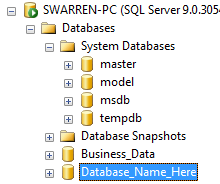
You have now successfully restored and moved the database files as shown in Figure J and Figure K.

Problem(Abstract)
SQL database restore back to the same SQL Server without overwriting the original database when using the Data Protection for SQL client
Resolving the problem
The Data Protection for SQL will allow for a restore to an alternate location on the same SQL Server.
When using the Data Protection (DP) for SQL to restore a database to an alternate location (into a new database) on the same machine, both the RELOCATE and the RESTORE INTO parameters must be used.
The RELOCATE is used to determine what file on the hard drive will be used to hold the data. This will need to be changed to have a different name and/or location to be something different (test) than the production database.
The RESTORE INTO is used by the SQL Server to identify the database. This should be a new name so that the SQL Server will be able to differentiate between the production database and this second (test) copy of the database.
To use the Data Protection for SQL GUI client, the following steps can be used for this alternate restore.
1. Launch the DP SQL GUI.
2. Click on the Restore Databases tab.
3. Make sure that both boxes are checked for the Wait for Tape Mounts (for both the Restore and for File Information).
4. Depending on which database backup is being restored, it may be necessary to check the Show Active and Inactive box.
5. On the left-hand side, under SQL Servers, open the list to see the SQL Server and databases.
6. In the main restore window, select the database to be restored ( the box next to the database should be yellow and have a red check mark).
7. Right click on this selected database and 3 options will be displayed: Restore Into, Relocate, Standby Server Undo File.
8. Both the Restore Into and Relocate options will need to be configured.
Select the Restore Into and enter the alternate name for this database on the SQL Server.
Then select the Relocate, wait for the dialog box to appear that contains the information regarding the file location/name for the database backup and update these to be different than the existing database files. If the metadata containing this information must wait for a tape mount on the TSM Server, it may be some amount of time until the dialog box is populated. It is not possible to update the Relocate information until after the box has been filled in with this File Information metadata.
9. Then click the Restore button to complete the restore.