Active Directory – How to display Bitlocker Recovery Key

source: http://www.alexandreviot.net/2015/06/10/active-directory-how-to-display-bitlocker-recovery-key/


Active Directory – How to display Bitlocker Recovery Key

When Bitlocker is enabled on workstation/ laptop in your entreprise, you must have a solution to get the recovery key of the hard drive. In some cases, Bitlocker can prompt to the user the Recovery key if it detects a specific behavior like partition changes.

The easiest solution is to use Active Directory Users And Computers console. This can only be possible if you set in the GPO to store Recovery Key into Active Directory.

With Active Directory Users And Computers, we can:

  • Display Bitlocker Recovery key for one computer.
  • Search in all Active Directory for a Password ID.
  • Delegate Rights to display confidential information.

Feature installation

Before searching your computer in Active Directory, you need to install a plugin to display Bitlocker Recovery Key information. It is integrated in features since Windows Server 2008.

To install Bitlocker Recovery Key feature:

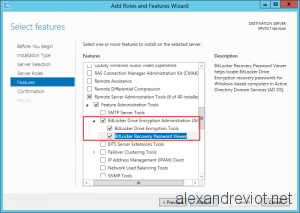
  • Go to Server Manager.
  • On Features Page select Remote Server Administration Tools.
  • Check Bitlocker Drive Encryption Administration Utility.
    • Check Bitlocker Drive Encryption Tools.
    • Bitlocker Recovery Password Viewer.

Bitlocker Recovery Key Feature

Bitlocker Recovery Key Feature

Computer Object

After the installation, just close and open Active Directory Users And Computers again.

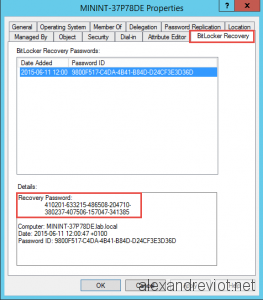
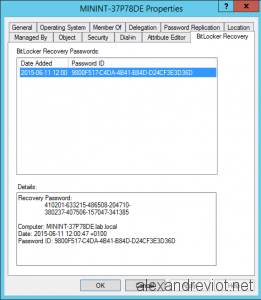
A new tab is now available on computer object:  Bitlocker Recovery with some information:

  • Recovery Key : this key must be given to the user if needed.
  • Computer name and date
  • Password ID:  User must give you this information. (First 8 digit)

Bitlocker Recovery Key Tab

Bitlocker Recovery Key Tab

Bitlocker Recovery Key Lookup Tool

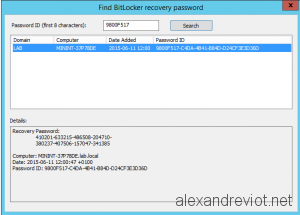
Sometime, you don’t have the computer name because the remote user doesn’t know it. You only have first 8 digit code. Don’t panic, there is a solution for that too. ?

We can search for 8 digit code in all computer objects:

  • Right click on your domain name.
  • Select Find Bitlocker Recovery Password.

Find Bitlocker Recovery Password

Find Bitlocker Recovery Password

  • Enter the first 8 digit and click Search. You will find the computer and the recovery key.

Bitlocker Find Recovery Key

Bitlocker Find Recovery Key

Delegation Rights

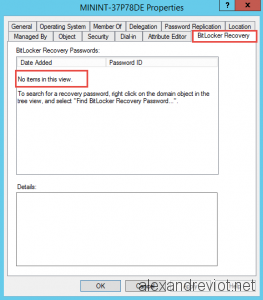
If a helpdesk team exists in your enterprise, you maybe want to give them the right to display this information. However, Recovery key is a confidential information and standard users can not view it.

Bitlocker Recovery Key Standard User

Bitlocker Recovery Key Standard User

We need to delegate some rights on the targeted OU to specific group.

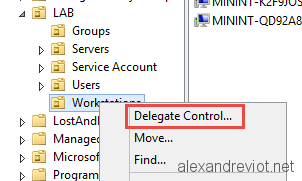
  • Right click on the targeted OU and select Delegate Control.

OU Delegate Control

OU Delegate Control

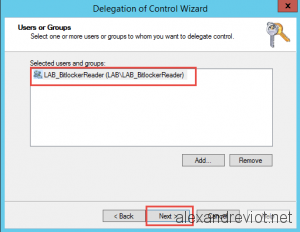
  • Add groups which need to view Recovery Key.

Delegate Group

Delegate Group

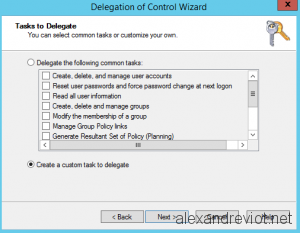
  • Select Create a custom task to delegate.

Custom task to delegate

Custom task to delegate

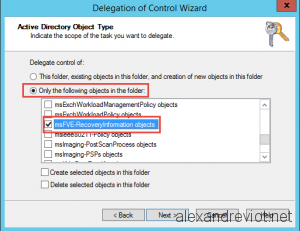
  • Choose Only the following object in the folder and check MSFVE-RecoveryInformation objects.

MSFVE-RecoveryInformation

MSFVE-RecoveryInformation

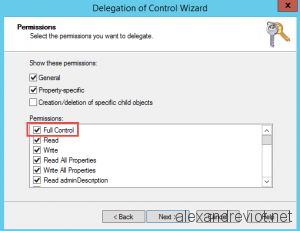
  • Give Full Control on this object.

Full Control Right

Full Control Right

  • Helpdesk user can now view Recovery information.

Recovery Key Granted user

Recovery Key Granted user

More

You can get more information about Bitlocker here.

Quickly list all mailboxes to which a particular user has access

From Vasil Michev

source: http://www.michev.info/Blog/Post/77/Quickly-list-all-mailboxes-to-which-a-particular-user-has-access


  • List all mailboxes to which a particular user has Full Access permissions:

PS C:\> Get-Mailbox | Get-MailboxPermission -User vasil

Identity             User                 AccessRights

——–             —-                 ————

HuKu                 Vasil Michev         {FullAccess}

retail               Vasil Michev         {FullAccess}

sharednew            Vasil Michev         {FullAccess}

testplan2            Vasil Michev         {FullAccess}

WC                   Vasil Michev         {FullAccess}

  • List all shared/user/room/whatever mailboxes to which particular user has Full Access permissions:

PS C:\> Get-Mailbox -RecipientTypeDetails UserMailbox,SharedMailbox -ResultSize Unlimited | Get-MailboxPermission -User vasil

Identity             User                 AccessRights

——–             —-                 ————

HuKu                 Vasil Michev         {FullAccess}

retail               Vasil Michev         {FullAccess}

sharednew            Vasil Michev         {FullAccess}

testplan2            Vasil Michev         {FullAccess}

  • List all mailboxes to which members of a particular security group have access:

PS C:\> Get-Mailbox | Get-MailboxPermission -User secgrp

Identity             User                 AccessRights

——–             —-                 ————

Bathroom             secgrp               {FullAccess}

  • List all mailboxes to which a user has Send As permissions:

PS C:\> Get-Mailbox | Get-RecipientPermission -Trustee vasil

Identity                            Trustee                             AccessControlType                   AccessRights

——–                            ——-                             —————–                   ————

sharednew                           Vasil Michev                        Allow                               {SendAs}

  • List all user mailboxes to which members of a particular security group have access:

PS C:\> Get-Mailbox -RecipientTypeDetails UserMailbox -ResultSize Unlimited | Get-RecipientPermission -Trustee secgrp

Identity                            Trustee                             AccessControlType                   AccessRights

——–                            ——-                             —————–                   ————

HuKu                                secgrp                              Allow                               {SendAs}

  •  List all mailboxes to which a particular security principal has Send on behalf of permissions:

PS C:\> Get-Mailbox | ? {$_.GrantSendOnBehalfTo -match “vasil”}

Name                      Alias                ServerName       ProhibitSendQuota

—-                      —–                ———-       —————–

Bathroom                  bathroom             amspr03mb084     49.5 GB (53,150,220,288 bytes)

WC                        WC                   dbxpr03mb096     9.5 GB (10,200,547,328 bytes)

Find Mailbox and Online Archive size

Script to connect to Office 365 and collect the last logged on date/time, mailbox size and item count for each mailbox and archive mailbox for every user within your organization.

The following script was specifically written for a client recently which I thought would be good to share with the wider community. This will connect to Office 365 and collect the last logged on date/time, mailbox size and item count for each mailbox and archive mailbox for every user within your organization.


Those users without an archive mailbox will be returned as ‘No Archive’


For more information about this script please see the source at: https://gallery.technet.microsoft.com/scriptcenter/Find-Mailbox-and-Archive-2859b540

$Office365Credentials = Get-Credential
$session = New-PSSession -ConfigurationName Microsoft.Exchange -ConnectionUri "https://ps.outlook.com/powershell/" -Credential $Office365Credentials -Authentication Basic -AllowRedirection
Import-PSSession $session
 
Write-Host "Gathering Stats, Please Wait.."
 
$Mailboxes = Get-Mailbox -ResultSize Unlimited | Select UserPrincipalName, identity, ArchiveStatus
 
$MailboxSizes = @()
 
foreach ($Mailbox in $Mailboxes) {
 
                $ObjProperties = New-Object PSObject
               
                $MailboxStats = Get-MailboxStatistics $Mailbox.UserPrincipalname | Select LastLogonTime, TotalItemSize, ItemCount
               
                Add-Member -InputObject $ObjProperties -MemberType NoteProperty -Name "UserPrincipalName" -Value $Mailbox.UserPrincipalName
                Add-Member -InputObject $ObjProperties -MemberType NoteProperty -Name "Last Logged In" -Value $MailboxStats.LastLogonTime
                Add-Member -InputObject $ObjProperties -MemberType NoteProperty -Name "Mailbox Size" -Value $MailboxStats.TotalItemSize
                Add-Member -InputObject $ObjProperties -MemberType NoteProperty -Name "Mailbox Item Count" -Value $MailboxStats.ItemCount
               
                if ($Mailbox.ArchiveStatus -eq "Active") {
               
                                $ArchiveStats = Get-MailboxStatistics $Mailbox.UserPrincipalname -Archive | Select TotalItemSize, ItemCount
                               
                                Add-Member -InputObject $ObjProperties -MemberType NoteProperty -Name "Archive Size" -Value $ArchiveStats.TotalItemSize
                                Add-Member -InputObject $ObjProperties -MemberType NoteProperty -Name "Archive Item Count" -Value $ArchiveStats.ItemCount
 
                }
                else {
               
                                Add-Member -InputObject $ObjProperties -MemberType NoteProperty -Name "Archive Size" -Value "No Archive"
                                Add-Member -InputObject $ObjProperties -MemberType NoteProperty -Name "Archive Item Count" -Value "No Archive"
                               
                }
               
                $MailboxSizes += $ObjProperties
 
}             
               
$MailboxSizes | Out-GridView -Title "Mailbox and Archive Sizes"
 
Get-PSSession | Remove-PSSession


Customizing the RDS title “Work Resources” using PowerShell on Windows Server 2012

See http://social.technet.microsoft.com/wiki/contents/articles/13451.customizing-the-rds-title-work-resources-using-powershell-on-windows-server-2012.aspx


If you are running multiple Connection Brokers in High Availability mode, you must run this against the active broker. You can use this command:

Set-RDWorkspace -Name “XYZ Applications” -ConnectionBroker (Get-RDConnectionBrokerHighAvailability).ActiveManagementServer


Otherwise you can use:

set-RDWorkspace -Name “XYZ Applications” -ConnectionBroker broker01.company.local

Disable all active users from an AD group

To disable all enabled users from an Active Directory group use the following script. Replace the groupname with the correct groupname. Also this script will show what it does, but does not disable the accounts until you remove the “-whatif” option from the command: Disable-ADAccount -Identity $user -whatif


The original script comes from https://community.spiceworks.com/topic/380100-disable-enable-ad-account-based-on-group-membership


$Group = "groupname"
Try { Import-Module ActiveDirectory -ErrorAction Stop }
Catch { Write-Host "Unable to load Active Directory module, is RSAT installed?"; Exit }

Try {
    $GroupDN = (Get-ADGroup $Group -ErrorAction Stop).DistinguishedName
}
Catch {
    Write-Host "Unable to locate group: $Group because ""$($Error[0])""" -ForegroundColor Red
    Exit
}

ForEach ($User in (Get-ADUser -Filter * -Properties MemberOf))
{   If ($User.MemberOf -contains $GroupDN)
    {   
        If ($user.enabled)
        {
            Write-Host "Disabling $($User.Name)"
            Disable-ADAccount -Identity $user -whatif
        }
    }
} 


Check last logged on date from user

Check the last logged on date for users. Fill in the correct filter (e.g. Name, Office) and the name of it (e.g. joe*


Import-Module ActiveDirectory

function Get-ADUserLastLogon([string]$userName)
{
  $dcs = Get-ADDomainController -Filter {Name -like "*"}
  $time = 0
  foreach($dc in $dcs)
  { 
    $hostname = $dc.HostName
    $user = Get-ADUser $userName | Get-ADObject -Properties lastLogon 
    if($user.LastLogon -gt $time) 
    {
      $time = $user.LastLogon
    }
  }
  $dt = [DateTime]::FromFileTime($time)
  Write-Host $username "last logged on at:" $dt }


foreach ($user in Get-ADUser -Filter 'Name -like "*joe*"' -Properties *) {
    Get-ADUserLastLogon -UserName $user
    }


Implementing Content Freshness protection in DFSR

https://blogs.technet.microsoft.com/askds/2009/11/18/implementing-content-freshness-protection-in-dfsr/


Background

Content Freshness is an admin-defined setting that you can set on a per-computer basis when using DFSR on Win2008 or Win2008 R2 – it does not exist on Windows Server 2003 R2. The DFSR database has a record for each Replicated Folder (RF) called CONTENT_SET_RECORD. This record contains a timestamp called “LastConnected”. We store this record on a per-Replicated-Folder basis because it’s possible for a replicated folder to be current when it’s connected to other members in that replication group. At the same time, another replicated folder can be stale because it is not connected with other members in its replication group. Every day, DFSR updates this timestamp to show the opportunity for replication occurred. When attempting replication for an RF between computers, the DFSR service checks if the last time replication was allowed is older than the freshness date. If the last-allowed-replicated date is newer, it replicates. If it’s not, we block replication.

By now, you’re asking yourself “why would I want to block replication.” Good question. DFSR has a JET database just like Active Directory, and it uses multi-master replication just like AD. This means that it must implement tombstones to deleted items to replicate. When a file is deleted in DFSR, the local database records the deletion as a tombstone in the database – a logical deletion. After 60 days DFSR garbage collects the record from the database and it is truly gone – a physical deletion. Online defragmentation of the database can now reclaim that whitespace. The 60 days allows all the replication partners to learn about the deletion and act on it.

And herein lays the problem. If a DFSR server cannot replicate an RF for more than 60 days, but then replication is allowed later, it can replicate out old deletions for files that are actually live or replicate out stale data and overwrite existing files. If you’ve ever worked on an Active Directory “lingering object” issue, you have seen what can happen when a DC that was offline for months is brought back up. This is why Strict Replication Consistency was invented for AD – Content Freshness protection is the same thing.

Being “unable to replicate” can mean any one of these scenarios:

  • Disabling the replication connections.
  • Deleting the replication connections (either one-way or in both directions).
  • Stopping the DFSR service.
  • Closing the schedule (i.e. setting “no replication”)
  • Keeping the server shut off.

This whole content freshness idea is novel enough that we went to the trouble of applying for a patent on it.

Implementing Content Freshness Protection

Content Freshness protection is not enabled by default. To turn it on you simply modify the DfsrMachineConfig setting for MaxOfflineTimeInDays on each DFSR server with:

wmic.exe /namespace:\\root\microsoftdfs path DfsrMachineConfig set MaxOfflineTimeInDays=<some value>

The recommendation is to set the value to 60:

wmic.exe /namespace:\\root\microsoftdfs path DfsrMachineConfig set MaxOfflineTimeInDays=60

Remember, this has to be done on all DFSR servers, as this change only affects the computer itself. This value is not stored in a central AD location, but instead in the DfsrMachineConfig.XML file that resides in the hidden operating system folder “%systemdrive%\system volume information\dfsr\config”:

image

You can also view your existing MaxOfflineTimeInDays with:

wmic.exe /namespace:\\root\microsoftdfs path DfsrMachineConfig get MaxOfflineTimeInDays

Remember, by default this protection is OFF and be assumed to be zero if there are no entries in the DfsrMachineConfig.xml.

Note: Sharp-eyed admins may notice that we actually have an AD attribute stamped on every Replication Group called ms-DFSR-TombstoneExpiryInMin that appears to control tombstone lifetime. It even has the value – in minutes – for 60 days. Sorry to disappoint you, but this attribute is never read by DFSR and changing it has no effect – tombstone lifetime garbage collection is always hard-coded to 60 days in the service and cannot be changed.

Protection in Action

Let’s see how all this works. My repro environment:

  • A pair of Windows Server 2008 R2 computers named 2008r2-fresh-01 and 2008r2-fresh-02
  • Replicating in a Replication Group named “RG1”
  • Using a Replicated Folder named “RF1”
  • Keeping a few user files in sync.
  • MaxOfflineTimeInDays set to 60 on 2008r2-fresh-02

Important note: I am going to simulate the offline time by rolling clocks forward. Never ever do this in production – this is for testing and demonstration purposes only. Also, I only set MaxOfflineTimeInDays on one server – you would do this on all servers.

So here’s my data:

image

Now I stop DFSR on 2008r2-fresh-02 and roll time forward to January 1st, 2010 on both servers – about 75 days from this writing. I then make a few changes on 2008r2-fresh-02.

image

And then I start the DFSR service back up on 2008r2-fresh-02.

  • My changed files do not replicate out
  • New files do not replicate in

I now have this event:

Log Name:      DFS Replication
Source:        DFSR
Date:          1/1/2010 3:37:14 PM
Event ID:      4012
Task Category: None
Level:         Error
Keywords:      Classic
User:          N/A
Computer:      2008r2-fresh-02.blueyonderairlines.com
Description:
The DFS Replication service stopped replication on the replicated folder at local path c:\rf1. It has been disconnected from other partners for 76 days, which is longer than the MaxOfflineTimeInDays parameter. Because of this, DFS Replication considers this data to be stale, and will replace it with data from other members of the replication group during the next replication. DFS Replication will move the stale files to the local Conflict folder. No user action is required.
Additional Information:
Error: 9061 (The replicated folder has been offline for too long.)
Replicated Folder Name: rf1
Replicated Folder ID: 5856C18F-CA72-4D2D-9D89-4CC1D8042D86
Replication Group Name: rg1
Replication Group ID: BC5976EF-997E-4149-819D-57193F21EC76
Member ID: FAEC4B17-E81F-4036-AAD9-78AA46814606

Note: this event has incorrect wording. The first two sentences in the description are good, but the following sentences are wrong. DFSR does not self-correct this situation, it does not move files into the ConflictAndDeleted folder, and you, the user, have actions you need to take. More on this later.

The DFSR Debug logs will show (edited for brevity):

20100101 15:37:14.410 1008 CSMG 5504 [WARN] ContentSetManager::CheckContentSetState This replicated folder has not connected to other partners for a long time. lastOnlineTime: [*** Logger Runtime Error:-114757888 ***]

20100101 15:37:14.410 1008 CSMG 7492 [ERROR] ContentSetManager::Initialize Failed to initialize ContentSetManager csId:{5856C18F-CA72-4D2D-9D89-4CC1D8042D86} csName:rf1 Error:

+ [Error:9061(0x2365) ContentSetManager::CheckContentSetState contentsetmanager.cpp:5596 1008 C The replicated folder has been offline for too long.]

20100101 15:37:14.410 1008 CSMG 7972 ContentSetManager::Run csId:{5856C18F-CA72-4D2D-9D89-4CC1D8042D86} csName:rf1 state:InitialBuilding

20100101 15:37:14.504 1948 SRTR 957 [WARN] SERVER_EstablishSession Failed to establish a replicated folder session. connId:{5E05AE2A-6117-4206-B745-7785DB316F74} csId:{5856C18F-CA72-4D2D-9D89-4CC1D8042D86} Error:

+ [Error:9028(0x2344) UpstreamTransport::EstablishSession upstreamtransport.cpp:808 1948 C The content set was not found]

The state of the replicated folder will be “In Error” – i.e. set to 5:

wmic.exe /namespace:\\root\microsoftdfs path DfsrReplicatedFolderInfo get ReplicationGroupName,ReplicatedFolderName,State

ReplicatedFolderName   ReplicationGroupName   State
rf1                               rg1                               5

The above is Content Freshness protection in action. It is protecting your DFSR environment from sending divergent data out to the rest of your working servers.

Recovering DFSR from Content Protection

Important note: Before repairing the blocked replication, get a backup of the data on the affected server and its partners. Failure to do will tempt Murphy’s Law to disastrous new heights. Understand that by following these steps below, any DFSR data that was on this server and never replicated will be moved to PreExisting and/or ConflictAndDeleted – this server goes through non-authoritative sync again and loses all conflicts with other DFSR servers. You have been warned!!!

Also, whatever is being done to stop replication from working needs to be ironed out – whether it is leaving the service off for months on end or not having any connections. Otherwise this is just going to happen again.

To get things back in order, do the following:

1. Start DFSMGMT.MSC on the affected server.

2. On any affected replication groups this server is a member of, select the computer on the Membership tab and “Disable” it.

image

3. Accept the warning prompt.

image

4. If the reason for replication never occurring was the schedule being set to “no replication” on the RG or RF, or no bi-directional connections being place between servers, fix that situation now.

5. Force AD Replication and verify it has converged.

6. On the affected server, run:

DFSRDIAG.EXE POLLAD

7. Wait for the 4008 and 4114 events being written to the DFSR event log to confirm that the replicated folder(s) are no longer being replicated.

8. In DFSMGMT.MSC, “Enable” the replication again on the affected replicated folders for that server.

9. Force AD replication and POLLAD again.

The server goes through non-authoritative initial sync, as if it was setup the first time. All matching data is unchanged and does not replicate. Any files on the server that do not exist on its authoritative partner are moved to the PreExisting folder. Any files on the server that have been changed locally are moved to the ConflictAndDeleted folder and the authoritative server’s copy is replicated inbound.

The Sum Up

Content Freshness protection is a good thing and putting it in place may someday save you some real pain. Trust me – we work cases here where Content Freshness being enabled would have stopped huge problems. All it takes is Windows Server 2008 or later, and a few moments of your time.

– Ned “Kool and the Gang” Pyle
sqlservr (4016) An attempt to open the file “C:\windows\system32\LogFiles\Sum\Api.chk” for read / write access failed with system error 5 (0x00000005): “Access is denied. “. The open file operation will fail with error -1032 (0xfffffbf8).

https://support.microsoft.com/en-us/kb/2811566


Symptoms

Consider the following scenario:

  • You install Microsoft SQL Server 2012 or SQL Server 2012 Analysis Services on a computer that is running Windows Server 2012.
  • You use the default account as a service account for these applications during the installation.
  • The installation is successful.
  • After the installation, the services for these programs start successfully.

In this scenario, you may find error messages in the Application log that resemble the following:

For instances of SQL Server (SQLServr.exe)

sqlservr (3472) An attempt to open the file “C:\Windows\system32\LogFiles\Sum\Api.log” for read only access failed with system error 5 (0x00000005): “Access is denied. “. The open file operation will fail with error -1032 (0xfffffbf8).
sqlservr (3472) Error -1032 (0xfffffbf8) occurred while opening logfile C:\Windows\system32\LogFiles\Sum\Api.log.

For instances of SQL Server Analysis Services (Msmdsrv.exe)

msmdsrv (4680) An attempt to open the file “C:\Windows\system32\LogFiles\Sum\Api.chk” for read / write access failed with system error 5 (0x00000005): “Access is denied. “. The open file operation will fail with error -1032 (0xfffffbf8).

msmdsrv (4680) Error -1032 (0xfffffbf8) occurred while opening logfile C:\Windows\system32\LogFiles\Sum\Api.log.

Cause

This problem occurs because of insufficient permissions for the service startup accounts for SQL Server and for SQL Server Analysis Services when the services access the following folder for logging as a part of the Software Usage Metrics feature:

C:\Windows\System32\LogFiles\Sum
Workaround

To work around this problem, add read/write permissions manually to the service accounts that are used by SQL Server (sqlservr.exe) and SQL Server Analysis Services (msmdsrv.exe) to access the \Windows\System32\LogFiles\Sum folder.

Configuring disks to use VMware Paravirtual SCSI (PVSCSI) adapters

source: http://kb.vmware.com/selfservice/microsites/search.do?language=en_US&cmd=displayKC&externalId=1010398

Details

This article includes supplemental information about configuring and using VMware Paravirtual SCSI (PVSCSI) adapters.

PVSCSI adapters are high-performance storage adapters that can result in greater throughput and lower CPU utilization. PVSCSI adapters are best suited for environments, especially SAN environments, where hardware or applications drive a very high amount of I/O throughput. The VMware PVSCSI adapter driver is also compatible with the Windows Storport storage driver. PVSCSI adapters are not suited for DAS environments.


This table shows the support matrix for use of Paravirtual SCSI adapters for data disks and boot disks for the various guest operating systems and ESX versions. Support shown in the table is from the listed ESXi/ESX version and later versions.

Guest operating system Data Disk Boot Disk
Windows Server 2012 R2 (64 bit only) ESXi 5.0 Update 2, ESXi 5.1, ESXi 5.5 ESXi 5.0 Update 2, ESXi 5.1, ESXi 5.5
Windows Server 2012 (64 bit only) ESXi 5.0 Update 1, ESXi 5.1, ESXi 5.5 ESXi 5.0 Update 1, ESXi 5.1, ESXi 5.5
Windows Server 2008 R2 (64 bit only) ESXi/ESX 4.0 Update 1, ESXi/ESX 4.1, ESXi 5.x ESXi/ESX 4.0 Update 1, ESXi/ESX 4.1, ESXi 5.x
Windows Server 2008 (32 and 64 bit) ESXi/ESX 4.x, ESXi 5.x ESXi/ESX 4.0 Update 1, ESXi/ESX 4.1, ESXi 5.x
Windows Server 2003 (32 and 64 bit) ESXi/ESX 4.x, ESXi 5.x ESXi/ESX 4.x, ESXi 5.x
Windows 8.1 (32 and 64 bit) ESXi 5.0 Update 2, ESXi 5.1, ESXi 5.5 ESXi 5.0 Update 2, ESXi 5.1, ESXi 5.5
Windows 8 (32 and 64 bit) ESXi 5.0 Update 1, ESXi 5.1, ESXi 5.5 ESXi 5.0 Update 1, ESXi 5.1, ESXi 5.5
Windows 7 (32 and 64 bit) ESXi/ESX 4.1, ESXi 5.x ESXi/ESX 4.1, ESXi 5.x
Windows Vista (32 and 64 bit) ESXi/ESX 4.1, ESXi 5.x ESXi/ESX 4.1, ESXi 5.x
Windows XP (32 and 64 bit) ESXi/ESX 4.1, ESXi 5.x ESXi/ESX 4.1, ESXi 5.x
CentOS 5.x (32 and 64 bit) ESXi/ESX 4.0 Update 4, ESXi/ESX 4.1 Update 2, ESXi 5.x Not Supported
CentOS 6.x (32 and 64 bit) * ESXi/ESX 4.0 Update 4, ESXi/ESX 4.1 Update 2, ESXi 5.x ESXi/ESX 4.0 Update 4, ESXi/ESX 4.1 Update 2, ESXi 5.x
CentOS 7.x (64 bit) ESXi 5.5 ESXi 5.5
Red Hat Enterprise Linux (RHEL) 5 (32 and 64 bit) and all update releases ESXi/ESX 4.x, ESXi 5.x Not Supported
RHEL 6 (32 and 64 bit) ESXi/ESX 4.0 Update 2, ESXi/ESX 4.1, ESXi 5.x ESXi/ESX 4.0 Update 2, ESXi/ESX 4.1, ESXi 5.x
RHEL 7 (64 bit) ESXi 5.5 ESXi 5.5
SUSE Linux Enterprise 11 SP1(32 and 64 bit) and later releases ESXi/ESX 4.0 Update 2, ESXi/ESX 4.1, ESXi 5.x ESXi/ESX 4.0 Update 2, ESXi/ESX 4.1, ESXi 5.x
Ubuntu 10.04 (32 and 64 bit) and later releases ESXi/ESX 4.0 Update 2, ESXi/ESX 4.1, ESXi 5.x ESXi/ESX 4.0 Update 2, ESXi/ESX 4.1, ESXi 5.x


* = CentOS 6.5 is not supported on ESXi/ESX 4.0. Support added in ESXi/ESX 4.1 Update 3, ESXi 5.0 Update 2 and above only.

The default type of newly hot-added SCSI adapter depends on the type of primary (boot) SCSI controller. This means that hot-adding a PVSCSI adapter is only supported for those versions that support booting from a PVSCSI adapter.

Paravirtual SCSI adapters also have these limitations:

  • Hot add or hot remove requires a bus rescan from within the guest.
  • Disks with snapshots might not experience performance gains when used on Paravirtual SCSI adapters if memory on the ESX host is over committed.
  • Do not use PVSCSI on a virtual machine running Windows with spanned volumes. Data may become inaccessible to the guest operating system.
  • If you upgrade from RHEL 5 to an unsupported kernel, you might not be able to access data on the virtual machine’s PVSCSI disks. You can run vmware-config-tools.pl with the kernel-version parameter to regain access.

Solution

To configure a new or existing data disk to use a PVSCSI adapter:

  1. Launch a vSphere Client and log in to an ESXi/ESX host or vCenter Server.
  2. Select a virtual machine, or create a new one.
  3. Ensure a guest operating system that supports PVSCSI is installed on the virtual machine.
  4. If it is an existing virtual machine, power it off.
  5. In the vSphere Client, right-click on the virtual machine and click Edit Settings.
  6. Click the Hardware tab.
  7. Click Add.
  8. Select Hard Disk.
  9. Click Next.
  10. Choose any one of the available options.
  11. Click Next.
  12. Specify the options you require. Options vary depending on which type of disk you chose.
  13. Choose a Virtual DeviceNode and specify whether you want to use Independent mode. For data disks, choose a Virtual Device Nodebetween SCSI (1:0)to SCSI (3:15). For a boot disk, choose Virtual Device Node SCSI (0:0), or choose the Virtual Device Node that boots in the order you require.
    Note: To set a disk to use Independent mode there must be no snapshots associated to the virtual disk, if there are existing snapshots commit them before changing the disk type.
  14. Click Next.
  15. Click Finish to finish the process and exit the Add Hardware wizard. A new disk and controller are created.
  16. Select the newly created controller and click Change Type.
  17. Click VMware Paravirtual and click OK.
  18. Click OK to exit the Virtual Machine Properties dialog.
  19. Power on the virtual machine.
  20. Install VMware Tools. VMware Tools includes the PVSCSI driver.
  21. If it is a new virtual disk, scan and format the hard disk within the guest operating system.

To configure an existing Windows boot disk to use a PVSCSI adapter:
This procedure is required as the guest operating system does not have the PVSCSI driver and the guest will BSOD on boot if using the above method. This workaround forces the guest operating system to install the PVSCSI driver.

  1. Power off the virtual machine.
  2. Create a new temporary 1GB disk(SCSI 1:0) and assign a new SCSI controller (default is LSI LOGIC SAS).
  3. Change the new SCSI controller to PVSCSI for the new SCSI controller.
  4. Click Change Type.
  5. Click VMware Paravirtual and click OK.
  6. Click OK to exit the Virtual Machine Properties dialog.
  7. Power on the virtual machine.
  8. Verify the new disk was found and is visible in Disk Management. This confirms the PVSCSI driver is now installed.
  9. Power off the virtual machine.
  10. Delete the temporary 1GB vmdk disk and associated controller (SCSI 1:0).
  11. Change the original SCSI controller(SCSI 0:X) to PVSCSI as detailed in Steps 3 to 5.
  12. Power on the virtual machine.

To deploy and boot a new Windows virtual machine from a disk attached to a PVSCSI adapter, the VMware PVSCSI driver must be installed in the Windows guest. Floppy disk images that contain the driver are available for the versions of ESXi/ESX that support this. The required floppy images are stored on the host and are located at the /vmimages/floppies/ directory. If the floppy images are not visible, see Unable to mount a floppy image in vCenter Server (1036836).

To install PVSCSI drivers:
Note: This procedure assumes that your virtual machine does not have a floppy driver. If the virtual machine already has a floppy drive, skip directly to Step 6.

  1. Right-click the virtual machine and click Edit Settings.
  2. Click Add.
  3. From list, click Floppy Drive and click Next.
  4. Click Next to accept the default option.
  5. Click Finish.
  6. Click New Floppy or Floppy Drive.
  7. Select the Use existing floppy image in datastore option.
  8. Click Browse.
  9. Navigate to the vmimages or floppies folder.
  10. Select the image and click Open. Note: When installing Windows 2012 Server, use the Windows 2008 image pvscsi-Windows2008.flp to install the driver.
  11. Click OK.
  12. Boot the virtual machine to install the PVSCSI drivers.


Install SQL 2012 on Core

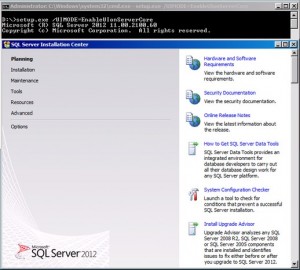
To install Microsoft SQL 2012 on a Microsoft 2012 core edition, use the /UIMODE switch. This will bring op the old interface.

setup /UIMODE=EnableUIonServerCore


2725_xxxx_2


Other samples to install it through the command line (parameters or file) can be found on: https://www.mssqltips.com/sqlservertip/2725/installing-sql-server-2012-on-windows-server-core-part-3/