How to Set or Change a Dell PowerEdge Service Tag

Source: http://lonesysadmin.net/2011/03/08/how-to-set-a-dell-poweredge-service-tag/


Got a Dell PowerEdge that you replaced the motherboard on, and now it doesn’t have a service tag? Reset it with the asset.com tool, which I’ve conveniently packaged as both a floppy disk image and an ISO for those of us in need. They both use the Windows 7 boot disk DOS and asset_A209.com from ftp.dell.com (renamed to asset.com).

[wpdm_file id=50]

[wpdm_file id=51]

Once you boot from these you can set the service tag with:

asset /s <service tag>

You can also set the asset tag with:

asset <asset tag>

Or clear the asset tag with:

asset /d

Check FSMO Roles

Run the following vbs script to show you the location off the FSMO roles:


Set objRootDSE = GetObject("LDAP://rootDSE")

Set objSchema = GetObject _
    ("LDAP://" & objRootDSE.Get("schemaNamingContext"))
strSchemaMaster = objSchema.Get("fSMORoleOwner")
Set objNtds = GetObject("LDAP://" & strSchemaMaster)
Set objComputer = GetObject(objNtds.Parent)
WScript.Echo "Forest-wide Schema Master FSMO: " & objComputer.Name

Set objNtds = Nothing
Set objComputer = Nothing

Set objPartitions = GetObject("LDAP://CN=Partitions," & _
    objRootDSE.Get("configurationNamingContext"))
strDomainNamingMaster = objPartitions.Get("fSMORoleOwner")
Set objNtds = GetObject("LDAP://" & strDomainNamingMaster)
Set objComputer = GetObject(objNtds.Parent)
WScript.Echo "Forest-wide Domain Naming Master FSMO: " & objComputer.Name

Set objDomain = GetObject _
    ("LDAP://" & objRootDSE.Get("defaultNamingContext"))
strPdcEmulator = objDomain.Get("fSMORoleOwner")
Set objNtds = GetObject("LDAP://" & strPdcEmulator)
Set objComputer = GetObject(objNtds.Parent)
WScript.Echo "Domain's PDC Emulator FSMO: " & objComputer.Name

Set objRidManager = GetObject("LDAP://CN=RID Manager$,CN=System," & _
    objRootDSE.Get("defaultNamingContext"))
strRidMaster = objRidManager.Get("fSMORoleOwner")
Set objNtds = GetObject("LDAP://" & strRidMaster)
Set objComputer = GetObject(objNtds.Parent)
WScript.Echo "Domain's RID Master FSMO: " & objComputer.Name

Set objInfrastructure = GetObject("LDAP://CN=Infrastructure," & _
    objRootDSE.Get("defaultNamingContext"))
strInfrastructureMaster = objInfrastructure.Get("fSMORoleOwner")
Set objNtds = GetObject("LDAP://" & strInfrastructureMaster)
Set objComputer = GetObject(objNtds.Parent)
WScript.Echo "Domain's Infrastructure Master FSMO: " & objComputer.Name


download link: [wpdm_file id=49]

Windows Live Mesh behind Proxy

Run Netsh Commands for WINHTTP to set proxy?
http://technet.microsoft.com/en-us/library/cc731131(WS.10).aspx

  1. client Start. In the search box, type
    Command, and then right-click on Command
    Prompt
    -> Run as Administrator
  2. in the Command prompt,
  3. type netsh winhttp set proxy myproxy (where
    myproxy should be your proxy server)
    and
    Enter OR type netsh winhttp import proxy source=ie and Enter
    (if you can browser Internet using IE without issue)
  4. click Start. In the search box, type
    Services, and then click Services
  5. find “Windows Live ID Sign-in Assistant” service
    and make sure it is running
  6. if not, make sure its “Startup Type” is set to “Automatic”, and start the
    service manually by right-click -> “Start
  7. find “WinHTTP Web Proxy Auto-Discovery Service
  8. right click on it -> All Tasks -> Restart
  9. run Mesh

How To Use the Symantec Endpoint Recovery Tool with the Latest Virus Definitions

  1. Using an unzipping utility, unzip the .jdb file into a new folder.

    Note: It is possible to use the built-in Windows unzip utility to unzip the .jdb file. To do so, change the file extension on the .jdb file to .zip, right-click the file, and click “Extract All…”.

  2. After the .jdb is uncompressed, place the folder on a removable storage device or in at the root of the infected computer’s hard drive so that the Symantec Endpoint Recovery Tool can access the definitions.
  3. Confirm that the infected computer boots from CD or removable media first.
    Refer to the computer’s manual for information on configuring the computer appropriately.
  4. Boot the infected computer from the SERT disc created in step 2.
  5. Click Continue loading Endpoint Recovery Tool
  6. Select a language and click OK.
  7. When presented with the Symantec Software License Agreement, click I Agree.
  8. If a network connection is detected, the Symantec Endpoint Recovery Tool attempts to download the latest virus definitions. If the computer is isolated from the network, or if it is unable to download definitions for any reason, click Browse for Virus Definitions, and browse to the folder to which you unzipped the virus definitions.
  9. Verify that the virus definitions have been loaded by looking in the lower right-hand corner of the screen. Virus definitions current as of should reflect the current date.
  10. Make sure that Save scan session information is checked.
    Saving the scan session allows you to undo any modifications made by the tool.
    If needed, you can change the location where the scan session information will be stored. To do so, click  Change location and select the preferred location.
  11. Click Start Scan.


Source: http://www.symantec.com/docs/TECH131732

Backup file permissions [icacls.exe]

A simple tool to backup/restore file permissions is the tool: icacls.exe

To backup the file permissions on the e:\folder\* run the following program:
>icacls.exe E:\folder\* /save E:\cacls.txt /t /c

To restore them later you can run:
>icacls.exe E:\folder\ /restore E:\cacls.txt

Icacls.exe can handle logical drives, network drives and UNC paths.

Dell OMSA LiveCD 6.0.1

Dell OMSA LiveCD 6.0.1 provides the following features

• Safe environment to perform diagnostics or data recovery
• Access to disk diagnostics (Dell Online Diagnostics)
• Access to tape diagnostics (xTalk and IBM ITDT)
• DSET tool built into operating system
• Built in FTP and SMB shares to easily transfer files
• Built in telnet, SSH and VNC servers for remote troubleshooting
• Webex support for Dell technical support access
• OMSA 6.0.1 built in for local and remote access

Read the PDF: http://linux.ins.dell.com/files/openmanage-contributions/omsa-601-live/Guide.pdf

Download the iso: http://linux.dell.com/files/openmanage-contributions/?C=M;O=A

Create a bootable SERT USB key

The Symantec Endpoint Recovery Tool is an image that you can burn on a disc, which you can use to scan and remove malware from client computers. You use this tool for the computers that are too infected for Symantec  Endpoint Protection to clean effectively.

(http://www.symantec.com/connect/videos/symantec-endpoint-recovery-tool-sert)

You can download the tool from https://fileconnect.symantec.com/ and you need your license number like B1234567891.

Download the tool and get a USB key with at least 512 MB space

1.    Using WinRAR or similar, extract the SERT.iso file to the local file system (assume C:\SERT).
2.    Open a command prompt with admin rights.
3.    Insert the USB stick into the computer.
4.    Type the following command to start Diskpart:
diskpart <enter>
5.    Type the following command to list the available disks:
list disk <enter>

This command is important.  It will show you what number your USB drive is.  Failure to select the right disk at this point may result in loss of data from your hard disk.  Normally the drive is Disk 1, but you should confirm before proceeding.

6.    Type following commands to format the USB stick and prepare it for SERT:
select disk <number> <enter>
clean <enter>
create partition primary <enter>
select partition 1 <enter>
active <enter>
format fs=fat32 <enter>
assign <enter>
exit <enter>

7.    At the command prompt, type the following to copy the SERT files to the USB Stick:
xcopy C:\SERT\*.* <removable disk drive letter>\ /e /h /f <enter>

For updated definition files, download the JDB files and unzip them to the USB key. The JDB files can be found at http://www.symantec.com/business/security_response/definitions/download/detail.jsp?gid=savce

To see how the SERT tool can be updated with the downloaded JDB file, read the following article: http://www.bvanleeuwen.nl/faq/?p=748

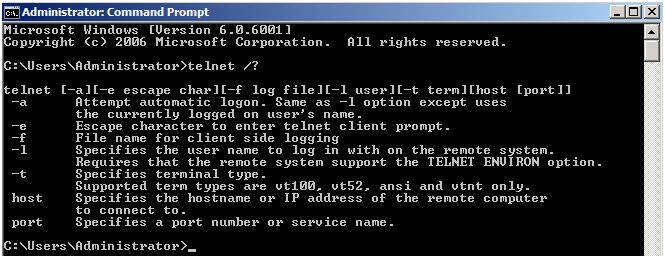
How To Enable Telnet In Windows Server 2008

Telnet Client allows a computer to connect to a remote Telnet server and run applications on that server. Once logged on, a user is given a command prompt that can be used as if it had been opened locally on the Telnet server’s console. Commands that you type at the Telnet client command prompt are sent to the Telnet Server and executed there, as though you were locally logged on to a command prompt session at the server. Output from the commands that you run are sent back to the Telnet client where they are displayed for you to view. 

When you first try to run a telnet command, Windows will informs you that telnet is not recognized as a command  


 To enable Telnet on Windows Server 2008 follow these steps :

  1. Open Server Manager, click Start  > Server Manager
  2. From the left panel in Server Manager, click on Features
  3. Click on Add Features
  4. From the available list of features, scroll down and select Telnet Client, then click Next
  5. On the Confirmation page, click on Install
  6. Installation of the selected feature will be initialized and started
  7. Once installation is completed, click on Close
  8. Now open Command Prompt, and run the telnet command

As you can see, Telnet is now recognized by Windows Server 2008 and you can start using it to connect to your telnet servers.

Configuring SNMP Traps for ESX 3.5 and ESX 4.0

Details

To generate virtual machine and environmental traps from ESX 3.5 and ESX 4.0 hosts, you must configure and enable the embedded SNMP agent. You cannot use the Net-SNMP-based agent to generate these traps, although it can receive GET transactions and generate other types of traps.
 
This represents a change in behavior from ESX 3.0.x, in which the configuration file for the Net-SNMP-based agent controlled the generation of virtual machine traps. For more information, see Configuring SNMP on an ESX 3.0.x host (1008186).

Solution

Use the vicfg-snmp command from the Remote CLI or vSphere CLI to enable this SNMP agent and configure trap destinations. Each time you specify a target with the vicfg-snmp command, the settings you specify overwrite all previously specified settings. To specify multiple targets, specify them in a single command, separated by commas.

To enable and configure SNMP traps:
 
Note: For ESX 3.5, use the Remote CLI. For ESX 4.0, use the vSphere CLI. The commands for both are same.  vicfg-snmp.pl is located in the C:\Program Files\VMware\VMware vSphere CLI\bin directory after the VMware vSphere CLI installation, by default.
 
  1. Specify the communities and trap targets with the command:

    vicfg-snmp.pl –server <hostname> –username <username> –password <password> -t <target hostname>@<port>/<community>

    Note: Under ESX 4.0, you may need to use the -c <community> flag.

    For example, to send SNMP traps from the host host.example.com to port 162 on target.example.com using the public community, use the command:

    vicfg-snmp.pl –server host.example.com –username root –password password -t target.example.com@162/public
     

  2. To enable the SNMP service, run the command:

    vicfg-snmp.pl –server <hostname> –username <username> –password <password> –enable
     

  3. (Optional) Send a test trap to verify that the agent is configured correctly with the command:

    vicfg-snmp.pl –server <hostname> –username <username> –password <password> –test

The test trap generated is a warmStart trap.

source: http://kb.vmware.com/kb/1008065