Update a HA Netscaler environment

source:http://support.citrix.com/article/CTX127455

To update an HA netscaler, do the following steps.

User-added image

Upgrade the secondary netscaler appliance

    1. Save the config: save config
    2. Switch to shell: shell
    3. Change to the installation directory: cd /var/nsinstall
    4. Create a temporary directory: mkdir x.xnsinstall
    5. Chang to the created directory: cd x.xnsinstall
    6. Upload the files to the temporary directory (e.g. pscp build-11.0-66.11_nc.tgz nsroot@192.168.1.1:/var/nsinstall/11.0nsinstall/build-11.0-66.11_nc.tgz)
    7. Extract the files: tar -zxvf ns-x.0-xx.x-doc.tgz
    8. Install the software: # ./installns
    9. Press y to restart the appliance
    10. Check the state of the appliance: > show ha node
      This should state that it is the secondary node and synchronization is disabled. To disable the synchronization manually run the command: > set node -hasync disable
    11. Check the configuration
      The version can be found with the command:  > show version
    12. Failover the appliance: > force failover

Upgrade the primary netscaler appliance

  1. Follow step 1 to 9 mentioned in the previous section
  2. Check if the appliance is UP and it is the primary node: > show ha node
    If the appliance isn’t the primary application a failover can be initiated: > force failover

Enable Synchronization

  1. Log on the secondary node, check if it is the secondary node: > show node
  2. Enable synchronization: > set node -hasync enable
  3. Check synchronization status: > show ns runningconfig

The update has been completed. Additional backups can be removed as well the downloaded files in the created directory (step 4).

Mount and Modify a Windows Image Using DISM

source: http://technet.microsoft.com/en-us/library/hh824814.aspx

Applies To: Windows 8, Windows 8.1, Windows Server 2008 R2, Windows Server 2012, Windows Server 2012 R2

Mounting an Image


You can mount an image using the /optimize option to reduce initial mount time. However, When using the /optimize option, processes that are ordinarily performed during a mount will instead be completed the first time that you access a directory. As a result, there may be an increase in the time that is required to access a directory for the first time after mounting an image using the /optimize option.

To mount an image


  1. Open a command prompt with administrator privileges. If you are using a version of Windows other than Windows 8, use the Deployment Tools Cmd Prompt installed with the ADK or navigate to the DISM directory on your local computer.
  2. Mount the image.
    Copy
    Dism /Mount-Image /ImageFile:C:\test\images\myimage.wim /index:1 /MountDir:C:\test\offline
    
    noteNote
    To mount a Windows image from a VHD file, you must specify /index:1


    You can also add options to mount the image with read-only permissions or to reduce the initial mount time with the /Optimize option. For example,

    Copy
    Dism /Mount-Image /ImageFile:C:\test\images\myimage.wim /index:1 /MountDir:C:\test\offline /ReadOnly /Optimize
    

    For more information about the options available for the /Mount-Image option in DISM, see DISM Image Management Command-Line Options.


Modifying an Image


After you mount an image, you can browse the directory of the image. You can review the file and folder structure, and add, edit, or delete files and folders.

You can also use the DISM tool to add and remove drivers and packages, including language packs, enumerate drivers and packages, modify configuration settings, and more. For more information, see Service a Windows Image Using DISM.

To view and modify an image


  1. On your technician computer open the mounted directory. For example,
    Copy
    cd C:\mounted_images
    
  2. Delete, edit, or add additional files and folders to the location where they must appear after they have been applied to the destination computer. For example, C:\program_files\application_name.
    ImportantImportant
    If you must add an application or a device, verify that you included all of the required files. Although you can add application files and folders, you cannot install applications. 


Committing Changes to an Image


You can commit changes to an image without unmounting the image.

To commit changes to an image


  1. At the command prompt, type:
    Copy
    Dism /Commit-Image /MountDir:C:\test\offline
    

    Use /CheckIntegrity to detect and track .wim file corruption when you commit changes to the image. When you apply or mount the image, use /CheckIntegrity again to stop the operation if file corruption was detected. /CheckIntegrity cannot be used with virtual hard disk (VHD) files.

Unmounting an Image


After you modify an image, you must unmount it. If you mounted your image with the default read/write permissions, you can commit your changes. This makes your modifications a permanent part of the image.

To unmount an image


  1. Open a command prompt with administrator privileges. If you are using a version of Windows other than Windows 8, use the Deployment Tools Cmd Prompt installed with the ADK or navigate to the DISM directory on your local computer.

    For Windows 8.1:

    Copy
    cd C:\Program Files (x86)\Windows Kits\8.1\Assessment and Deployment Kit\ <architecture>\DISM
    

    For Windows 8:

    Copy
    cd C:\Program Files (x86)\Windows Kits\8.0\Assessment and Deployment Kit\ <architecture>\DISM
    

    where <architecture> can be x86 or amd64.

  2. Unmount the image.
    Copy
    Dism /Unmount-Image /MountDir:C:\test\offline /commit
    

    where C:\test\offline is the location of the mount directory. If you do not specify the parameters to unmount, this option lists all of the mounted images but does not perform the unmount action.

    ImportantImportant
    You must use either the /commit or /discard argument when you use the /unmount option. 


After modifying an image, you can apply the image from a network share or from local media, such as a CD/DVD or a USB flash drive (UFD).

Troubleshooting


If the DISM commands in this topic fail, try the following:


  • Make sure that you are using the Windows 8.1 version of DISM that is installed with the Windows ADK.
  • If you are using a Windows 8 or Windows 7 PC, use the Deployment and Imaging Tools Environment to access the tools that are installed with the Windows 8.1 version of the Windows ADK.
  • Don’t mount images to protected folders, such as your User\Documents folder.
  • If DISM processes are interrupted, consider temporarily disconnecting from the network and disabling virus protection.
  • If DISM processes are interrupted, consider running the commands from the Windows PE environment instead.

DiskPart has encountered an error: The media is write protected.

During the creation of a new disk, the error “The media is write protected” pops up.

Check if the disk (or volume) is in a read-only state:

DISKPART> attributes disk
Current Read-only State : Yes
Read-only : Yes
Boot Disk : No
Pagefile Disk : No
Hibernation File Disk : No
Crashdump Disk : No
Clustered Disk : No

If the disk or volume is in a read-only state, clear the attribute with the following command:


attributes disk clear readonly

attributes volume clear readonly

Go ahead with the creation of the new disk

CLI uninstall Powerchute Business Edition from Windows 2012 Core

Run the following command to deinstall PBE from the Command Line Interface


PowerChute Business Edition Agent:

“C:\Program Files (x86)\InstallShield Installation Information\{BCE9F441-9027-4911-82E0-5FB28057897D}\setup.exe” -runfromtemp -l0x0409 AnyText -removeonly

PowerChute Business Edition Server:

“C:\Program Files (x86)\InstallShield Installation Information\{A6491A4A-AAA0-4892-BFEF-ECD6CECE2FF3}\setup.exe” -runfromtemp -l0x0409 AnyText -removeonly

PowerChute Business Edition Console:

“C:\Program Files (x86)\InstallShield Installation Information\{0F86FD09-BA63-4E45-A70B-604C1106C2F2}\setup.exe” -runfromtemp -l0x0409 AnyText -removeonly


The corresponding directories in “C:\Program Files (x86)\InstallShield Installation Information” could also be removed

KMS Client Setup Keys

Computers that are running volume licensing editions of Windows 8, Windows Server 2012, Windows 7, Windows Server 2008 R2, Windows Vista, and Windows Server 2008 are, by default, KMS clients with no additional configuration needed.

If you are converting a computer from a KMS host, MAK, or retail edition of Windows to a KMS client, install the applicable setup key (GVLK) from the following tables

To install a client setup key, open an administrative command prompt on the client, type slmgr /ipk <setup key> and press ENTER.

Operating system edition KMS Client Setup Key
Windows 8 Professional NG4HW-VH26C-733KW-K6F98-J8CK4
Windows 8 Professional N XCVCF-2NXM9-723PB-MHCB7-2RYQQ
Windows 8 Enterprise 32JNW-9KQ84-P47T8-D8GGY-CWCK7
Windows 8 Enterprise N JMNMF-RHW7P-DMY6X-RF3DR-X2BQT
Windows Server 2012 Core BN3D2-R7TKB-3YPBD-8DRP2-27GG4
Windows Server 2012 Core N 8N2M2-HWPGY-7PGT9-HGDD8-GVGGY
Windows Server 2012 Core Single Language 2WN2H-YGCQR-KFX6K-CD6TF-84YXQ
Windows Server 2012 Core Country Specific 4K36P-JN4VD-GDC6V-KDT89-DYFKP
Windows Server 2012 Server Standard XC9B7-NBPP2-83J2H-RHMBY-92BT4
Windows Server 2012 Standard Core XC9B7-NBPP2-83J2H-RHMBY-92BT4
Windows Server 2012 MultiPoint Standard HM7DN-YVMH3-46JC3-XYTG7-CYQJJ
Windows Server 2012 MultiPoint Premium XNH6W-2V9GX-RGJ4K-Y8X6F-QGJ2G
Windows Server 2012 Datacenter 48HP8-DN98B-MYWDG-T2DCC-8W83P
Windows Server 2012 Datacenter Core 48HP8-DN98B-MYWDG-T2DCC-8W83P
Operating system edition KMS Client Setup Key
Windows 7 Professional FJ82H-XT6CR-J8D7P-XQJJ2-GPDD4
Windows 7 Professional N MRPKT-YTG23-K7D7T-X2JMM-QY7MG
Windows 7 Professional E W82YF-2Q76Y-63HXB-FGJG9-GF7QX
Windows 7 Enterprise 33PXH-7Y6KF-2VJC9-XBBR8-HVTHH
Windows 7 Enterprise N YDRBP-3D83W-TY26F-D46B2-XCKRJ
Windows 7 Enterprise E C29WB-22CC8-VJ326-GHFJW-H9DH4
Windows Server 2008 R2 Web 6TPJF-RBVHG-WBW2R-86QPH-6RTM4
Windows Server 2008 R2 HPC edition TT8MH-CG224-D3D7Q-498W2-9QCTX
Windows Server 2008 R2 Standard YC6KT-GKW9T-YTKYR-T4X34-R7VHC
Windows Server 2008 R2 Enterprise 489J6-VHDMP-X63PK-3K798-CPX3Y
Windows Server 2008 R2 Datacenter 74YFP-3QFB3-KQT8W-PMXWJ-7M648
Windows Server 2008 R2 for Itanium-based Systems GT63C-RJFQ3-4GMB6-BRFB9-CB83V
Operating system edition KMS Client Setup Key
Windows Vista Business YFKBB-PQJJV-G996G-VWGXY-2V3X8
Windows Vista Business N HMBQG-8H2RH-C77VX-27R82-VMQBT
Windows Vista Enterprise VKK3X-68KWM-X2YGT-QR4M6-4BWMV
Windows Vista Enterprise N VTC42-BM838-43QHV-84HX6-XJXKV
Windows Web Server 2008 WYR28-R7TFJ-3X2YQ-YCY4H-M249D
Windows Server 2008 Standard TM24T-X9RMF-VWXK6-X8JC9-BFGM2
Windows Server 2008 Standard without Hyper-V W7VD6-7JFBR-RX26B-YKQ3Y-6FFFJ
Windows Server 2008 Enterprise YQGMW-MPWTJ-34KDK-48M3W-X4Q6V
Windows Server 2008 Enterprise without Hyper-V 39BXF-X8Q23-P2WWT-38T2F-G3FPG
Windows Server 2008 HPC RCTX3-KWVHP-BR6TB-RB6DM-6X7HP
Windows Server 2008 Datacenter 7M67G-PC374-GR742-YH8V4-TCBY3
Windows Server 2008 Datacenter without Hyper-V 22XQ2-VRXRG-P8D42-K34TD-G3QQC
Windows Server 2008 for Itanium-Based Systems 4DWFP-JF3DJ-B7DTH-78FJB-PDRHK


source: http://technet.microsoft.com/en-us/library/jj612867.aspx


VirtualBox – PXE does not work

During a WDS implementation the image stopt. After installing the VirtualBox 4.2.4 Oracle VM VirtualBox Extension Pack PXE ran fine and WDS could deploy images.

Download the extension pack from: https://www.virtualbox.org/wiki/Downloads

Make sure the machine which you are deploying has at least 512 MB of internal memory, otherwise the pxe boot will fail.

Windows 2012 – CLI

Activating Windows 2012 with powershell:

(or use sconfig)

slmgr.vbs –ipk <productkey>
slmgr.vbs –ato


Rename the sever:
  • Determine the current name of the server with the hostname or ipconfig command.
  • In Windows PowerShell, run Rename-Computer.
  • Restart the computer.


Installing GUI with powershell:

(or use sconfig)

Install-WindowsFeature Server-Gui-Shell, Server-Gui-Mgmt-Infra

An other option is to use dism

Dism /online /enable-feature /featurename:ServerCore-FullServer /featurename:Server-Gui-Shell /featurename:Server-Gui-Mgmt

If this fail, you need to mount the files.

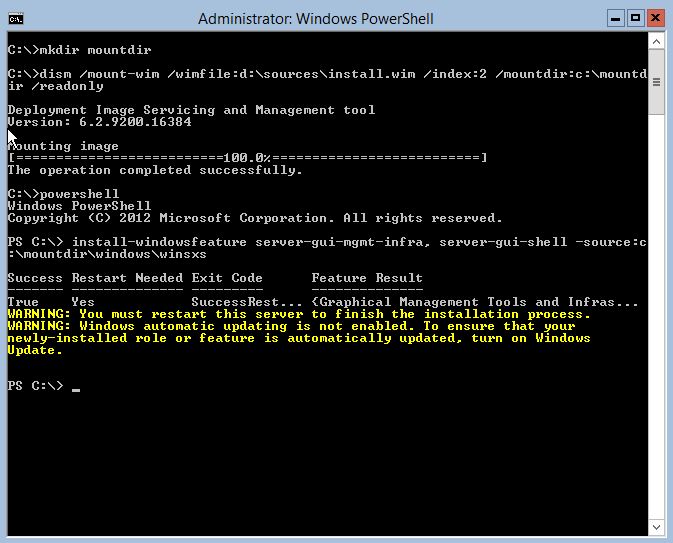
1. Create a folder to mount WIM (mkdir c:\mountdir)

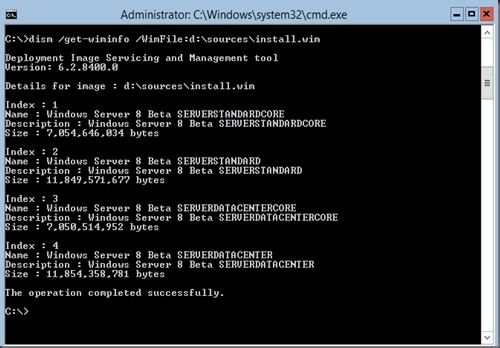
2. Check the index number needed for a server with GUI image (where d is the DVD drive)

dism /get-wiminfo /Wimfile: d:\sources\install.wim

We want to install the SERVERSTANDARD so the index number will be 2

3. Mount the WIM for Server Standard:

dism /mount-wim /wimfile: d:\sources\install.wim /Index:2 /mountdir:c:\mountdir /readonly

4. Start powershell and execute:

Install-WindowsFeature Server-Gui-Mgmt-Infra, Server-Gui-Shell –restart –source c:\mountdir\windows\winsxs

5. Restart the server


Remove the GUI with powershell:
Uninstall-WindowsFeature Server-Gui-Shell, Server-Gui-Mgmt-Infra


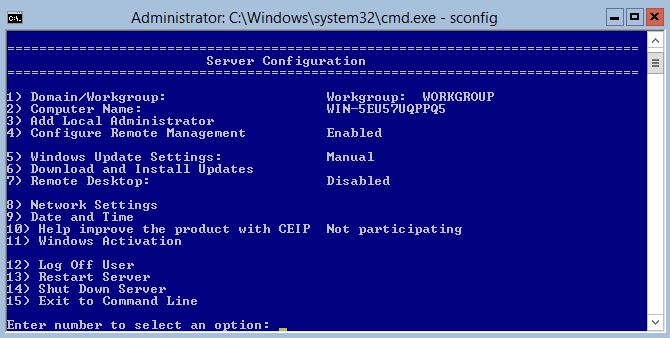
SCONFIG

Use SCONFIG to configure a lot of options (domain/Computername/updates/nic/…)


For other options to remove/install the GUI look at http://www.howtogeek.com/111967/how-to-turn-the-gui-off-and-on-in-windows-server-2012/

Configure a Server Core Server: http://technet.microsoft.com/en-us/library/jj592692.aspx#BKMK_1_5

SQL Server 2008 R2 – Unattended Silent Install

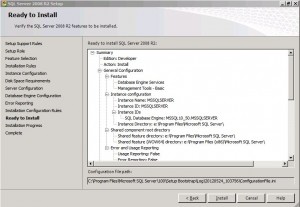
To create an Unattended Silent Install, you first need a configuration file with all the right settings in it. To create the file, run a installation of SQL and select all required settings. Continue the installation until you reach the “Ready To Install” step. In this step you will see the location of the configuration file (see the image below).


In this case it is: C:\program files\microsoft sql server\100\setup bootstrap\log\20120524_103756\configurationfile.ini

You can cancel the setup proces now.


Edit the configuration file as follows:


  • Set QUIET to “True”. This specifies that Setup will run in a quiet mode without any user interface (i.e. unattended installation)QUIET=”True”
  • Add IACCEPTSQLSERVERLICENSETERMS and set its value to “True”. This is to required to acknowledge acceptance of the license terms when the /Q (i.e. QUIET) parameter is specified for unattended installations.ACCEPTSQLSERVERLICENSETERMS=”True”
  • Remove the UIMODE parameter as it can’t be used with the QUITE parameter.
  • IF used SQL as the Securitymode, use SAPWD to set a password for the SA account
    SAPWD=”a complex password”
  • Set TCPENABLED to yes if you want external connections to you SQL instance
    TCPENABLED=”1″


Now you have your configuration file ready run SQL with the following command:

“<path to SQL setup folder>\setup.exe” /ConfigurationFile=”<path to config file>”

View BSOD (blue screen) crash information stored in dump files

Description

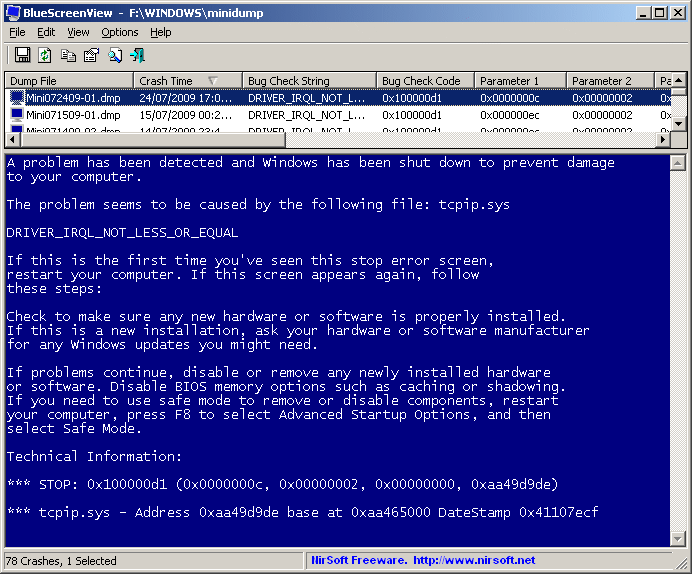
BlueScreenView scans all your minidump files created during ‘blue screen of death’ crashes, and displays the information about all crashes in one table. For each crash, BlueScreenView displays the minidump filename, the date/time of the crash, the basic crash information displayed in the blue screen (Bug Check Code and 4 parameters), and the details of the driver or module that possibly caused the crash (filename, product name, file description, and file version).
For each crash displayed in the upper pane, you can view the details of the device drivers loaded during the crash in the lower pane. BlueScreenView also mark the drivers that their addresses found in the crash stack, so you can easily locate the suspected drivers that possibly caused the crash.

http://www.nirsoft.net/utils/blue_screen_view.html

[wpdm_file id=76]