How to enable the Disk Cleanup tool on Windows Server 2008 R2

source: https://support.appliedi.net/kb/a110/how-to-enable-the-disk-cleanup-tool-on-windows-server-2008-r2.aspx

How to enable the Disk Cleanup tool:

1) Go to Programs & Features, and in the Features section, enable/install “Desktop Experience”.   The downside to this is that you will need to reboot your server after installing this and it installs other components you do not need on a server.

2) [RECOMMENDED] –  All you really need to do is copy some files that are already located on your server into specific system folders, as described at http://technet.microsoft.com/en-us/library/ff630161(WS.10).aspx

The location of the files you need to copy depend on your version of Windows:

Operating System Architecture File Location
Windows Server 2008 R2 64-bit C:\Windows\winsxs\amd64_microsoft-windows-cleanmgr_31bf3856ad364e35_6.1.7600.16385_none_c9392808773cd7da\cleanmgr.exe
Windows Server 2008 R2 64-bit C:\Windows\winsxs\amd64_microsoft-windows-cleanmgr.resources_31bf3856ad364e35_6.1.7600.16385_en-us_b9cb6194b257cc63\cleanmgr.exe.mui
Windows Server 2008 64-bit C:\Windows\winsxs\amd64_microsoft-windows-cleanmgr.resources_31bf3856ad364e35_6.0.6001.18000_en-us_b9f50b71510436f2\cleanmgr.exe.mui
Windows Server 2008 64-bit C:\Windows\winsxs\amd64_microsoft-windows-cleanmgr_31bf3856ad364e35_6.0.6001.18000_none_c962d1e515e94269\cleanmgr.exe.mui
Windows Server 2008 32-bit C:\Windows\winsxs\x86_microsoft-windows-cleanmgr.resources_31bf3856ad364e35_6.0.6001.18000_en-us_5dd66fed98a6c5bc\cleanmgr.exe.mui
Windows Server 2008 32-bit C:\Windows\winsxs\x86_microsoft-windows-cleanmgr_31bf3856ad364e35_6.0.6001.18000_none_6d4436615d8bd133\cleanmgr.exe

Windows Server 2012:

C:\Windows\WinSxS\amd64_microsoft-windows-cleanmgr_31bf3856ad364e35_6.2.9200.16384_none_c60dddc5e750072a\cleanmgr.exe
C:\Windows\WinSxS\amd64_microsoft-windows-cleanmgr.resources_31bf3856ad364e35_6.2.9200.16384_en-us_b6a01752226afbb3\cleanmgr.exe.mui

Windows Server 2012 R2:  must install Desktop Experience. Use Powershell command:
Install-WindowsFeature Desktop-Experience


Once you’ve located the files move them to the following locations (Server 2012 non-R2 and earlier):

  1. Copy Cleanmgr.exe to %systemroot%\System32.
  2. Copy Cleanmgr.exe.mui to %systemroot%\System32\en-US.

You can now launch the Disk cleanup tool by running Cleanmgr.exe from the command prompt.

If an old cleanup manager is used, windows update files will not be cleaned. For this you need Microsoft hotfix 2852386
Create a Dynamics NAV NST Instance with Powershell

How to create a NST instance with a powershell script:


Set-ExecutionPolicy -ExecutionPolicy Unrestricted
Set-ExecutionPolicy -Scope CurrentUser -ExecutionPolicy Unrestricted

Import-Module "C:\Program Files\Microsoft Dynamics NAV\100\Service\NavAdminTool.ps1" -DisableNameChecking

# Set varaibles for NST
$NAVServiceInstance = 'instance-name'
$DatabaseName = 'database-name'
$DatabaseServer = 'database-server'
$NAVServiceUser = 'service-account'
$NAVServiceUserPW = 'service-account-password'

$DefaultTimeZone = 'Server Time Zone'
$MaxUploadSize = 2047
$EnableTaskScheduler = 'False'

$UseNTLM = $TRUE

$SOAPMaxMsgSize = '5120'

$ChangeTimeout = $FALSE
$IdleClientTimeout = '01:30:00'

$IsNAS = $FALSE
$NASArgument = 'JOBQUEUE'
$NASCodeunit = '450'
$NASMethod = ''
$DefaultCompany = ''

$IsNOR = $FALSE
$LanguageID = '1044'
$Language = 'no-NO'

# NAV Service Account
$secpasswd = ConvertTo-SecureString $NAVServiceUserPW -AsPlainText -Force
$mycreds = New-Object System.Management.Automation.PSCredential ($NAVServiceUser, $secpasswd)

##Creating NST
New-NAVServerInstance $NAVServiceInstance -DatabaseName $DatabaseName `
                                          -DatabaseServer $DatabaseServer `
                                          -ManagementServicesPort 7045 `
                                          -ClientServicesPort 7046 `
                                          -ODataServicesPort 7048 `
                                          -SOAPServicesPort 7047 `
                                          -ServiceAccount user `
                                          -ServiceAccountCredential $mycreds `
                                          -Verbose

Set-NAVServerConfiguration   -ServerInstance $NAVServiceInstance `
                             -KeyName ServicesDefaultTimeZone `
                             -KeyValue $DefaultTimeZone `
                             -WarningAction SilentlyContinue

Set-NAVServerConfiguration   -ServerInstance $NAVServiceInstance `
                             -KeyName ClientServicesMaxUploadSize `
                             -KeyValue $MaxUploadSize `
                             -WarningAction SilentlyContinue

Set-NAVServerConfiguration   -ServerInstance $NAVServiceInstance `
                             -KeyName EnableTaskScheduler `
                             -KeyValue $EnableTaskScheduler `
                             -WarningAction SilentlyContinue

Set-NAVServerConfiguration   -ServerInstance $NAVServiceInstance `
                             -KeyName ServicesUseNTLMAuthentication `
                             -KeyValue $UseNTLM `
                             -WarningAction SilentlyContinue

Set-NAVServerConfiguration   -ServerInstance $NAVServiceInstance `
                             -KeyName SOAPServicesMaxMsgSize `
                             -KeyValue $SOAPMaxMsgSize `
                             -WarningAction SilentlyContinue
                             
                             
##Creating NAS
IF ($IsNAS) {  
Set-NAVServerConfiguration   -ServerInstance $NAVServiceInstance `
                             -KeyName ClientServicesEnabled `
                             -KeyValue FALSE `
                             -WarningAction SilentlyContinue

Set-NAVServerConfiguration   -ServerInstance $NAVServiceInstance `
                             -KeyName SOAPServicesEnabled `
                             -KeyValue FALSE `
                             -WarningAction SilentlyContinue

Set-NAVServerConfiguration   -ServerInstance $NAVServiceInstance `
                             -KeyName ODataServicesEnabled `
                             -KeyValue FALSE `
                             -WarningAction SilentlyContinue

Set-NAVServerConfiguration   -ServerInstance $NAVServiceInstance `
                             -KeyName ManagementServicesEnabled `
                             -KeyValue FALSE `
                             -WarningAction SilentlyContinue

Set-NAVServerConfiguration   -ServerInstance $NAVServiceInstance `
                             -KeyName NASServicesStartupArgument `
                             -KeyValue $NASArgument `
                             -WarningAction SilentlyContinue

Set-NAVServerConfiguration   -ServerInstance $NAVServiceInstance `
                             -KeyName NASServicesStartupCodeunit `
                             -KeyValue $NASCodeunit `
                             -WarningAction SilentlyContinue

Set-NAVServerConfiguration   -ServerInstance $NAVServiceInstance `
                             -KeyName NASServicesStartupMethod `
                             -KeyValue $NASMethod `
                             -WarningAction SilentlyContinue

Set-NAVServerConfiguration   -ServerInstance $NAVServiceInstance `
                             -KeyName ServicesDefaultCompany `
                             -KeyValue $DefaultCompany `
                             -WarningAction SilentlyContinue
}

##Set Idle Client Timeout
IF ($ChangeTimeout) {  
Set-NAVServerConfiguration   -ServerInstance $NAVServiceInstance `
                             -KeyName ClientServicesIdleClientTimeout `
                             -KeyValue $IdleClientTimeout `
                             -WarningAction SilentlyContinue
}

##Set Services Language
IF ($IsNOR) {  
Set-NAVServerConfiguration   -ServerInstance $NAVServiceInstance `
                             -KeyName DefaultLanguageId `
                             -KeyValue $LanguageID `
                             -WarningAction SilentlyContinue

Set-NAVServerConfiguration   -ServerInstance $NAVServiceInstance `
                             -KeyName ServicesLanguage `
                             -KeyValue $Language `
                             -WarningAction SilentlyContinue
}

#Add NAVService to portsharing and start Service.
#Import-Module $PSScriptRoot\NAVServerInstancePortSharing.ps1
#Enable-NAVServerInstancePortSharing $NAVServiceInstance


Update a HA Netscaler environment

source:http://support.citrix.com/article/CTX127455

To update an HA netscaler, do the following steps.

User-added image

Upgrade the secondary netscaler appliance

    1. Save the config: save config
    2. Switch to shell: shell
    3. Change to the installation directory: cd /var/nsinstall
    4. Create a temporary directory: mkdir x.xnsinstall
    5. Chang to the created directory: cd x.xnsinstall
    6. Upload the files to the temporary directory (e.g. pscp build-11.0-66.11_nc.tgz nsroot@192.168.1.1:/var/nsinstall/11.0nsinstall/build-11.0-66.11_nc.tgz)
    7. Extract the files: tar -zxvf ns-x.0-xx.x-doc.tgz
    8. Install the software: # ./installns
    9. Press y to restart the appliance
    10. Check the state of the appliance: > show ha node
      This should state that it is the secondary node and synchronization is disabled. To disable the synchronization manually run the command: > set node -hasync disable
    11. Check the configuration
      The version can be found with the command:  > show version
    12. Failover the appliance: > force failover

Upgrade the primary netscaler appliance

  1. Follow step 1 to 9 mentioned in the previous section
  2. Check if the appliance is UP and it is the primary node: > show ha node
    If the appliance isn’t the primary application a failover can be initiated: > force failover

Enable Synchronization

  1. Log on the secondary node, check if it is the secondary node: > show node
  2. Enable synchronization: > set node -hasync enable
  3. Check synchronization status: > show ns runningconfig

The update has been completed. Additional backups can be removed as well the downloaded files in the created directory (step 4).

Check last logged on date from user

Check the last logged on date for users. Fill in the correct filter (e.g. Name, Office) and the name of it (e.g. joe*


Import-Module ActiveDirectory

function Get-ADUserLastLogon([string]$userName)
{
  $dcs = Get-ADDomainController -Filter {Name -like "*"}
  $time = 0
  foreach($dc in $dcs)
  { 
    $hostname = $dc.HostName
    $user = Get-ADUser $userName | Get-ADObject -Properties lastLogon 
    if($user.LastLogon -gt $time) 
    {
      $time = $user.LastLogon
    }
  }
  $dt = [DateTime]::FromFileTime($time)
  Write-Host $username "last logged on at:" $dt }


foreach ($user in Get-ADUser -Filter 'Name -like "*joe*"' -Properties *) {
    Get-ADUserLastLogon -UserName $user
    }


Install SQL 2012 on Core

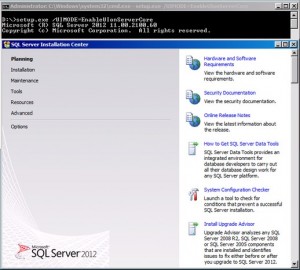
To install Microsoft SQL 2012 on a Microsoft 2012 core edition, use the /UIMODE switch. This will bring op the old interface.

setup /UIMODE=EnableUIonServerCore


2725_xxxx_2


Other samples to install it through the command line (parameters or file) can be found on: https://www.mssqltips.com/sqlservertip/2725/installing-sql-server-2012-on-windows-server-core-part-3/

Consolidated list of VirusScan Enterprise exclusion articles

The following list contains the most frequently used articles on configuring File and Folder exclusions for VSE 8.x. The list does not contain specific issues that you might be experiencing when setting exclusions. Search the KnowledgeBase using the error received or describing the issue experienced.


https://kc.mcafee.com/corporate/index?page=content&id=KB66909

Remote Update iDRAC 7

Install the racadm tools on your local system (http://en.community.dell.com/techcenter/systems-management/w/wiki/3205.racadm-command-line-interface-for-drac).


Download the iDRAC firmware and enable a TFTP server (google for it, or get one from solarwinds: http://www.solarwinds.com/downloads/)

Run the following command:

racadm -r <idrac address> -u <user> -p <password> fwupdate -a <tftp server> -g -u


The update will start and take a few minutes.

Convert Disk to VDH

http://technet.microsoft.com/en-us/sysinternals/ee656415.aspx

download: http://download.sysinternals.com/files/Disk2vhd.zip


Introduction

Disk2vhd is a utility that creates VHD (Virtual Hard Disk – Microsoft’s Virtual Machine disk format) versions of physical disks for use in Microsoft Virtual PC or Microsoft Hyper-V virtual machines (VMs). The difference between Disk2vhd and other physical-to-virtual tools is that you can run Disk2vhd on a system that’s online. Disk2vhd uses Windows’ Volume Snapshot capability, introduced in Windows XP, to create consistent point-in-time snapshots of the volumes you want to include in a conversion. You can even have Disk2vhd create the VHDs on local volumes, even ones being converted (though performance is better when the VHD is on a disk different than ones being converted).

It will create one VHD for each disk on which selected volumes reside. It preserves the partitioning information of the disk, but only copies the data contents for volumes on the disk that are selected. This enables you to capture just system volumes and exclude data volumes, for example.

Note: Virtual PC supports a maximum virtual disk size of 127GB. If you create a VHD from a larger disk it will not be accessible from a Virtual PC VM.

To use VHDs produced by Disk2vhd, create a VM with the desired characteristics and add the VHDs to the VM’s configuration as IDE disks. On first boot, a VM booting a captured copy of Windows will detect the VM’s hardware and automatically install drivers, if present in the image. If the required drivers are not present, install them via the Virtual PC or Hyper-V integration components. You can also attach to VHDs using the Windows 7 or Windows Server 2008 R2 Disk Management or Diskpart utilities.

Command Line Usage

Disk2vhd includes command-line options that enable you to script the creation of VHDs. Specify the volumes you want included in a snapshot by drive letter (e.g. c:) or use “*” to include all volumes.

Usage: disk2vhd <[drive: [drive:]…]|[*]> <vhdfile>
Example: disk2vhd * c:\vhd\snapshot.vhd