Find IP addresses using Exchange SMTP relay

see Find IP addresses using Exchange SMTP relay – ALI TAJRAN

To make this work, your SMTP relay logging should be enabled.
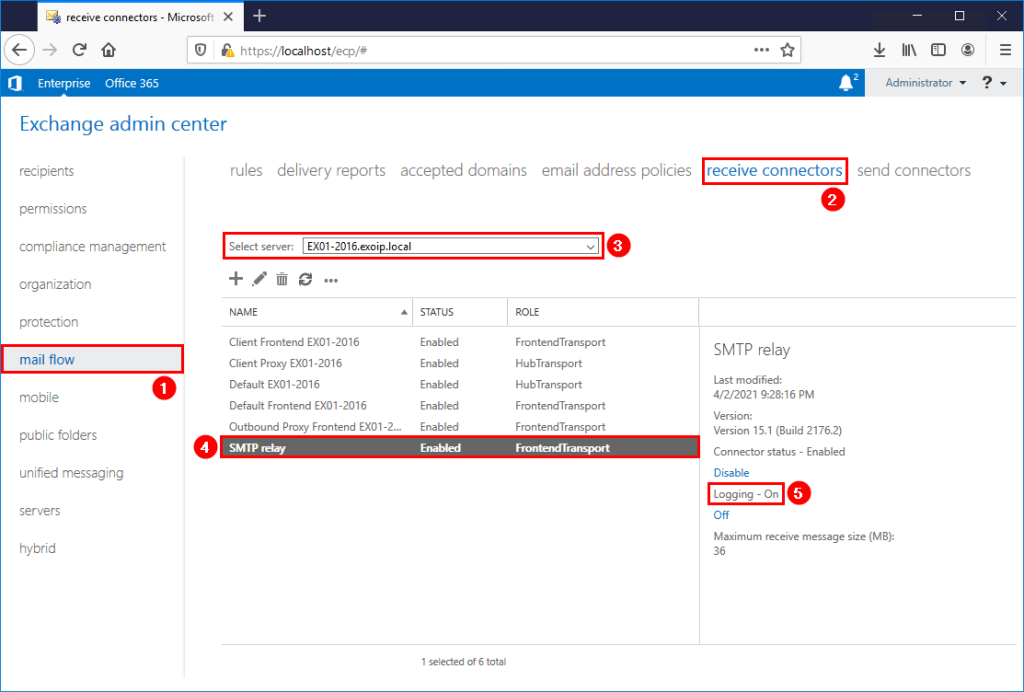
The script will look into your logfiles and export all IP address which have been using the relay service. If your loglocations is different then the default (C:\Program Files\Microsoft\Exchange Server\V15\TransportRoles\Logs\FrontEnd\ProtocolLog\SmtpReceive), make sure to alter it in the script.

Your logfile location can be found by executing the following powershell script:

Get-FrontendTransportService | fl Name,Identity,Receive*

Prepare SMTP-Review PowerShell script

Create two folders on the Exchange Server (C:) drive:

  • Temp
  • Scripts

Copy and paste the below code into Notepad. Give it the name SMTP-Review.ps1 and place it in the C:\scripts folder.

<#
    .SYNOPSIS
    SMTP-Review.ps1

    .DESCRIPTION
    Script is intended to help determine servers that are using an Exchange server to connect and send email.
    This is especially pertinent in a decommission scenario, where the logs are to be checked to ensure that
    all SMTP traffic has been moved to the correct endpoint.

    .LINK
    www.alitajran.com/find-ip-addresses-using-exchange-smtp-relay

    .NOTES
    Written by: ALI TAJRAN
    Website:    www.alitajran.com
    LinkedIn:   linkedin.com/in/alitajran

    .CHANGELOG
    V1.00, 04/05/2021 - Initial version
    V2.00, 03/28/2023 - Rewrite script to retrieve results faster
#>

# Clears the host console to make it easier to read output
Clear-Host

# Sets the path to the directory containing the log files to be processed
$logFilePath = "C:\Program Files\Microsoft\Exchange Server\V15\TransportRoles\Logs\FrontEnd\ProtocolLog\SmtpReceive\*.log"

# Sets the path to the output file that will contain the unique IP addresses
$Output = "C:\temp\IPAddresses.txt"

# Gets a list of the log files in the specified directory
$logFiles = Get-ChildItem $logFilePath

# Gets the number of log files to be processed
$count = $logFiles.Count

# Initializes an array to store the unique IP addresses
$ips = foreach ($log in $logFiles) {

    # Displays progress information
    $percentComplete = [int](($logFiles.IndexOf($log) + 1) / $count * 100)
    $status = "Processing $($log.FullName) - $percentComplete% complete ($($logFiles.IndexOf($log)+1) of $count)"
    Write-Progress -Activity "Collecting Log details" -Status $status -PercentComplete $percentComplete

    # Displays the name of the log file being processed
    Write-Host "Processing Log File $($log.FullName)" -ForegroundColor Magenta

    # Reads the content of the log file, skipping the first five lines
    $fileContent = Get-Content $log | Select-Object -Skip 5

    # Loops through each line in the log file
    foreach ($line in $fileContent) {

        # Extracts the IP address from the socket information in the log line
        $socket = $line.Split(',')[5]
        $ip = $socket.Split(':')[0]
        
        # Adds the IP address to the $ips array
        $ip
    }
}

# Removes duplicate IP addresses from the $ips array and sorts them alphabetically
$uniqueIps = $ips | Select-Object -Unique | Sort-Object

# Displays the list of unique IP addresses on the console
Write-Host "List of noted remove IPs:" 
$uniqueIps
Write-Host 

# Writes the list of unique IP addresses to the output file
$uniqueIps | Out-File $Output

In Line 27, change the path to the receive protocol log path you searched for in the previous step.

Run SMTP-Review PowerShell script

Run PowerShell as administrator and run the SMTP-Review.ps1 PowerShell script.

The script will go through all the files, and after it finishes, you will see which IP addresses use the SMTP relay in the console output. Also, it will generate an IPAddresses.txt file with the IP addresses in the C:\temp folder.

Make a note of the IP addresses and adjust the SMTP field in the printers, applications, and servers to the new SMTP relay record.

Resetting Administrator Password in Windows 2012

Instructions

To reset the password on your Windows 2012 server, simply complete the following steps:

  • Boot from the Micrsoft Windows Server 2012 DVD
  • From the Windows Setup menu, click “Next”.
  • Select “Repair your computer”
  • Under Choose and option, click on “Troubleshoot”.
  • Under Advanced options, click “Command Prompt”.
  • At the command prompt, run the following commands:
    d:
    cd windows\system32
    ren Utilman.exe Utilman.exe.old
    copy cmd.exe Utilman.exe
  • Close the command prompt and then click “Continue”.
  • The server should now boot and present the logon screen. Here click Windows Key + U.
  • At the prompt you can now change the password, by typing the following command:
    net user administrator Password123
    This will set the password for the Administrator user to be Password123 (case sensitive).

    If a new (adminstrator) user is needed, type the following commands:
    net user “OtherUser” Password123 /add
    net localgroup administrators “OtherUser” /add

Closing the command prompt, you should now be able to log back onto the server using the password you have provided in the last step.


Cleanup Steps

Once you have verified you can log on to the server you will have repeat the steps above and boot using the Windows Server 2008 DVD/ISO and run the command prompt again.

  • Restart your server and once again, boot from the Micrsoft Windows Server 2012 DVD
  • From the Windows Setup menu, click “Next”.
  • Select “Repair your computer”
  • Under Choose and option, click on “Troubleshoot”.
  • Under Advanced options, click “Command Prompt”.
  • At the command prompt, run the following commands:
    d:
    cd windows\system32
    ren utilman.exe utilman.exe.new
    copy utilman.exe.old utilman.exe
  • Close the command prompt and then click “Continue”.

You should be back up and running as if nothing ever happened.


source: http://www.kieranlane.com/2013/09/18/resetting-administrator-password-windows-2012/

Copy WSUS approvals between Groups

source: http://www.craig-tolley.co.uk/2016/01/21/wsus-copy-updates-between-groups/

Run the script below, then call it using the following syntax:

Copy-WsusGroupApprovals -WsusServerFqdn wsus.domain.co.uk -SourceGroupName "OldServers" -TargetGroupName "NewServers"

You can optionally specify a port, the default being 8530. You can also specify to use a secure connection. The group names are both case sensitive though.

# ----------------------------------------------------------------------------------------------------------
# PURPOSE:    WSUS - Copy Approvals from one Group to another Group
#
# VERSION     DATE         USER                DETAILS
# 1           21/01/2016   Craig Tolley        First Version
#
# ----------------------------------------------------------------------------------------------------------

#.SYNOPSIS
# Copies all approvals from the specified source group to the specified destination group. 
# Group names are case sensitive. 
# Unless specified the default WSUS port of 8530 will be used to connect. 
function Copy-WsusGroupApprovals
{
    param
    (

    [Parameter(Mandatory=$true)]
    [ValidateNotNullOrEmpty()]
    [String]$WsusServerFqdn,

    [Int]$WsusServerPort = 8530,

    [Boolean]$WsusServerSecureConnect = $false,

    [Parameter(Mandatory=$true)]
    [ValidateNotNullOrEmpty()]
    [String]$SourceGroupName,

    [Parameter(Mandatory=$true)]
    [ValidateNotNullOrEmpty()]
    [String]$TargetGroupName

    )
    
    # Load the assembly required
    try
    {
        [void][reflection.assembly]::LoadWithPartialName("Microsoft.UpdateServices.Administration")
    }
    catch
    {
        Write-Error "Unable to load the Microsoft.UpdateServices.Administration assembly: $($_.Exception.Message)"
        break

    }

    # Attempt the connection to the WSUS Server
    try
    {
        $WsusServer = [Microsoft.UpdateServices.Administration.AdminProxy]::getUpdateServer($WsusServerFqdn, $WsusServerSecureConnect, $WsusServerPort)
    }
    catch
    {
        Write-Error "Unable to connect to the WSUS Server: $($_.Exception.Message)"
        break
    }

    # Get all of the Wsus Groups, and check that the specified source and destination groups exist
    $Groups = $WsusServer.GetComputerTargetGroups()
    If ($Groups.Name -notcontains $SourceGroupName -or $Groups.Name -notcontains $TargetGroupName)
    {
        Write-Error "Source or Destination group names cannot be found in the list of groups on the WSUS Server. Group names are case sensitive. Please check your names."
        break
    }
    $SourceGroupObj = $Groups | Where {$_.Name -eq $SourceGroupName}
    $TargetGroupObj = $Groups | Where {$_.Name -eq $TargetGroupName}

    # Get all of the updates on the server
    Write-Progress -Activity "Getting Details of all updates"
    $Updates = $WsusServer.GetUpdates()
    
    # Go through each of the updates. If the update has an approval for the source group, then create an approval for the destination group. 
    $i = 0
    $Approved = 0
    ForEach ($Update in $Updates)
    {
        $i ++
        Write-Progress -Activity "Copying update approvals" -PercentComplete (($i/$($Updates.Count))*100) -Status "$i of $($Updates.Count)"
        
        if ($Update.GetUpdateApprovals($SourceGroupObj).Count -ne 0 -and $Update.GetUpdateApprovals($TargetGroupObj).Count -eq 0)
        {
            Write-Host ("Approving {0} for {1}" -f $Update.Title, $TargetGroupObj.Name)
            $Update.Approve('Install',$TargetGroupObj) | Out-Null
            $Approved ++
        }
    }
    Write-Progress -Activity "Copying update approvals" -Completed

   Write-Output ("Approved {0} updates for target group {1}" -f $Approved, $TargetGroupName)
}

Remote Update iDRAC 7

Install the racadm tools on your local system (http://en.community.dell.com/techcenter/systems-management/w/wiki/3205.racadm-command-line-interface-for-drac).


Download the iDRAC firmware and enable a TFTP server (google for it, or get one from solarwinds: http://www.solarwinds.com/downloads/)

Run the following command:

racadm -r <idrac address> -u <user> -p <password> fwupdate -a <tftp server> -g -u


The update will start and take a few minutes.

Convert Disk to VDH

http://technet.microsoft.com/en-us/sysinternals/ee656415.aspx

download: http://download.sysinternals.com/files/Disk2vhd.zip


Introduction

Disk2vhd is a utility that creates VHD (Virtual Hard Disk – Microsoft’s Virtual Machine disk format) versions of physical disks for use in Microsoft Virtual PC or Microsoft Hyper-V virtual machines (VMs). The difference between Disk2vhd and other physical-to-virtual tools is that you can run Disk2vhd on a system that’s online. Disk2vhd uses Windows’ Volume Snapshot capability, introduced in Windows XP, to create consistent point-in-time snapshots of the volumes you want to include in a conversion. You can even have Disk2vhd create the VHDs on local volumes, even ones being converted (though performance is better when the VHD is on a disk different than ones being converted).

It will create one VHD for each disk on which selected volumes reside. It preserves the partitioning information of the disk, but only copies the data contents for volumes on the disk that are selected. This enables you to capture just system volumes and exclude data volumes, for example.

Note: Virtual PC supports a maximum virtual disk size of 127GB. If you create a VHD from a larger disk it will not be accessible from a Virtual PC VM.

To use VHDs produced by Disk2vhd, create a VM with the desired characteristics and add the VHDs to the VM’s configuration as IDE disks. On first boot, a VM booting a captured copy of Windows will detect the VM’s hardware and automatically install drivers, if present in the image. If the required drivers are not present, install them via the Virtual PC or Hyper-V integration components. You can also attach to VHDs using the Windows 7 or Windows Server 2008 R2 Disk Management or Diskpart utilities.

Command Line Usage

Disk2vhd includes command-line options that enable you to script the creation of VHDs. Specify the volumes you want included in a snapshot by drive letter (e.g. c:) or use “*” to include all volumes.

Usage: disk2vhd <[drive: [drive:]…]|[*]> <vhdfile>
Example: disk2vhd * c:\vhd\snapshot.vhd

Mount and Modify a Windows Image Using DISM

source: http://technet.microsoft.com/en-us/library/hh824814.aspx

Applies To: Windows 8, Windows 8.1, Windows Server 2008 R2, Windows Server 2012, Windows Server 2012 R2

Mounting an Image


You can mount an image using the /optimize option to reduce initial mount time. However, When using the /optimize option, processes that are ordinarily performed during a mount will instead be completed the first time that you access a directory. As a result, there may be an increase in the time that is required to access a directory for the first time after mounting an image using the /optimize option.

To mount an image


  1. Open a command prompt with administrator privileges. If you are using a version of Windows other than Windows 8, use the Deployment Tools Cmd Prompt installed with the ADK or navigate to the DISM directory on your local computer.
  2. Mount the image.
    Copy
    Dism /Mount-Image /ImageFile:C:\test\images\myimage.wim /index:1 /MountDir:C:\test\offline
    
    noteNote
    To mount a Windows image from a VHD file, you must specify /index:1


    You can also add options to mount the image with read-only permissions or to reduce the initial mount time with the /Optimize option. For example,

    Copy
    Dism /Mount-Image /ImageFile:C:\test\images\myimage.wim /index:1 /MountDir:C:\test\offline /ReadOnly /Optimize
    

    For more information about the options available for the /Mount-Image option in DISM, see DISM Image Management Command-Line Options.


Modifying an Image


After you mount an image, you can browse the directory of the image. You can review the file and folder structure, and add, edit, or delete files and folders.

You can also use the DISM tool to add and remove drivers and packages, including language packs, enumerate drivers and packages, modify configuration settings, and more. For more information, see Service a Windows Image Using DISM.

To view and modify an image


  1. On your technician computer open the mounted directory. For example,
    Copy
    cd C:\mounted_images
    
  2. Delete, edit, or add additional files and folders to the location where they must appear after they have been applied to the destination computer. For example, C:\program_files\application_name.
    ImportantImportant
    If you must add an application or a device, verify that you included all of the required files. Although you can add application files and folders, you cannot install applications. 


Committing Changes to an Image


You can commit changes to an image without unmounting the image.

To commit changes to an image


  1. At the command prompt, type:
    Copy
    Dism /Commit-Image /MountDir:C:\test\offline
    

    Use /CheckIntegrity to detect and track .wim file corruption when you commit changes to the image. When you apply or mount the image, use /CheckIntegrity again to stop the operation if file corruption was detected. /CheckIntegrity cannot be used with virtual hard disk (VHD) files.

Unmounting an Image


After you modify an image, you must unmount it. If you mounted your image with the default read/write permissions, you can commit your changes. This makes your modifications a permanent part of the image.

To unmount an image


  1. Open a command prompt with administrator privileges. If you are using a version of Windows other than Windows 8, use the Deployment Tools Cmd Prompt installed with the ADK or navigate to the DISM directory on your local computer.

    For Windows 8.1:

    Copy
    cd C:\Program Files (x86)\Windows Kits\8.1\Assessment and Deployment Kit\ <architecture>\DISM
    

    For Windows 8:

    Copy
    cd C:\Program Files (x86)\Windows Kits\8.0\Assessment and Deployment Kit\ <architecture>\DISM
    

    where <architecture> can be x86 or amd64.

  2. Unmount the image.
    Copy
    Dism /Unmount-Image /MountDir:C:\test\offline /commit
    

    where C:\test\offline is the location of the mount directory. If you do not specify the parameters to unmount, this option lists all of the mounted images but does not perform the unmount action.

    ImportantImportant
    You must use either the /commit or /discard argument when you use the /unmount option. 


After modifying an image, you can apply the image from a network share or from local media, such as a CD/DVD or a USB flash drive (UFD).

Troubleshooting


If the DISM commands in this topic fail, try the following:


  • Make sure that you are using the Windows 8.1 version of DISM that is installed with the Windows ADK.
  • If you are using a Windows 8 or Windows 7 PC, use the Deployment and Imaging Tools Environment to access the tools that are installed with the Windows 8.1 version of the Windows ADK.
  • Don’t mount images to protected folders, such as your User\Documents folder.
  • If DISM processes are interrupted, consider temporarily disconnecting from the network and disabling virus protection.
  • If DISM processes are interrupted, consider running the commands from the Windows PE environment instead.

DelinvFile – Delete Invalid Files and Folders

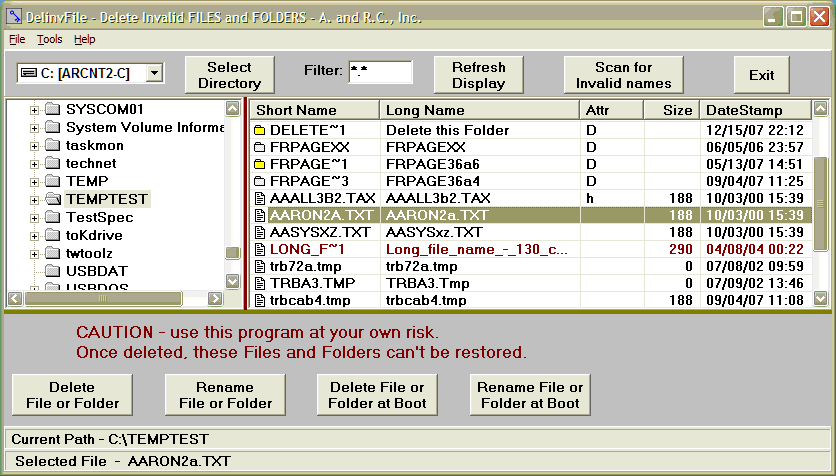
Windows allows the creation of file names and folder names that can not be deleted or renamed via Windows Explorer.  This includes names with invalid characters and names that are too long. The current limit is 260 characters.  In other words, windows can create names that are too long for the standard Windows Explorer to delete. When copying or deleting file the message: “Path too long” appears.


“DelinvFile.exe” is a Windows program that provides a convenient User Interface for selecting the file that you need to delete and provides for a choice of two delete methods. You use the standard controls for Drives, Folders, and Files to navigate to the Folder and Select the file to be deleted.


A trial version is available. See http://www.purgeie.com/delinv/

divfscrn

The Windows Server Update Services console crashes when browsing for updates

The Windows Server Update Services (WSUS) console crashes when browsing for updates and displays the following error message:

error

An unexpected error occurred. 
click reset server node to try to connect to the server again


This can occur if the application cache is corrupted.

To resolve this issue, delete the WSUS application cache from the location below:

C:\Documents and Settings\<user profile>\application data\microsoft\mmc

where user profile is the currently logged in user profile.


source: http://support.microsoft.com/kb/2761925

Excel AddIn to reset the last worksheet cell

source: http://xsformatcleaner.codeplex.com/

Microsoft Excel saves only the part of each worksheet that is in use, meaning the section that contains data or formatting. Sometimes the last cell of a worksheet may be beyond the range of your actual used data. This issue may cause you to have a larger file size than neccesary, you may print extra pages, you may receive “Out of Memory” error messages, or you may experience other unusual behavior. Clearing the excess rows and columns to reset the last cell can help to resolve these issues.

Note You can locate the last cell of the active worksheet by pressing CTRL+SHIFT+END.

This is a sample of the code located in Microsoft KB 244435
How to reset the last cell in Excel
http://support.microsoft.com/kb/244435


[wpdm_file id=85]